Loading...
Loading...
Loading...
Loading...
Loading...
Loading...
Loading...
Loading...
Loading...
Loading...
Loading...
Loading...
Loading...
Loading...
Loading...
Loading...
Loading...
Loading...
Loading...
Loading...
Loading...
Loading...
Loading...
Loading...
Loading...
Loading...
Loading...
Loading...
Loading...
Loading...
Loading...
Loading...
Loading...
Loading...
Loading...
Loading...
Loading...
Loading...
Loading...
Loading...
Loading...
Loading...
Loading...
Loading...
Loading...
Loading...
Loading...
Loading...
Loading...
Loading...
Loading...
Loading...
Loading...
Loading...
Loading...
Loading...
Loading...
Loading...
Loading...
Loading...
Loading...
Loading...
Loading...
Loading...
Loading...
Loading...
Loading...
Loading...
Loading...
Loading...
Loading...
Loading...
Loading...
Loading...
Loading...
Loading...
Loading...
Loading...
Loading...
Loading...
Loading...
Loading...
Loading...
ClauseBuddy is an add-in for Microsoft Word and Outlook. It is an all-in-one legal "toolbox" that covers all your drafting, reviewing and comparison requirements as a legal professional.
You can get started in just a few minutes by watching the videos below. You can read about the nitty gritty details in this extensive manual, but for most users this will not be necessary.
All you need is a recent version of Microsoft Word for Windows or Mac, or Microsoft Word Online in a browser.
Office 365 is ideal because most versions use moden web browsing technology, and are continually upgraded.
Even when WebView2 is installed, you should be careful with Word 2016, because it is missing certain features. ClauseBuddy may work on this version of Word, but some advanced features (mostly related to layout and metadata) will be disabled.
If you get a blank ClauseBuddy screen in Word, then you unfortunately have an unsupported combination of Windows and/or Word.
Upgrade your version of Microsoft Office. As pointed out above, Office 365 works best.
It very infrequently happens that your corporate security layers (e.g., malware scanners) block items. Check with your IT department.
Use ClauseBuddy in a browser. Except with ancient browsers like Internet Explorer — which you should not use for many other reasons — this will always work.
To navigate to ClauseBuddy's login page, you:
Click on the ClauseBuddy icon within the Home section of the top bar ("ribbon").
Similarly, click on the button in the Home section of the ribbon.
If you want to use ClauseBuddy inside of Microsoft Word Online (i.e., Word running inside of a browser), then click on the "..." button of the Home pane of the ribbon and choose "ClauseBuddy".
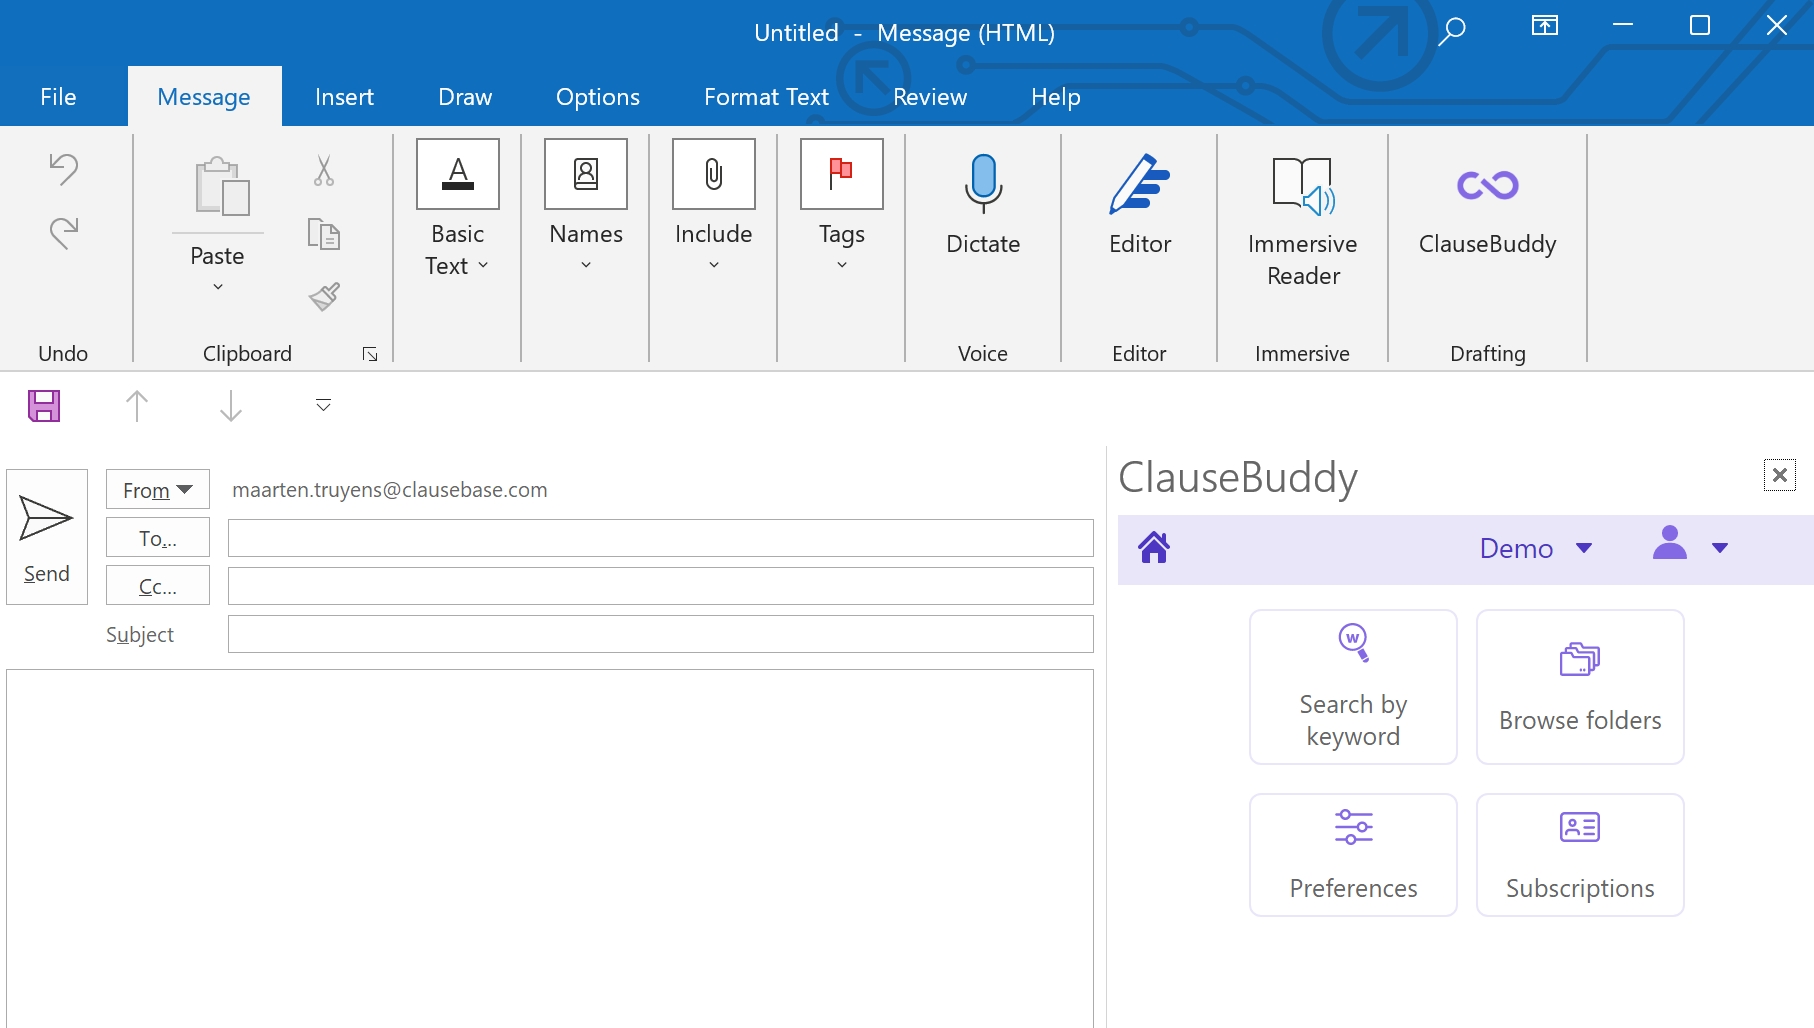
Click on the "..." button inside of a new email
Click on Apps when drafting a new email, and then select ClauseBuddy from the list.
Click on the "..." icon inside of a new email window, and select ClauseBuddy from the list.
Tip: you may want to click on the Customise toolbar option inside of the "..." dropdown menu and drag ClauseBuddy to the toolbar, so that it is always visible there.
Once navigated to ClauseBuddy — in Word for Windows, Outlook, browser, ...-- you need to effectively login if this is the first time you're using ClauseBuddy.
If you're using ClauseBuddy in a small team without a big IT-department, then you probably received a "security code" from ClauseBase or from your team leader.
To effectively login with this security code, click on the top button "Sign in with a security code".
Next, enter the security code, or click on the bottom link to retrieve the security code with your email address.
If you're using ClauseBuddy in a large organisation, then Single Sign On (SSO) was probably set up for you by your IT-department. In such scenario, you don't get a security code; instead you login by passing through the security procedures of your own company.
To do so, click on the green button at the bottom:
Next, enter your email address and click on the blue "Request login" button.
You will then be forwarded to the login procedure of your own organisation, which will be shown in a popup-window if all goes well. This looks and behaves differently for every organisation (e.g., some organisations require the use of a token, some a fingerprint reader), but in the end you should arrive in the ClauseBuddy homepage:
The sample document shown can be downloaded from
Some separately purchased versions of Office (i.e., non-Office 365 versions such as Word 2016) may also be fine, as long as they use "WebView2" (Chromium-based) browsing technology for the add-ins, instead of the ancient Internet Explorer or the old Microsoft Edge. It may be possible to . Please check to make sure you have the right combination of Windows and Word. You may also want to check for detailed information about specific version numbers.
Also note that as of October 2023, MS Word 2019 has been out of support on Mac. As a result, ClauseBuddy will not work properly. You may also encounter compatibility and security issues, especially when updating to a newer macOS. We recommend upgrading to a supported version of Word for the best experience. More information via:
Not only are those browsers missing important web technologies, but they are also very insecure and extremely slow. For those reasons, Microsoft has phased out the use of this browser for many years already — and even . Unfortunately, for Word/Outlook add-ins, Microsoft will not upgrade old versions of Word to make use of the new technology.
Try to install . Often, this immediately resolves the problem.
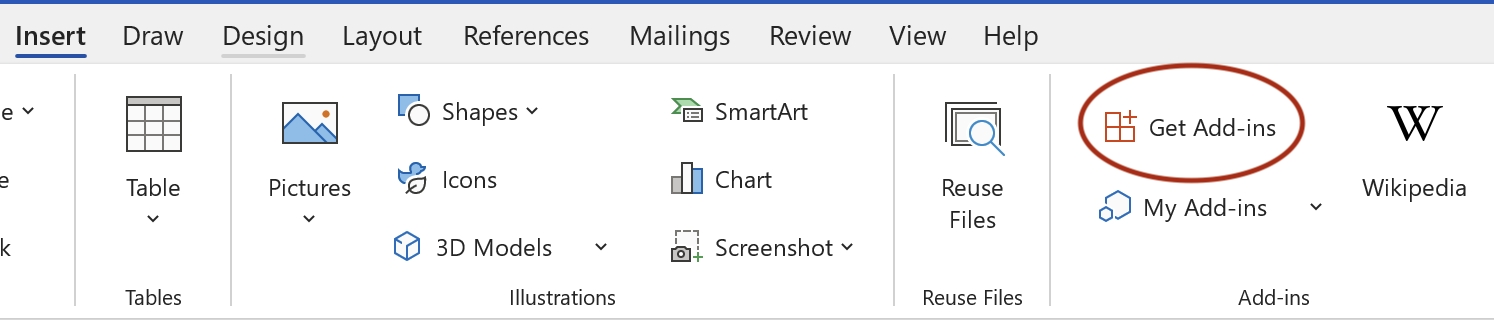
Go to
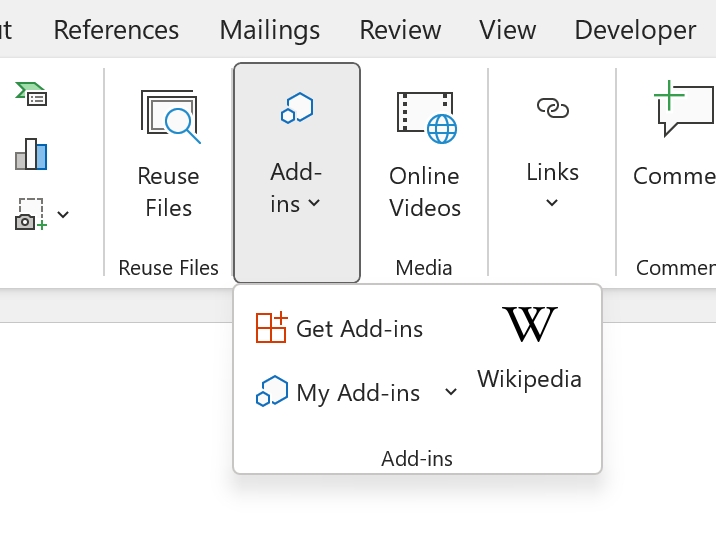
Note that on smaller screens, this button may got folded into another button:
Similarly, on older versions of Word, it may be called Add-ins, located in the Home tab of the toolbar.
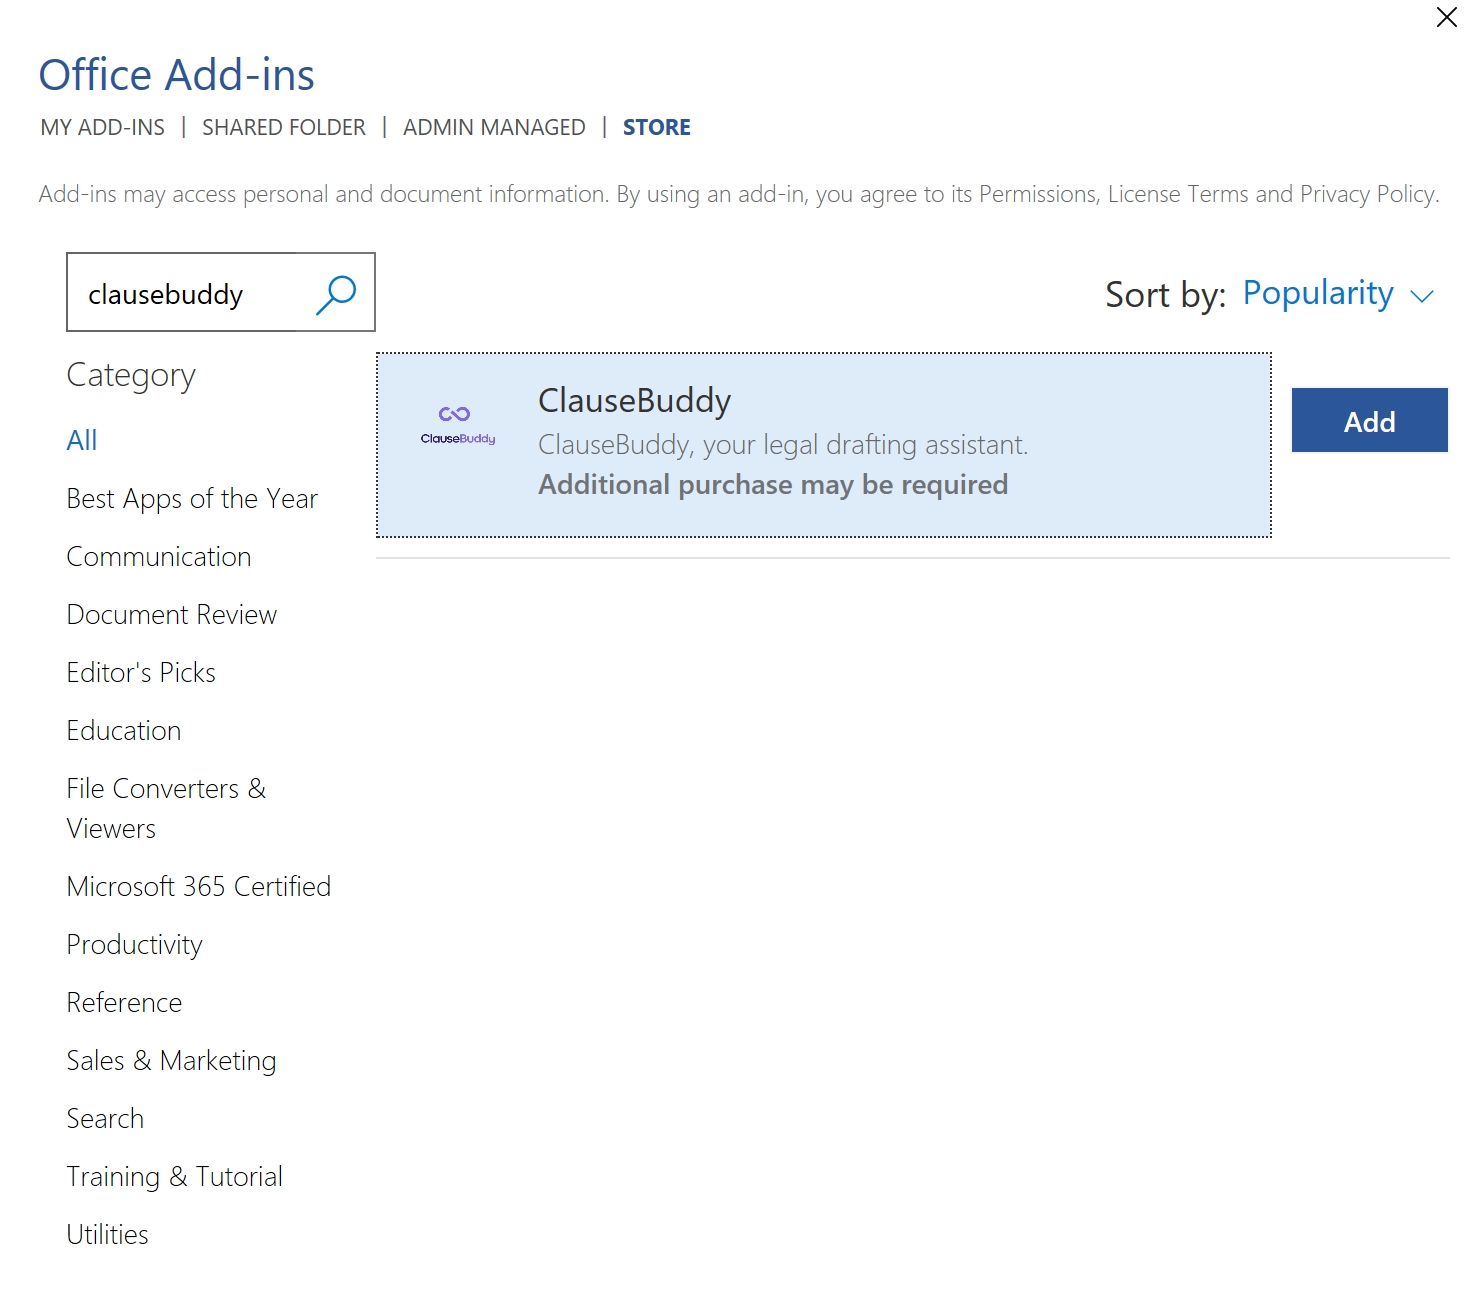
In the dialog box that appears, search for ClauseBuddy and click on the Add button.
After installation, you will see an icon for ClauseBuddy at the right side in your Home tab.
The procedure is roughly the same as for Windows, but the button is different:
The installation is very similar to Microsoft Word: click on the Get Add-Ins button in your toolbar.
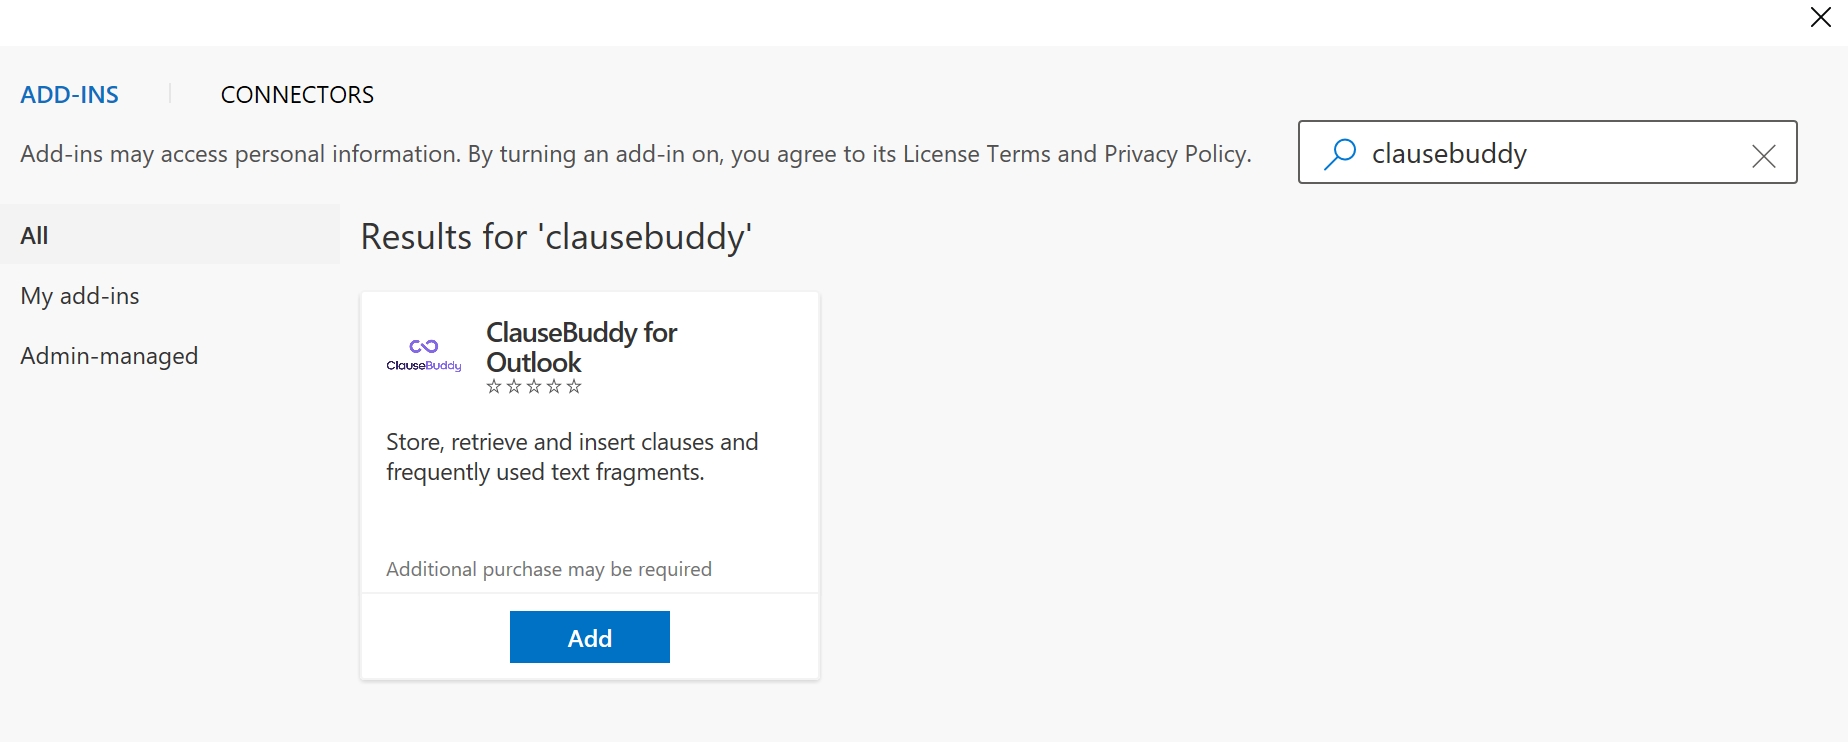
In the dialog box that appears, search for ClauseBuddy for Outlook, and click on Add.
ClauseBuddy will then be available by clicking on the button in your "Messages" toolbar when you draft a new email:
In the new version of Microsoft Outlook for Windows, the "Apps" button is located in a different part of the Ribbon at the top.
Next, you search for "ClauseBuddy" in the store, and click on ClauseBuddy when you see it:
The advantage is that you do not need to install anything, but the downside is of course that there is no tight integration with Word or Outlook. This means that you will have to copy / paste everything from & to Word or Outlook, and that some features will simply not be available (e.g., comparing a clause you found with some clause you selected in MS Word, or enforcing your house style).
You have probably opened a .DOC file instead of a .DOCX file.
A .DOC-file is an outdated format, that is unfortunately not supported by Microsoft for the modern plugin architecture. The solution is to simply save the .DOC as a .DOCX file.
Update February 2025: Microsoft seems to have solved this issue in newer versions of Word. But if you're still using an old version, it may be interesting to read the old explanation:
If you can reliably reproduce this problem, you would do everyone a favour in letting us know!
Installing ClauseBuddy is usually very easy in any recent version of Microsoft Word, on Windows or macOS. Assuming your IT department has not disabled this possibility (in which case you should look at our ), simply go the Insert tab in your toolbar, and click on Get add-in.
If the ClauseBuddy panel is shown with a blank screen, then this means that you have an unsupported combination of Windows and/or Microsoft Office. Check our article on the .
You can even use ClauseBuddy when you do not have Microsoft Word or Outlook available (or you do not have the right to install it, e.g. because your IT-department disabled this possibility). When you use any modern browser — Chrome, Safari, Firefox, the new Microsoft Edge, Vivaldi, Brave, etc. — you can simply go to
Unfortunately, this problem is not limited to ClauseBuddy, as several other addins have the same problem. Microsoft is why this is to some users at unpredictable moments. It seems to usually occur when certain Windows / Office updates are being installed, and it seems to affect Outlook more than Word.
Aside from emailing us, feel free to create an account on our ! You will learn from other users, and are invited to ask any questions you feel like.
Most users will probably use only one login to ClauseBuddy. However, it may happen that multiple logins are useful in your situation.
ClauseBuddy allows you to simultaneously subscribe to multiple libraries, and switch between them with the click of a button. Those libraries can even host different languages.
Imagine, for example, that you are a corporate lawyer working at the Paris office of Smithers & Partners. You may have simultaneous access to:
your own personal library (French)
the library of the Corporate department in Paris (English & French)
the library of the Employment department in Paris (French only)
clauses published by an M&A association you are affiliated with (French, German & Italian)
You can add a new subscription at any time by clicking on the dropdown list in the top-right corner, and choosing Add login
Alternatively, you can add a new subscription by going to the Logins settings.
There you can manage your logins, i.e. removing existing logins and adding new ones as well.
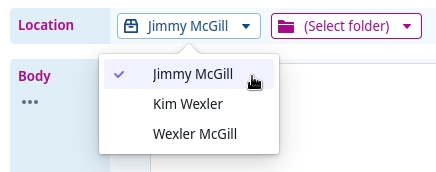
You can switch between logins by clicking on your current login's name in the top right corner.
Logins can have an expiry date. When a login has expired, ClauseBuddy will warn you that your access is blocked.
Contact us if you are interested in publishing your own library, e.g. towards your clients if you are a law firm.
Need a helping hand? Below are some resources to help you get the most out of ClauseBuddy!
Have a concrete question you can't find an answer to in this Help Center?
We also offer bite-sized videos to get you up to speed with different functionalities:
We offer regular deep dive webinars on the different modules in ClauseBuddy. Sign up for a slot that works for you below!
Can't attend any of the sessions? Just sign up! We'll send over the recording to anyone who registered.
The first thing you should try, is to close the ClauseBuddy panel and reopen it. Usually, any issue you encounter will be resolved by this. This effectively "reboots" the software — which, as usual, solves half of the technology problems you can ever run into.
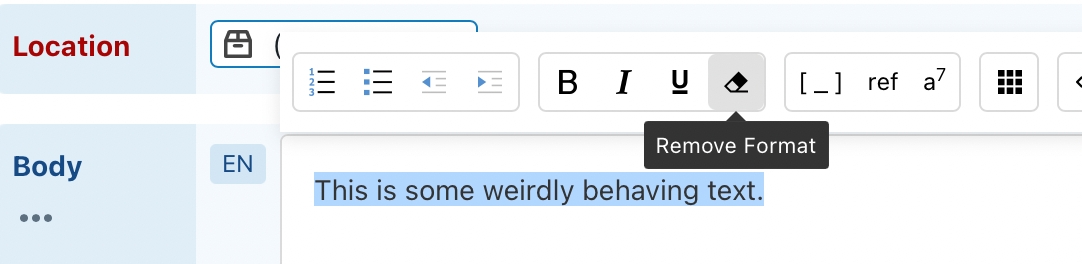
Microsoft Word sometimes performs weird stuff when copying text from its document (left side) to the ClauseBuddy boxes (right side). If the text is behaving strangely, then try to remove all text formatting by selecting all text and pressing the eraser icon.
When closing and reopening does not work, you can try to reset ClauseBuddy.
Don't worry: this merely removes your locally stored settings, i.e. the configuration stored in your copy of Microsoft Word (or Outlook). Although you will have to login again using your security code(s), this will not affect any clauses that you have stored on the server.
If you are using a Mac, click on the "i" icon in the top right corner, choose Clear Web Cache, and close & reopen ClauseBuddy.
Each of the three search types has its own strengths and weaknesses:
Any search result will be shown either with a blue, green or purple background.
Clauses with a purple background do not contain any deeper intelligence — they merely contain text, placeholders, tables, footnotes, etc.
Clauses with a green background are clauses that were prepared in Clause9. They contain interactive elements, such as dynamic legal terminology, calculations and conditional text.
Clauses with a blue background (and a cog icon) are the most interactive of all. They can be like sheer magic: by answering a few questions, the text of the clause will be changed — sometimes in subtle ways by hiding or altering a few words, sometimes very drastically by showing or hiding entire paragraphs.
The rightmost buttons in ClauseBuddy's toolbar allow you to go back and forth in time — essentially a kind of undo & redo that bring you back to earlier search results, before you started to modify keywords, filtered down your search results or modified the wording of the clauses. Do not underestimate the power of those buttons: they can make your search experience so much smoother!
Check out our , where you can receive free support for any question you may have and learn from the questions of other users!
In Windows, you have to .
and describe where you get stuck. We'll then try to un-stuck you.
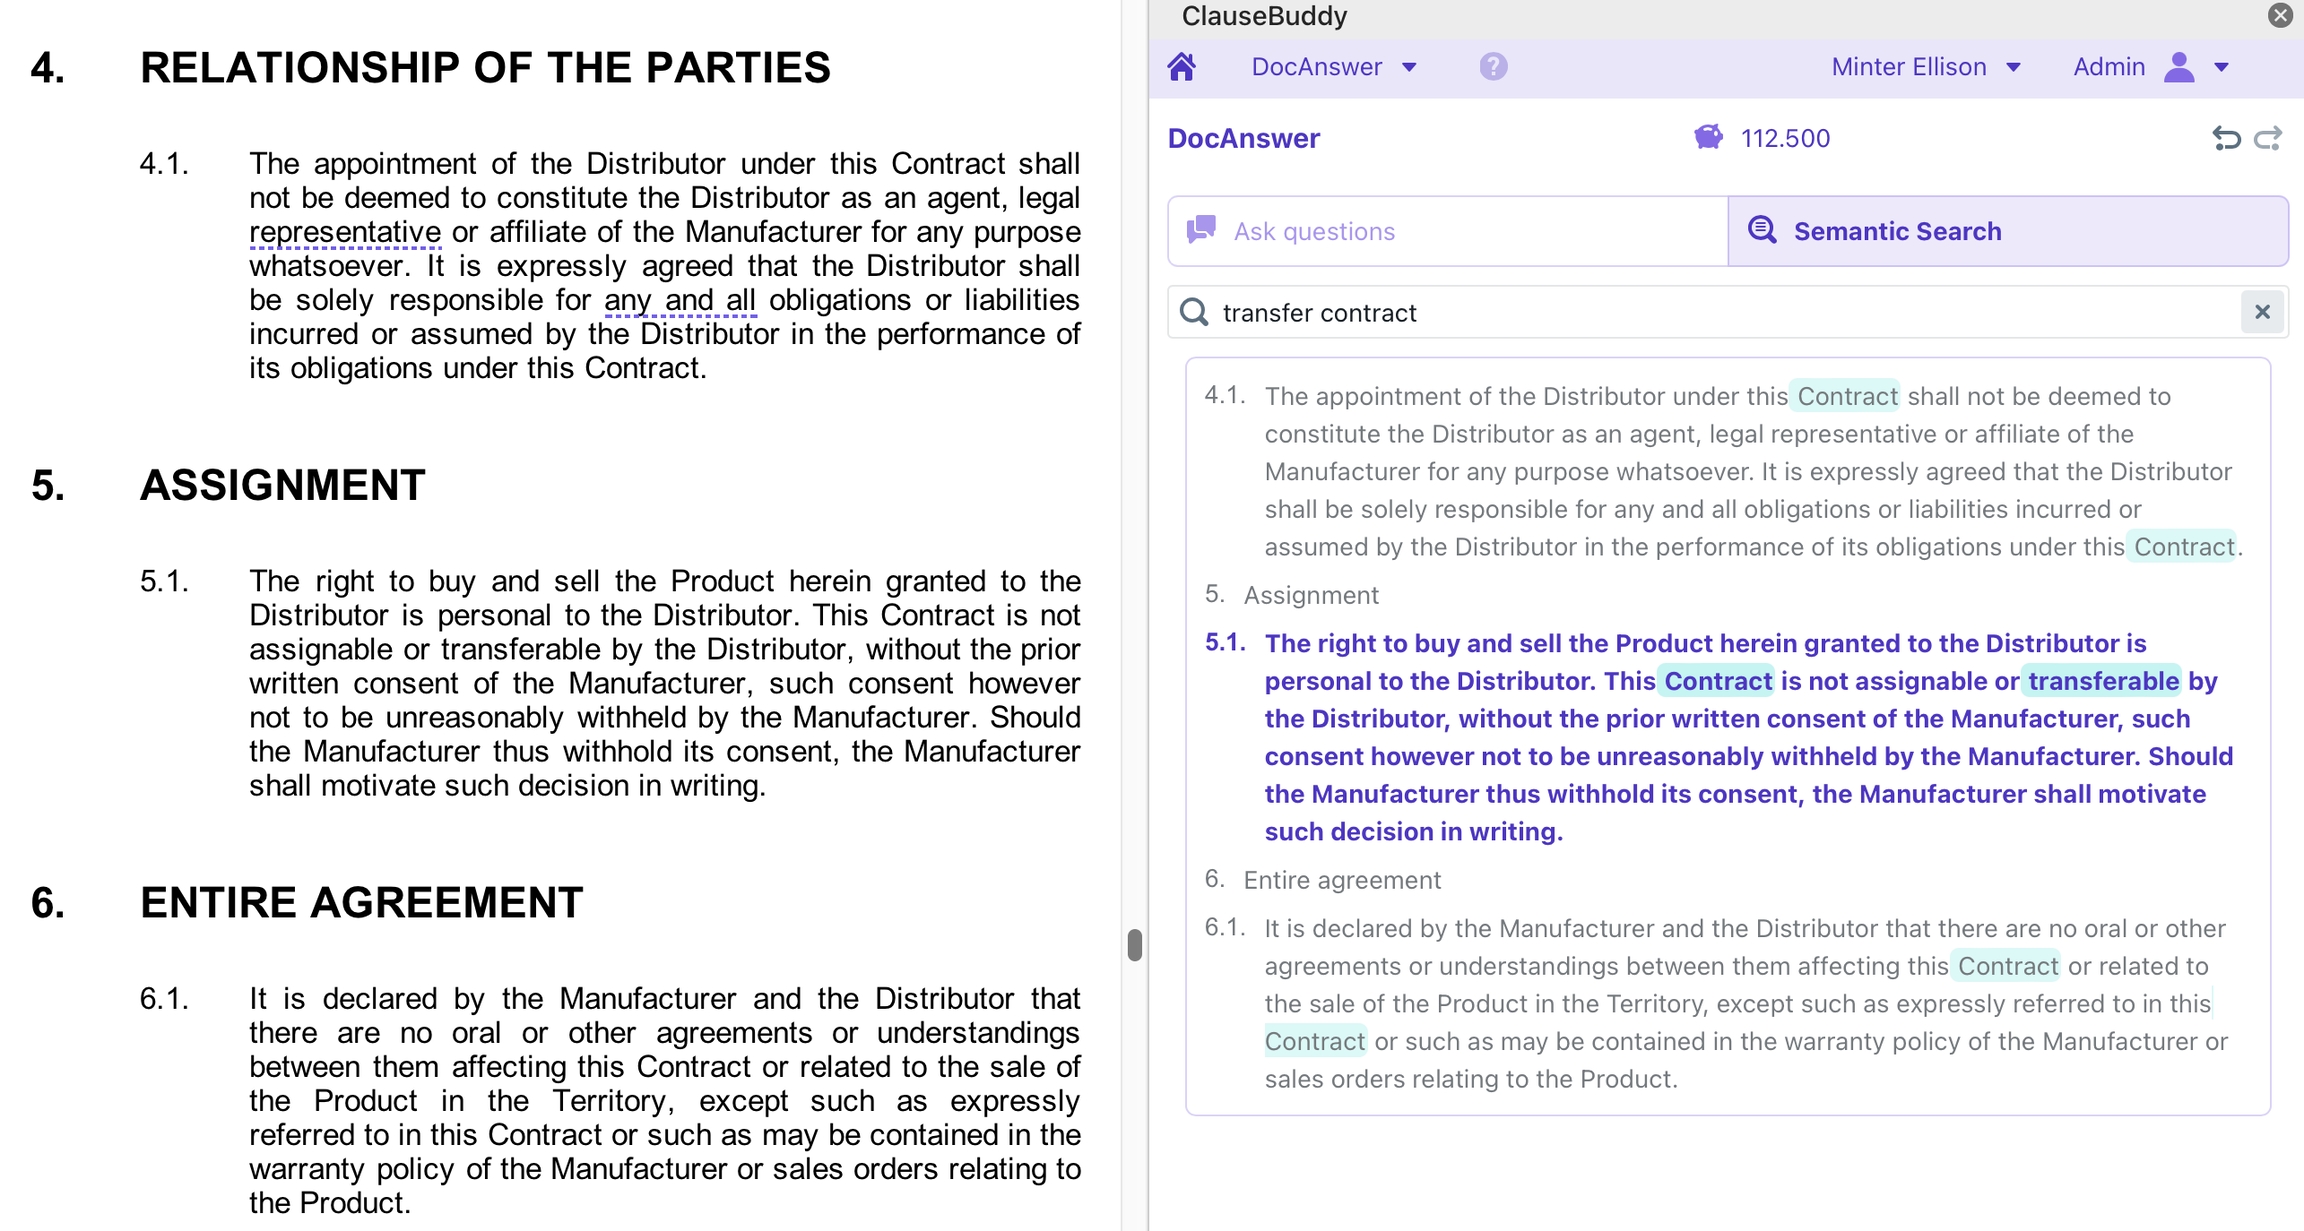
In ClauseBuddy, you can search clauses in your Quality Library in two major ways: by entering keywords, or by browsing through folders. You can also use the to search by similarity.
is what everybody is used to from everyday use in Google or other search engines. ClauseBuddy allows for both a smart search (more intelligent, wider cast) and a strict search (more literal).
Browsing folders perhaps sounds less interesting, but in our experience — both as former lawyers and from having witnessed other users — (tree) aligns most closely to how most legal professionals want to search for clauses.
Similarity searches through allow you to immediately get an overview of all the clauses that match a currently selected clause you have currently selected.
Searching by keywords is probably the most "natural" way to search: it is similar to how you search in Google or Bing. Just enter a few words, and the software will go on a hunting mission inside your clause library.
When searching by keywords, you can choose between two different modes: smart and strict.
The default search mode is smart. In this mode, ClauseBuddy uses an Artificial Intelligence layer to search for clauses that semantically match what you type in. The search will not be literal, so that descriptions and synonyms will usually also result in the right clause being shown at the top.
You can also search in strict mode, by enabling the checkbox to the right of the search box. In strict mode, the search is performed in a literal way. Even though grammatical variations are allowed (e.g., searching for "claims" will also find clauses containing the singular "claim"), clauses that contain synonyms of your keywords will not be included in the search results.
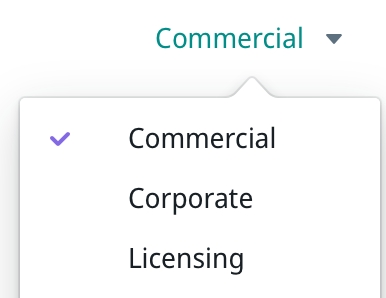
You can quote keywords if you want the keywords to appear next to each other. For example, "holiday entitlement" will only find clauses that contain the word holiday and the word entitlement (or linguistic variations of those words) next to each other.
You can insert a hyphen before a keyword to remove clauses containing that keyword from the search results. For example, when you want to find clauses containing the words "holiday" and "entitlement" but not the word "termination", you can enter holiday entitlement -termination in the search box.
In an enriched clause library, you can also search for keywords found in the filename, clause description or internal legal comment. For example, when you want to search for a Texas shoot out clause in corporate law, you may want to search for the word Texas, even when that word would not literally appear in the actual clause title or body.
It's called keyword search, but you can actually also search on a clause's internal number. For example, instead of sending an entire clause to a colleague by email, you can tell the colleague to insert clause 123454121 — by entering that number as a keyword, the colleague will immediately find that particular clause.
You can find the internal number of the clause through the "..." menu in the top-right corner of the clause, and then submenu Additional information
Smart mode works best if you submit several keywords at once (e.g. confidential information exclusions), or even a short description (e.g. liability limitation with a maximum equal to the invoiced amount). Similar to how you would confuse humans when only giving one word (e.g. confidentiality), smart mode does not work so well if you provide only one word.
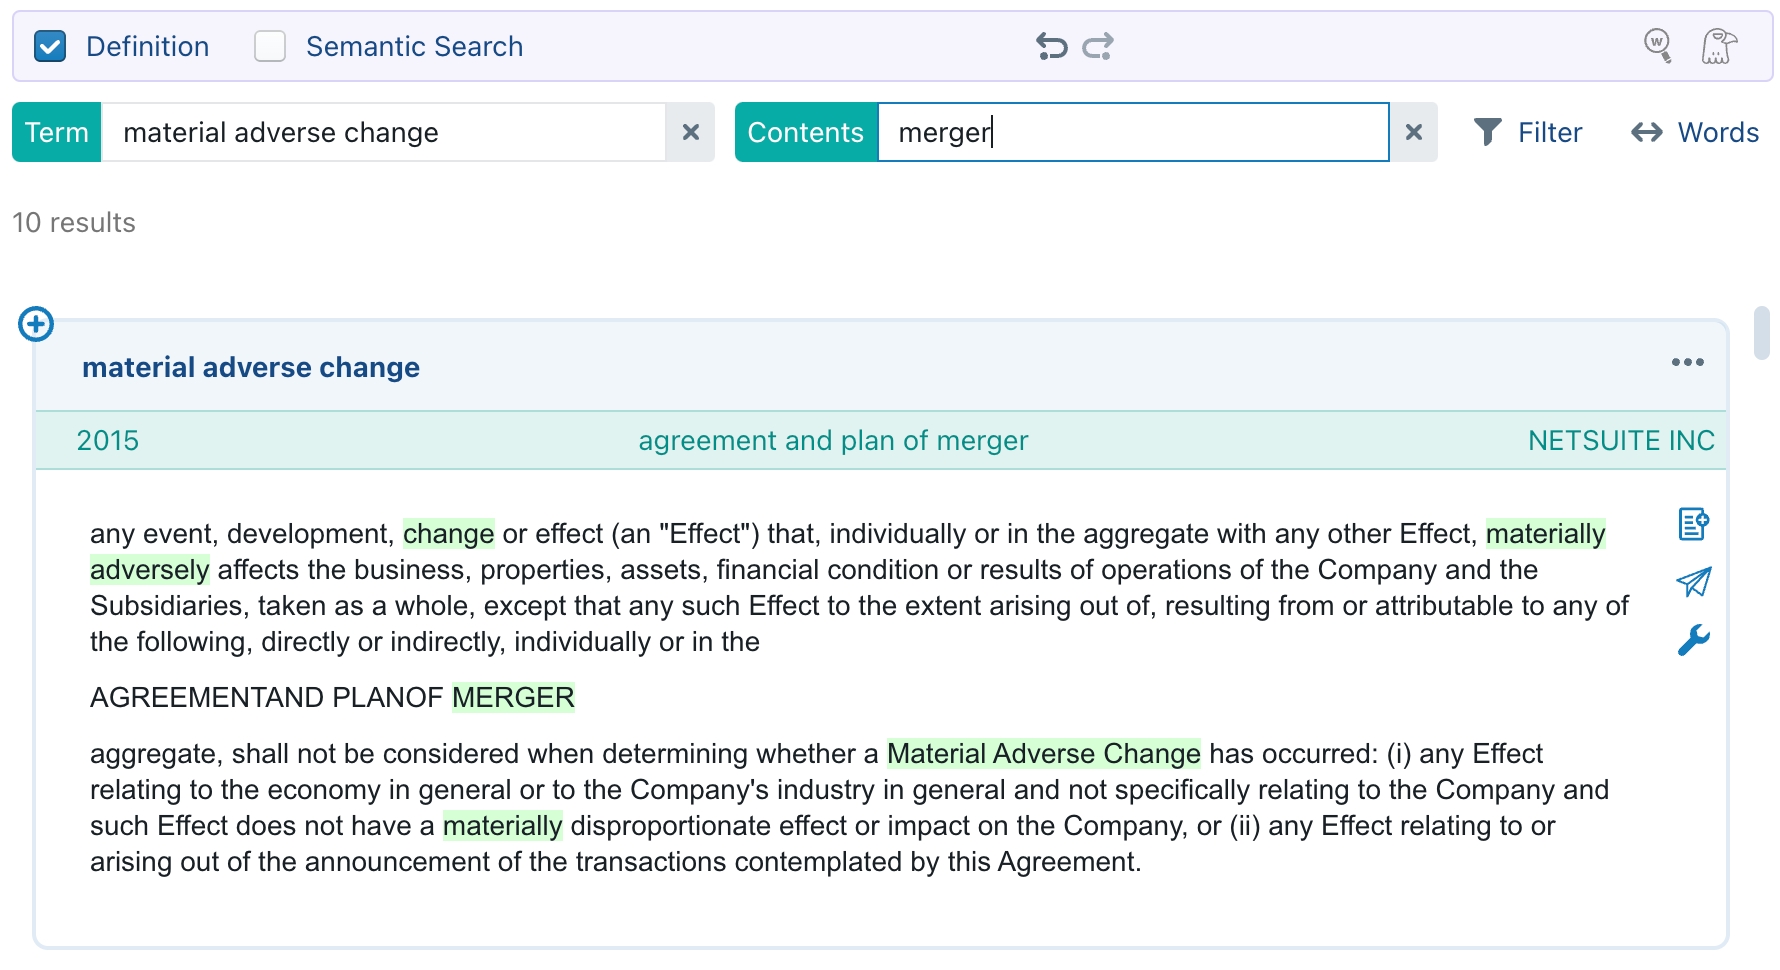
If multiple languages are enabled then, even though the results will be in the language you selected in the dropdown list, you can use keywords in any language you want. For example, in the screenshot below, you can see that English was selected and that the search result was in English, but the keywords were actually in French.
In strict mode, you can combine multiple keywords to narrow down your search. For example, if you are searching for employment clauses and enter holiday entitlement, ClauseBuddy will find clauses that contain both the word holiday and the word entitlement (or linguistic variations of those words). Note that both words do not need to be next to each other in the clause, in order to be found.
ClauseBuddy will ignore stop words, i.e. keywords that have no information value — e.g. words such as the, that, if, and so on (depending on the language).
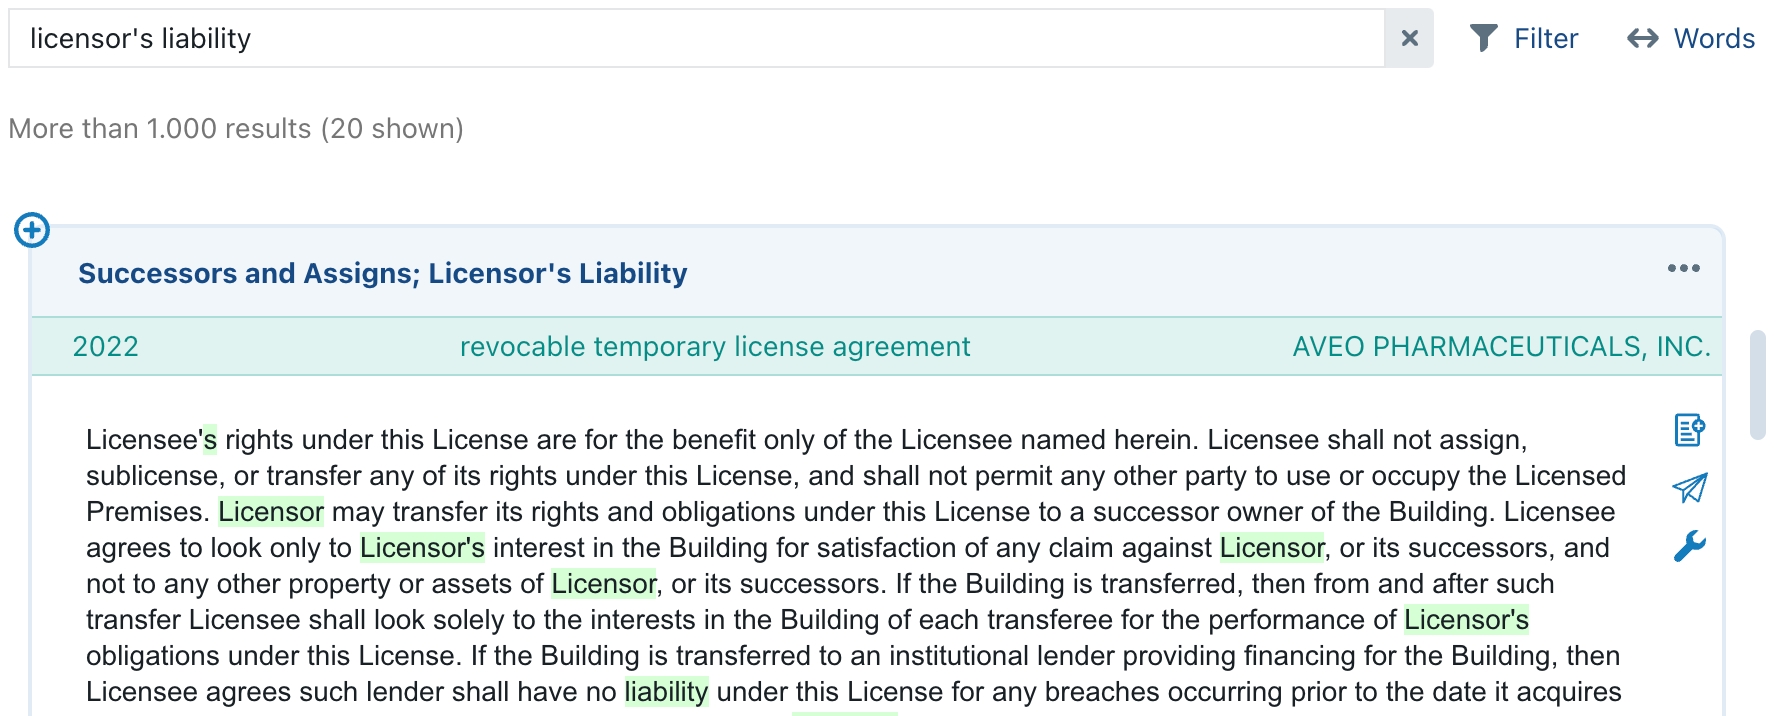
Many users will naturally gravitate towards keyword search, as everyone is very familiar with it. Even though the smart mode allows you to search with a level of intelligence, you should realise that keyword searches may not always be the best approach. The reason is that clauses tend to share popular legal keywords, such as obligation, contract, property, liability and so on.
You may not notice this when starting your ClauseBuddy journey, but once your library reaches a few hundreds clauses, you will notice that those keywords become less useful, as they will turn up many results.
Keyword searches are ideal when the clause you are looking for contains a few fairly specific words that are not found in too many other clauses in the library. For example, when searching for intellectual property clauses in employment law, the keyword trademark may be a very good keyword, while that keyword would be a poor candidate when searching in an intellectual property clause library.
Keyword searches can also still work reasonably well when your clause library is highly segmented, into different search folders.
Keyword searches can also work well in enriched libraries, where clause curators include relevant keywords in the filename, description and/or legal comment.
To mitigate the downsides of keyword searches, ClauseBuddy will allow you to narrow down found clauses to specific folders.
You can do so by clicking on "Folder". You will then be presented with a list of all the folders that that contain (either themselves, or through one of their subfolders) at least one clause that contains the specified keywords. To narrow down your search results to a specific folder, you simply click on a folder's name. You will see the name of that folder appear as a filter on the right side.
Searching for keywords in the highly dynamic parts of a dynamic clause created in Clause9 may be unpredictable. For example, when you include 8 variations of the same sentence, searching for keywords found in different variations is possible, but unpredictable.
Instead of searching through keywords, you can also search through your clauses by browsing through your folders and subfolders.
For example, if you are looking for a typical interpretation boilerplate clause, the keyword interpretation will itself probably not be a very good candidate, as it will lead to many noise search results with clauses that also happen to contain the word interpretation. In such case, it is probably much faster to browse to Clauses > Boilerplate > Interpretation and take a clause there.
To narrow down your search results, you can enter one or more keywords in the Filter input box. ClauseBuddy will then only show search results that are simultaneously within the folder you selected (or any of its subfolders) and also meet the keywords you entered.
For legal professionals, browsing through folders is actually the most natural way to search. After all, when you are thinking about a certain clause, you are probably (at least implicitly) thinking primarily about a kind of clause — e.g., "I want to insert an entire agreement clause" or "I need an applicable law clause".
If your library has a reasonably decent structure (taxonomy), you can therefore very quickly find a relevant clause, without having to come up with smart combinations of keywords.
Folder searches will not work well in chaotic clause libraries and "residual" folders where difficult-to-categorise clauses are thrown together. In such scenarios, keywords may be a better fit.
Entering keywords is probably just the start of your search journey. When you are presented with a list of clauses, you will probably want to perform some to quickly narrow down your results.
Searching through folders is very straightforward: you simply select a folder, and you are presented with a list of all the clauses in that folder, or any of its subfolders. If you want to further narrow down your search results, you can then click on a subfolder, or start .
Check out our page on to learn more on how you enter keywords; all the tips & tricks described there, apply equally to the filtering in the context of Browse.


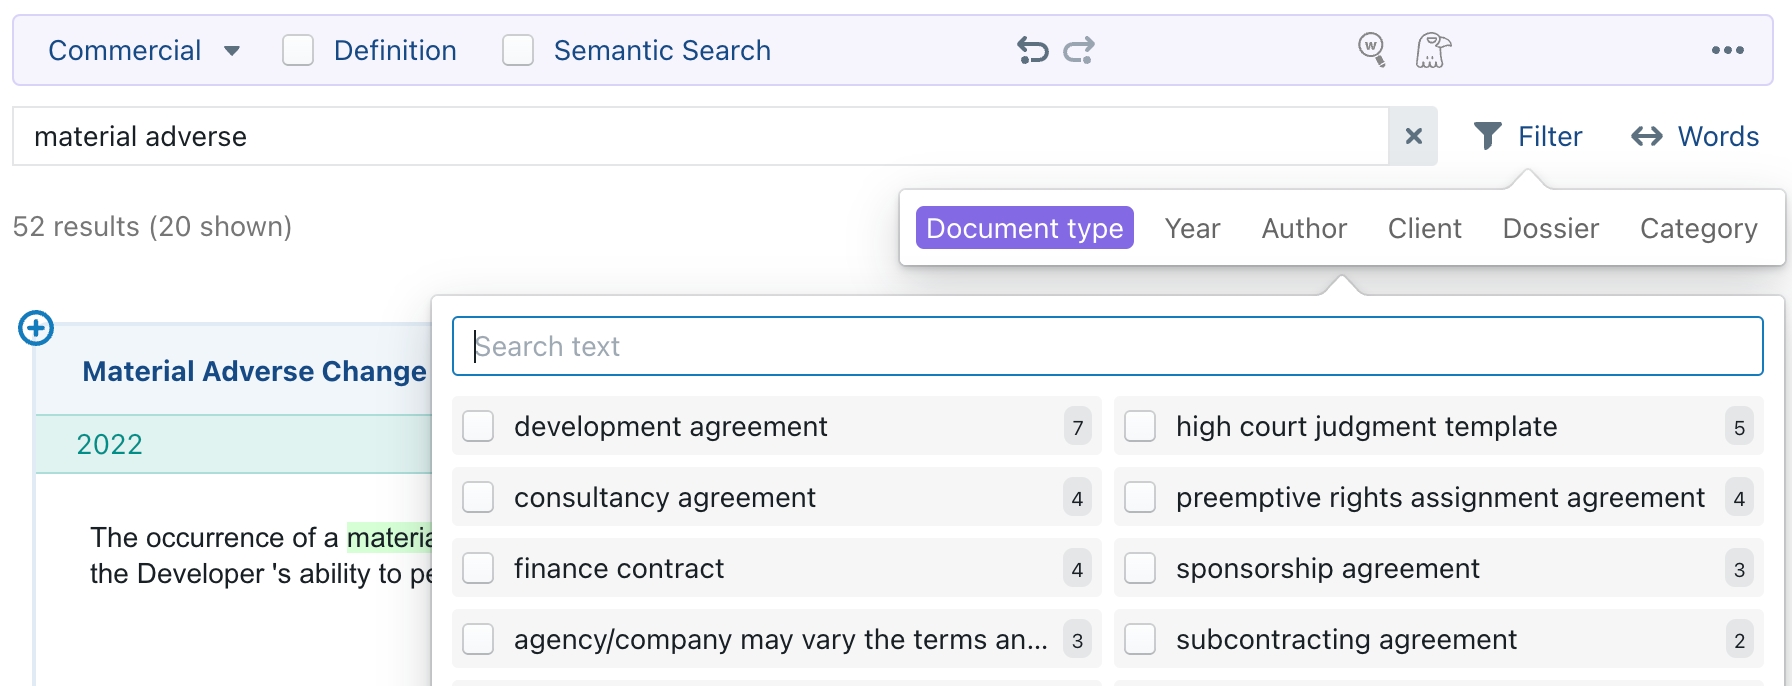
When you are presented with a list of search results — either through folder browsing, keyword search, or similarity search — you can filter clauses to quickly find a small subset of interesting results. You can do so by using the filtering pane at the right side of ClauseBuddy.
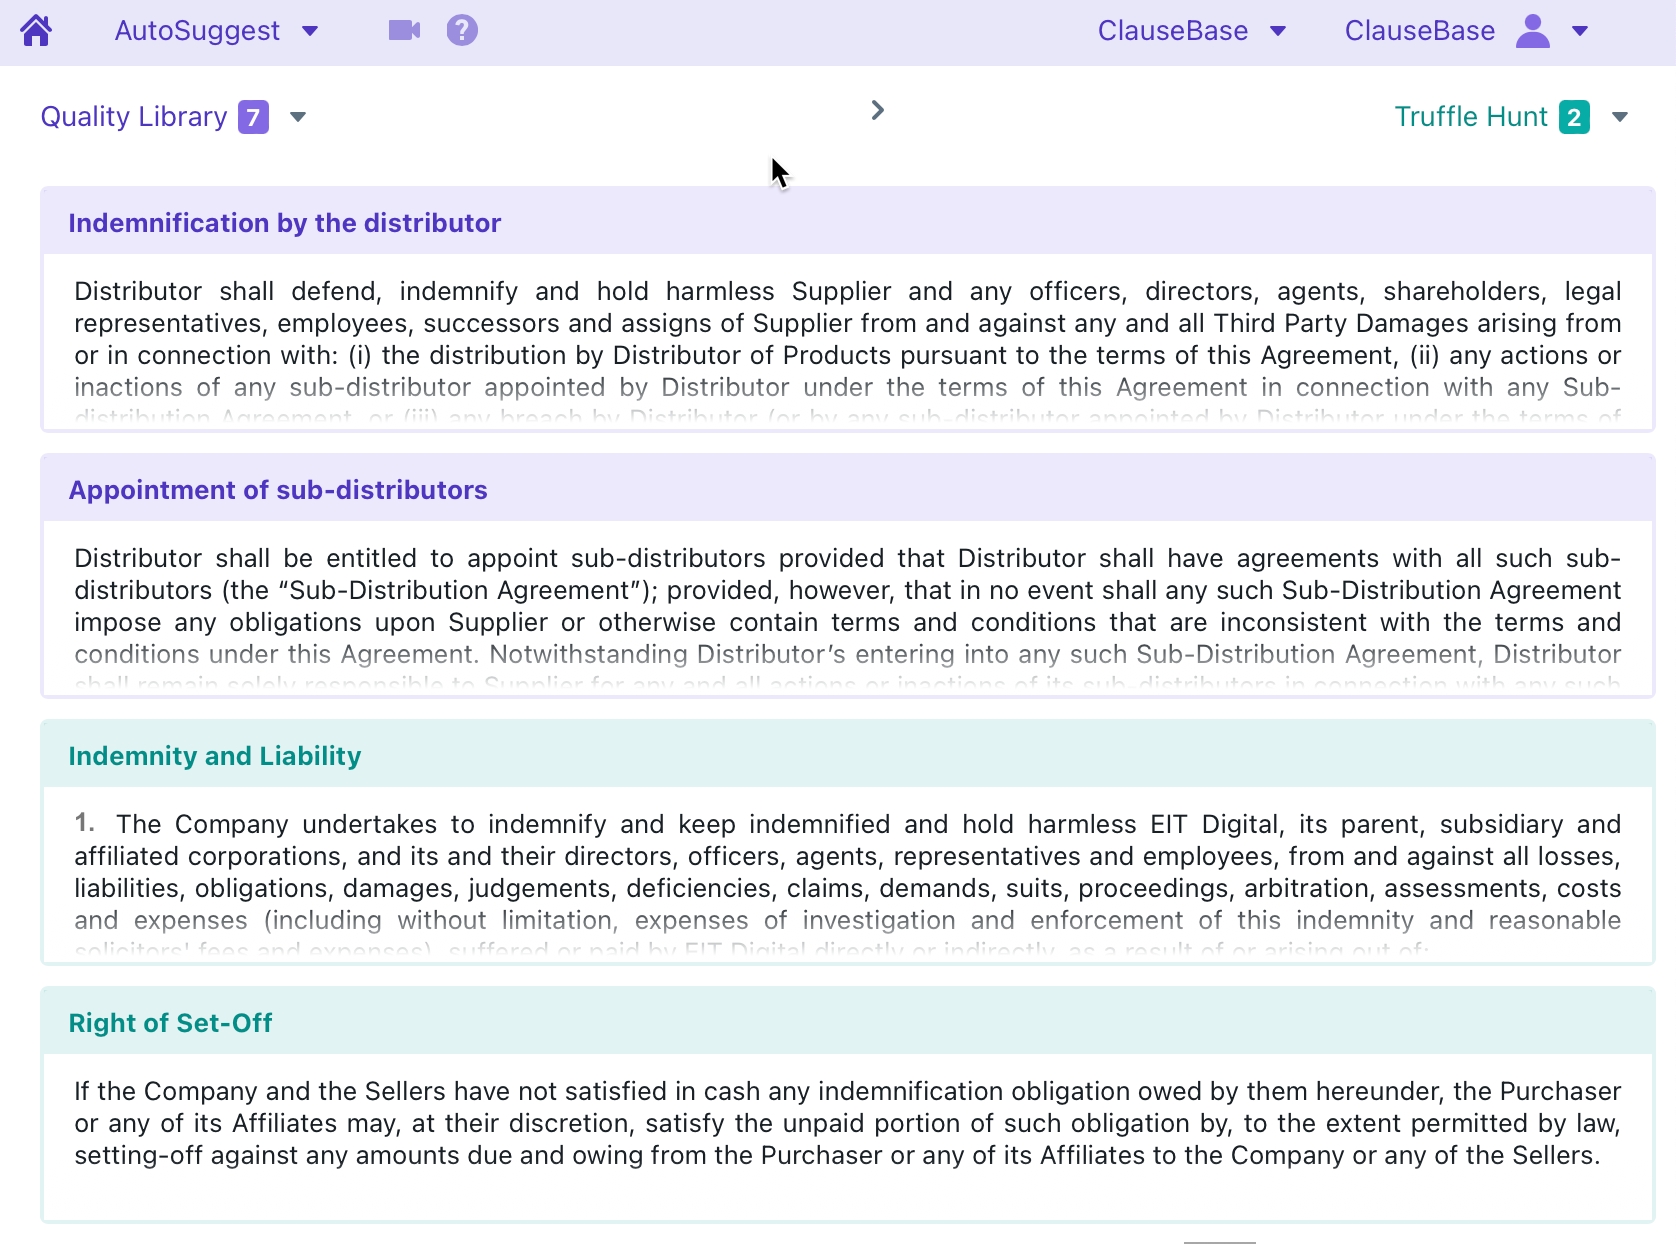
The filtering pane also allows you to filter on the search folder where each clause is found. For example, in a law firm's general library, you may have search folders per legal department (corporate, employment, IT/IP, ...) and you may want to narrow down your searches to specific search folders.
If none of the clauses you found are tagged with such attributes, and all the clauses are found in the same search folder, then the filtering pane will not be shown.
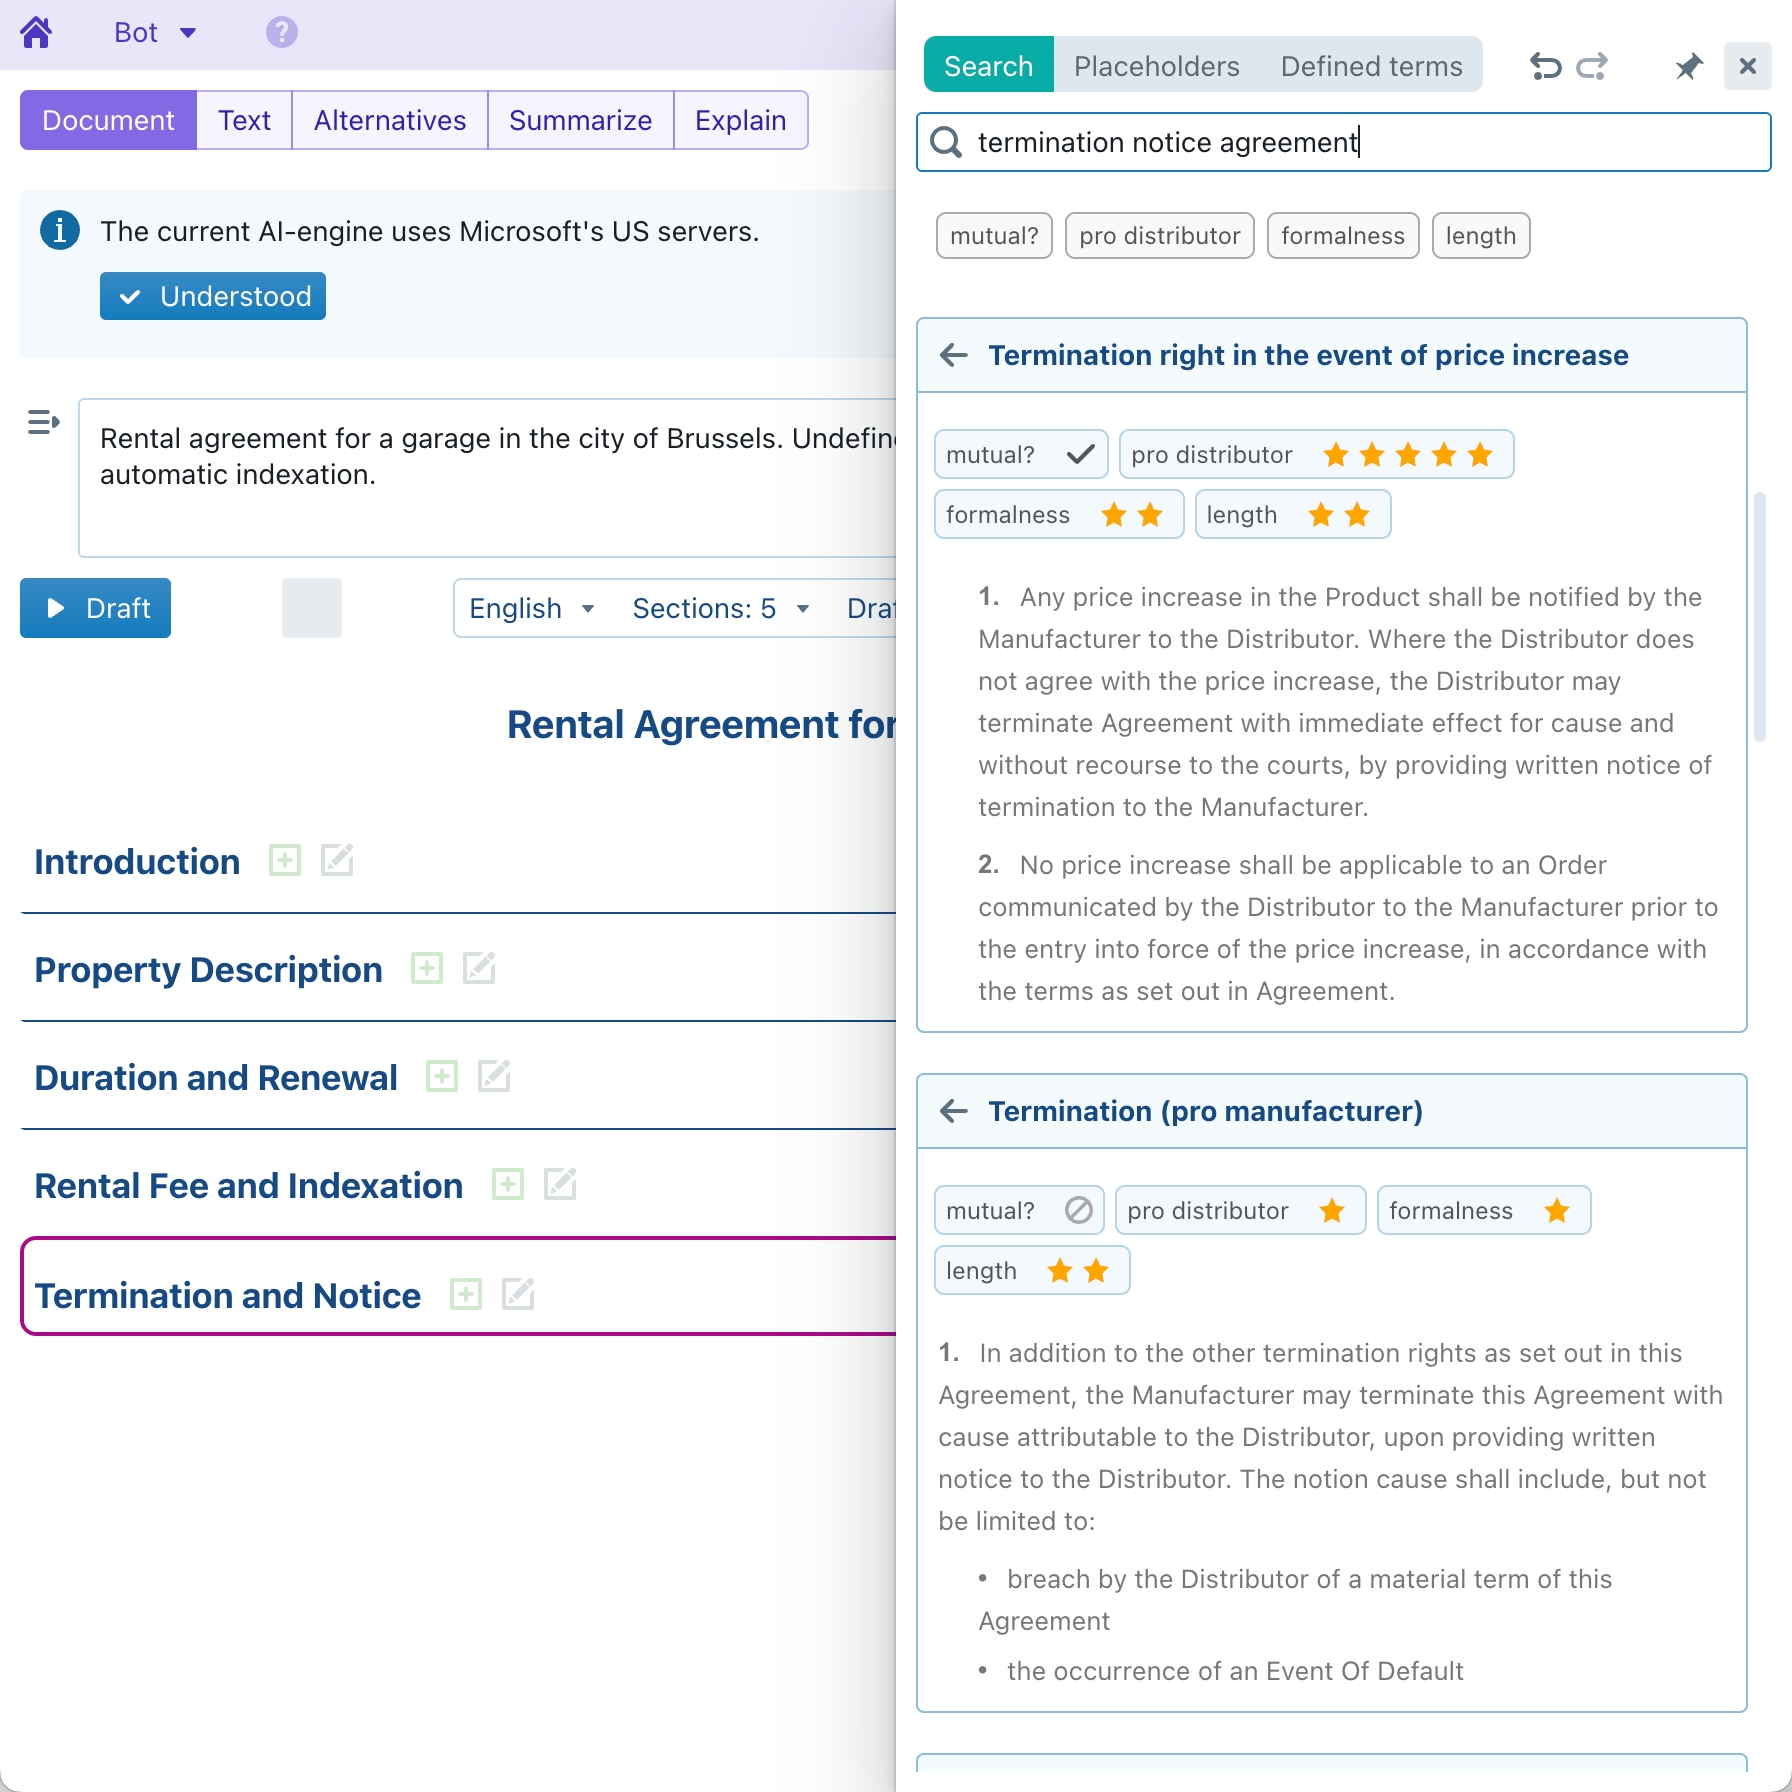
In the filtering pane, ClauseBuddy shows you all the search folders and legal attributes it found in your initial search results. For example, if you searched on keyword distributor, then it will take all the clauses containing that keyword, and present you with a list of all the search folders and legal attributes found in any of those clauses. In the example below, you can see 357 results, which is probably way too much to scroll through.
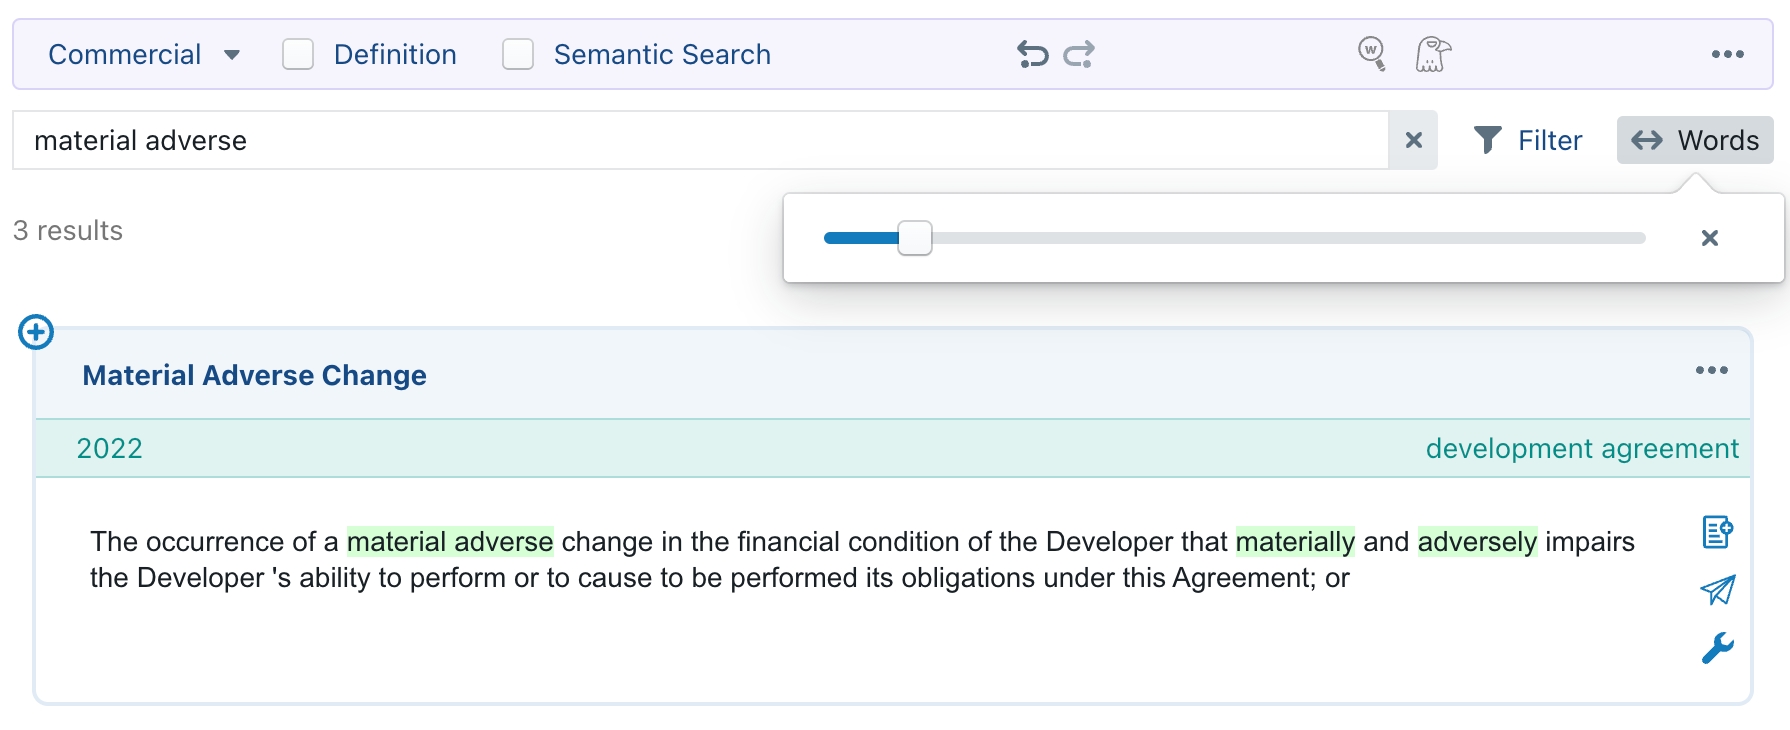
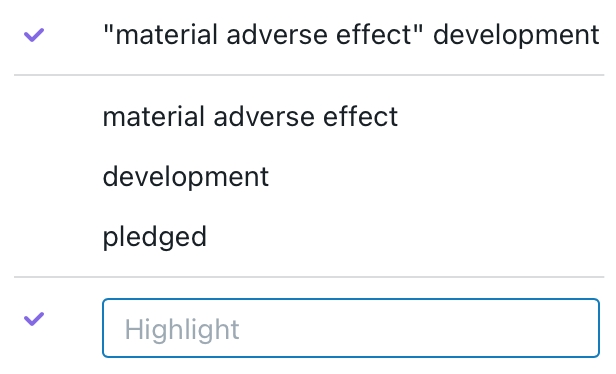
You can then filter your search results by clicking on any of the checkboxes in front of a search folder or attribute value. For example, when you only want to search for mutual cluases that highly favour the distributor, you can see that ClauseBuddy returns a manageable number of results (3).
If you happen to make an impossible combination — e.g. clauses that are both mutual and very long — you may end up with no results:
You can then either remove the filter (by clicking on the small x in the top corner), or go back in time by clicking on the leftpointing triangle at the right side.
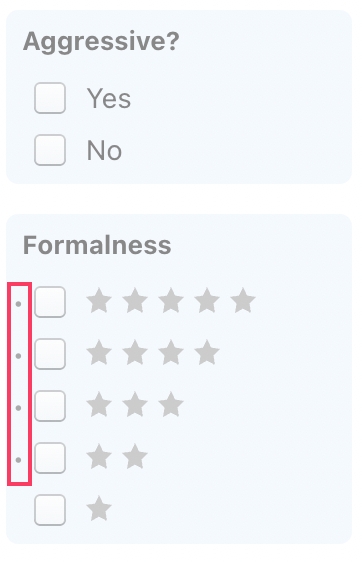
You will notice that often, small dots appear at the left side of the checkboxes.
Those dots indicate that, within the currently fetched list of clauses, there is at least one clause (but possibly multiple) that meet the filtering criterion. In other words, when clicking on this filter, you will be certain that the resulting list will not be empty.
Please note that the omission of a dot does not mean that there are no clauses in the database that meet that criterion. A dot may simply be missing because not all the clauses have been loaded; by simply altering your search criteria, you may very well arrive at a clause that meets that filter's criteria.
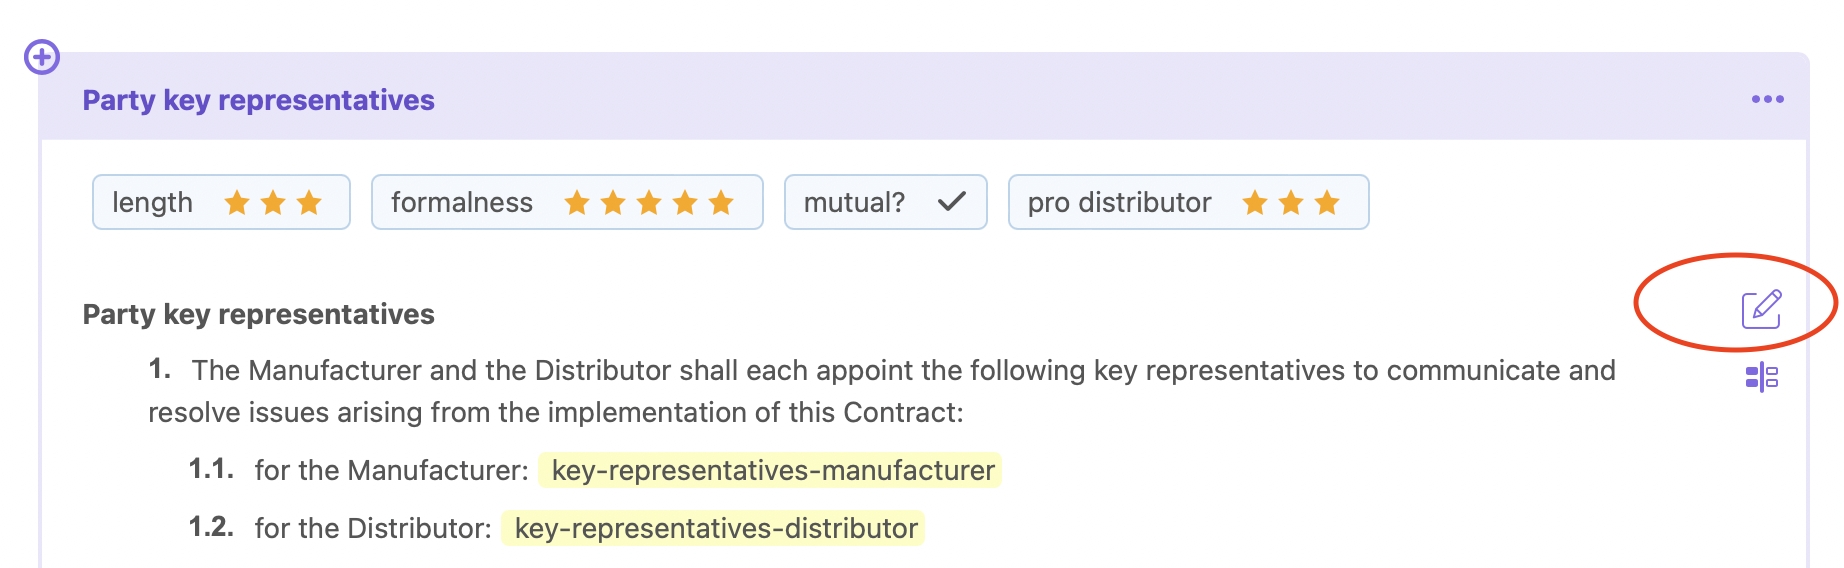
In dynamic clauses, i.e. those created with Clause9, you can tweak the label used for concepts. For example, if you are inserting a clause inside a contract where the manufacturer actually uses its own name (instead of the generic "Manufacturer"), you can change that term by clicking on the word "manufacturer".
Such terminology may seem overkill for a clause of two lines, but can be very handy for large clauses where the same term is used many times. Furthermore, when you would insert multiple dynamic clauses, ClauseBuddy will remember the terminology you previously used, and automatically apply that terminology for subsequent insertions — and even save that terminology within the MS Word file, so upon reopening you do not need to configure it again.
Instead of changing the term, you may also simply want to change the gender or the number (singular / plural) of the term you are about to insert. Thanks to ClauseBuddy's grammatical engine, all the verbs, pronouns, adjectives, articles and even grammatical cases will automatically adapt. Now that's a time saver!
Any placeholders inserted in a clause will show up in ClauseBuddy, so that you can tweak your clause before you effectively insert it into your MS Word document. Moreover, any values you assigned to a datefield in the past — whether in Clause9e or in ClauseBuddy — will automatically be remembered.
Such data is encrypted and stored in the Word file's "comments" property, and updated with every change you make to the datafields or terminology. By default, users of the same customer can read each other's metadata. If you want to change this default, your administrator has to login to the Clause9 administrator backend of ClauseBuddy, and go to the Admin > Defaults section.
Once you've found a good clause, you can inspect its legal metadata and compare it to other clauses inside your document. You can do so by hitting the ... button in the top right corner of the clause.
This popup menu will show you the following:
The internal number of the clause (e.g., #1272443). This number may come across as very nerdy, but it's sometimes very handy when communicating with colleagues — e.g., when a senior partner would email a junior associate telling to "use clause #8875124". The junior can then simply paste these numbers in the keyword search bar, and will immediately find that particular clause.
The date & time when this clause was last changed by someone.
Any legal comment (typically case law or doctrine references) assigned to the clause.
Note that the clause's legal description will be shown above the clause.
You can compare the content of a selected clause with whatever text you happen to have currently selected inside the MS Word document. You can do so by clicking on the Compare button.
Don't forget to click on this button again to show its normal contents!
If you want to edit the contents of a clause (and are authorised to do so), click on the Edit clause button.The clause will then be opened in the clause editor.
If the clause was created in Clause9 (and is therefore too complex to edit inside MS Word), you will be invited to edit the clause inside Clause9, i.e. in your browser (if you have the required access rights).
Probably the most likely installation stumbling block for most users is that your firm/company has blocked you from installing add-ins in Microsoft Word or Outlook. In such case, you will notice that the "Get Add-ins" button is greyed out.
If this is the case, then you will need to either switch to the browser-version of ClauseBuddy (see above — the downside is that you will have copy/paste between Word/Outlook), or alternatively involve your organisation's IT-expert ("administrator"), who has the required superpowers to grant you installation rights for the add-in.
Be nice to this person, as he/she has a very good reason to block add-ins: the previous generation of add-ins had a very bad reputation of causing severe slowdowns and difficult-to-trace crashes. (We've all seen fast computers that take over a minute to load MS Word!)
Unlike traditional desktop-software or the old generation of COM/VSTO plugins, there is no "installer" file, such as an .MSI file.
Let's repeat this one more time, because almost every IT-admin will be surprised by this:
There is NO installer file, there is NO .MSI file and there is NO .EXE file that you can get from us.
As an IT-admin, you're now probably thinking that ClauseBuddy is being difficult or special here. But ClauseBuddy's deployment is in no way special: it acts like every other Office-plugin of the new generation. The only thing that's probably special, is that ClauseBase will be the first vendor of a new generation Office-plugin that you encounter.
Even though the "new" generation is almost a decade old (it was introduced in 2014), in practice, IT-admins are not frequently confronted with it, simply because the old-generation of COM/VSTO plugins are very difficult to convert to the new generation, due to a completely different approach. Most vendors that sell old-generation plugins will therefore deliberately stay silent about the difference between the old and the new generation, because they face such difficulties in rewriting their old plugins.
The enterprise deployment of ClauseBuddy is in no way different than the deployment of any of the other new-style Microsoft Office plugins (often technically referred to as "Office.js" plugins, because it used the Microsoft Office.JS API for Javascript to communicate with the "host" applications such as Word and Outlook).
See Microsoft's resources:
Other vendors explaining how to install their Office.js plugin (essentially equivalent to ClauseBuddy):
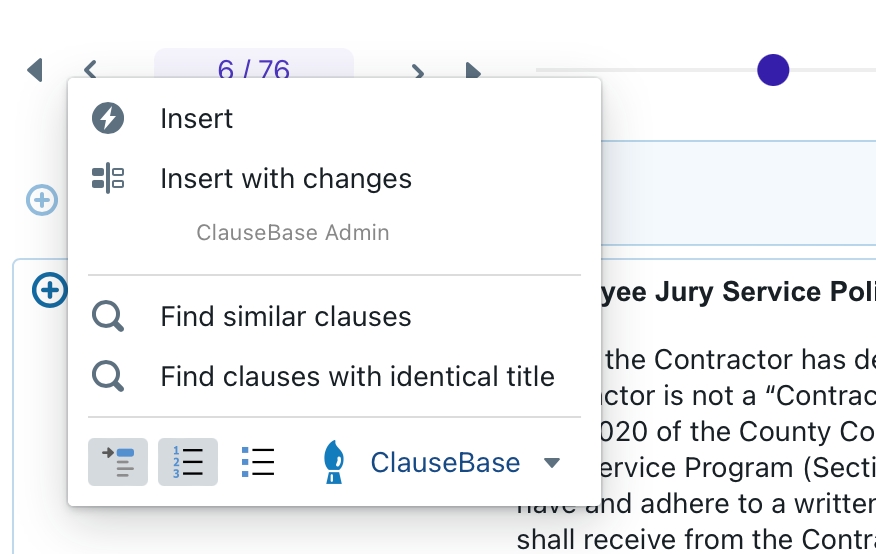
Once you have found a clause, you can insert it into your Word document (i.e. the left side of your Word window), by clicking on the + button.
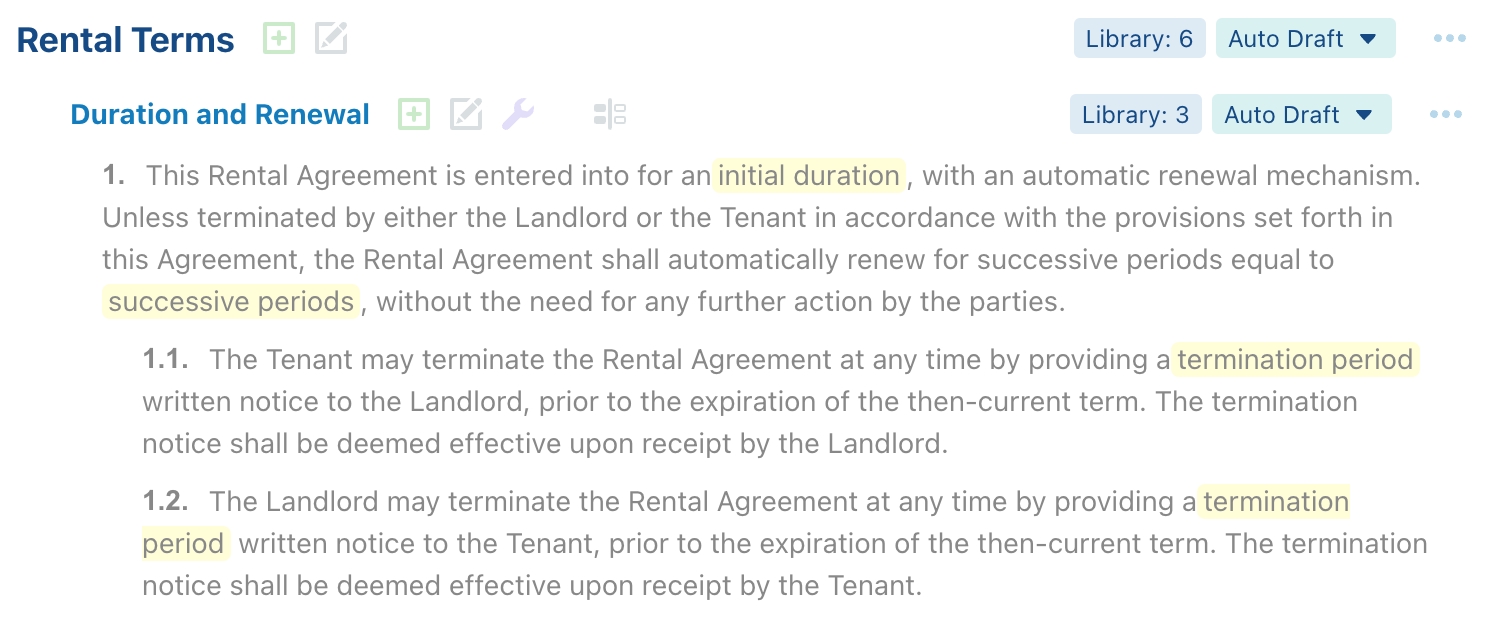
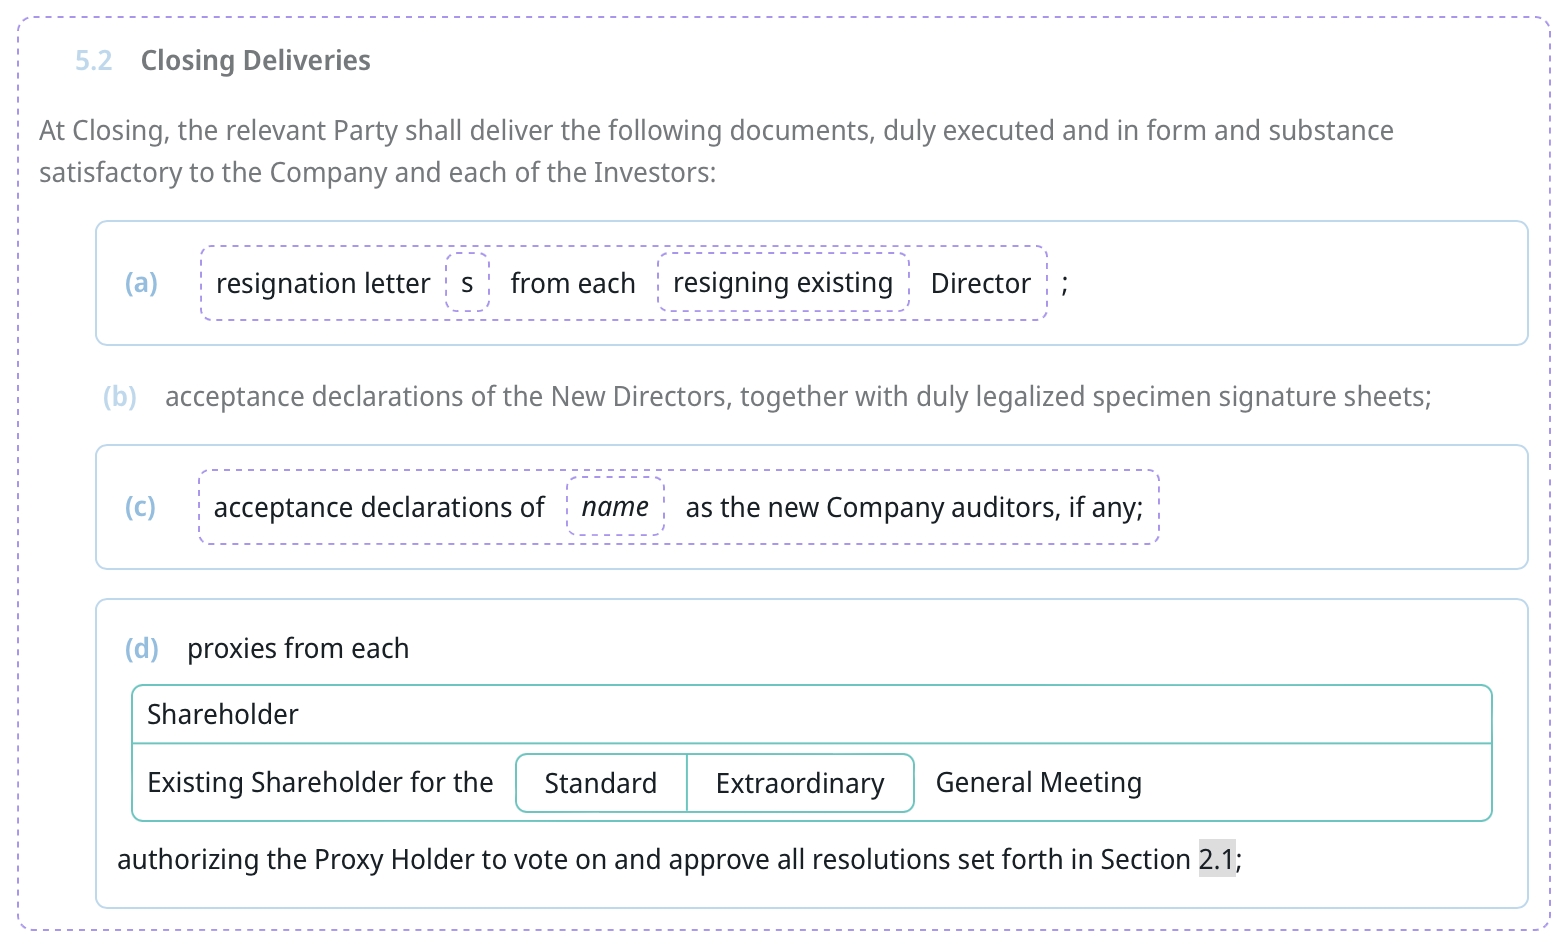
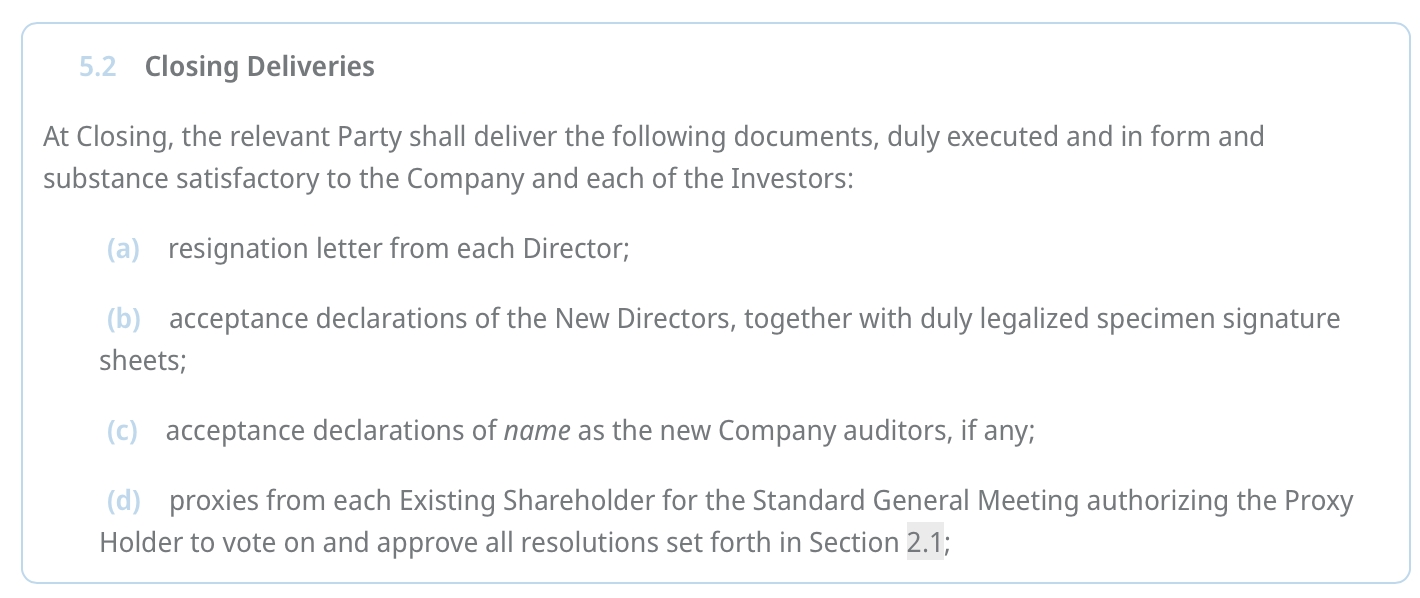
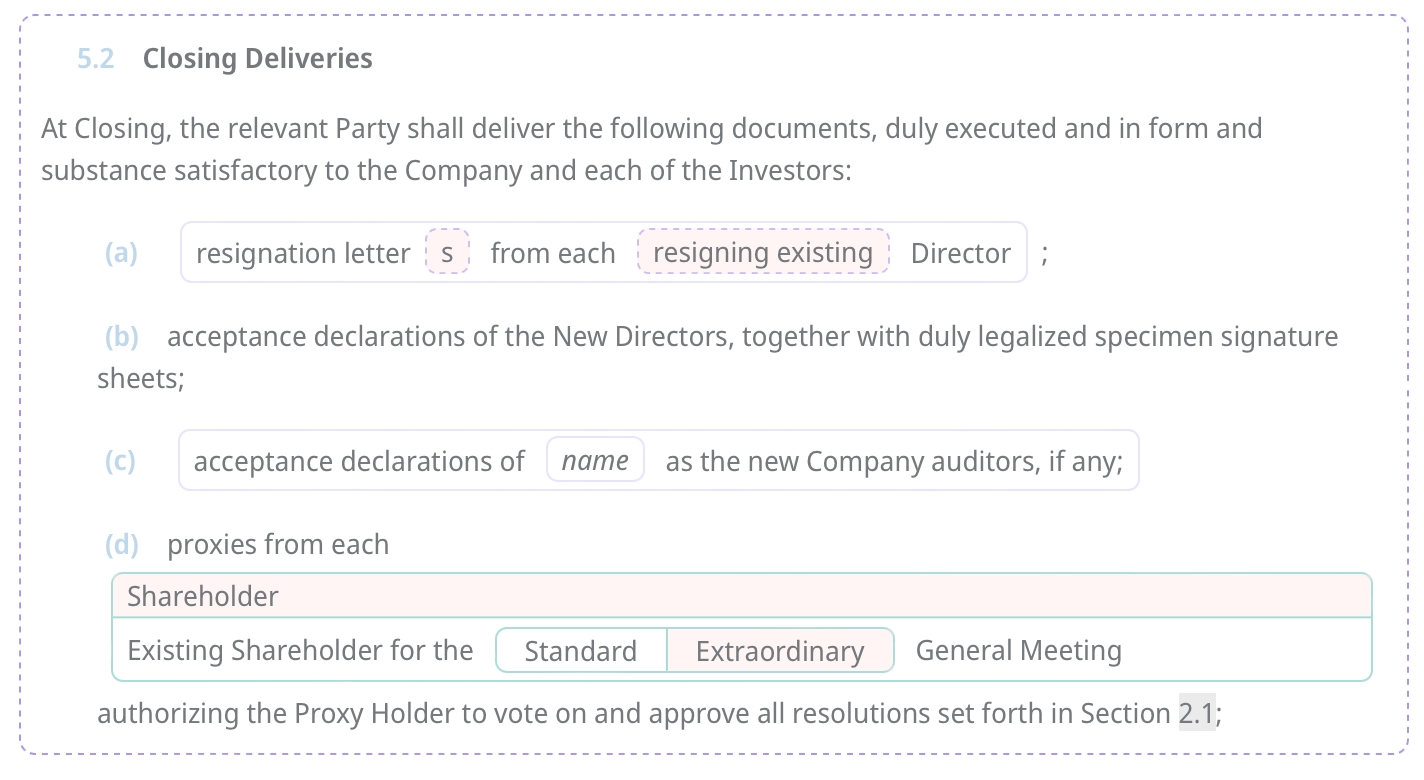
ClauseBuddy allows you to fill placeholders — i.e. text marked as yellow in ClauseBuddy's editor — right from within ClauseBuddy, before you insert the clause into your MS Word document. Simply click on the relevant placeholder, and fill in the value you want.
Numbering and styling in MS Word are terra incognita for many legal professionals, so that we all have to live in a world where there are much more poorly formatted documents then properly formatted documents. ClauseBuddy cannot solve this problem, but allows you to define how the clause should be inserted into a document:
With Minimal styling, ClauseBuddy will assign standard styles to clauses, and only indent them somewhat to ensure you still see the structure of the original paragraphs. This is the default option, which is recommended if your target document is ... ahem.. a chaotic mess in terms of layout.
With Guess styling, ClauseBuddy will try to mimic the styling of your target document, through an educated guess. Use this option if your target document is reasonably structured, and none of the following options are available to you.
All the following options in the dropdown list are intended to reflect a certain house style. At least one option ("ClauseBase", for documents generated with it) will be available, but you can also define your own house style. While you should be very familiar with styles in MS Word — knowledge typically reserved for a few people in an organisation — it does allow you to insert clauses that are virtually guaranteed to have correct styling. When you then open a template for which a house style was pre-configured in ClauseBuddy, the relevant style scheme will be automatically selected by ClauseBuddy.
When you insert your clause, you may see your screen quickly flash and restructure the text at the left side. The reason is that ClauseBuddy inserts an initially numbered clause, and subsequently tries to fit the numbering and styling to the surrounding clauses. Thanks to this two-step process, you can always try to hit undo (Ctrl-Z) once in MS Word to check whether you actually want to keep the initially inserted version. Hit undo again to remove the clause alltogether.

Inspiration module Deep Dive
Adding clauses to ClauseBuddy is very simple. You can either create a new clause yourself, or send interesting text to a colleague (a "curator").
In both cases, the easiest option is to start by selecting one or more paragraphs in your MS Word document, Buddy will then try to pre-fill the submission form with your selection.
When you choose New clause, the selected text will be analysed by the software and distributed over the relevant fields in the clause entry form.
For example, when selecting the following text in Word:
ClauseBuddy will split the text into a filename, title and two paragraphs for the body.
In the Name field, you can enter a filename for the clause. Typically you will want to make this field as short and descriptive as possible, indicating towards your users (or your future self) what this clause is all about, without requiring them to read the entire clause. In the example above, you may for example use "Entire agreement — standard" as the filename.
It is usually not a good idea to describe every legal nuance of a clause in the filename — ClauseBuddy's attributes (see below) can do a much better job in describing the general properties of a clause, while a clause's location will also provide context for the clause. And for very subtle nuances, you are recommended to use the Description or Comments field described below.
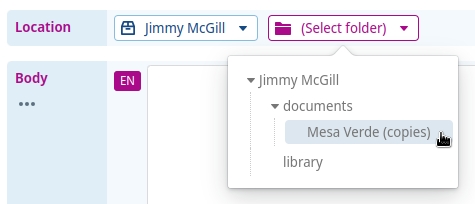
In the Location field you can specify in which search folder then (sub)folder a clause should be stored. Think carefully where you will store a clause, as the location provides a lot of legal context towards the users of your clause. Creating folder hierarchies is described in greater detail on the Managing Folders page.
In the Title field you can specify an optional title for your clause. Unlike the Name field (which ClauseBuddy will never insert into the actual Microsoft Word document), the title field will be included as a (sub)title of the clause that will get inserted into your users' document — although users can also configure ClauseBuddy to not insert that subtitle.
In the Body field you can include the bulk of your legal contents, separated into paragraphs. We describe this in greater detail on the Drafting clauses page.
In the bottom corner of the ClauseBuddy pane, you can click on + Augment clause to insert additional fields, for enriching your clause even further.
In the Description field you can add additional internal information, shedding some more light about the context of the clause — where it comes from, how it should (not) be used, what users should pay attention to, etc.
The text in the description field will be shown above the actual legal content of the clause; this text will never be inserted into the Word document.
Finally, the Comments field should be used for secondary information about a clause. Most ClauseBuddy users treat the Comments field as a storage area for legal comments, such as references to case law and legal doctrine.
Tip: as many users will naturally gravitate towards keyword search, you may want to take the opportunity to enter interesting keywords in the filename, description and/or legal comments. For example, with respect to a "Texas shoot out" clause in corporate law, you will not typically find the words "Texas" or "shoot out" in actual contracts, i.e. the title and body of a clause will not contain those exact words. However, it is probably a very good idea to include those words in the filename or description of the clause, as your users will probably enter those keywords when searching for such a clause.
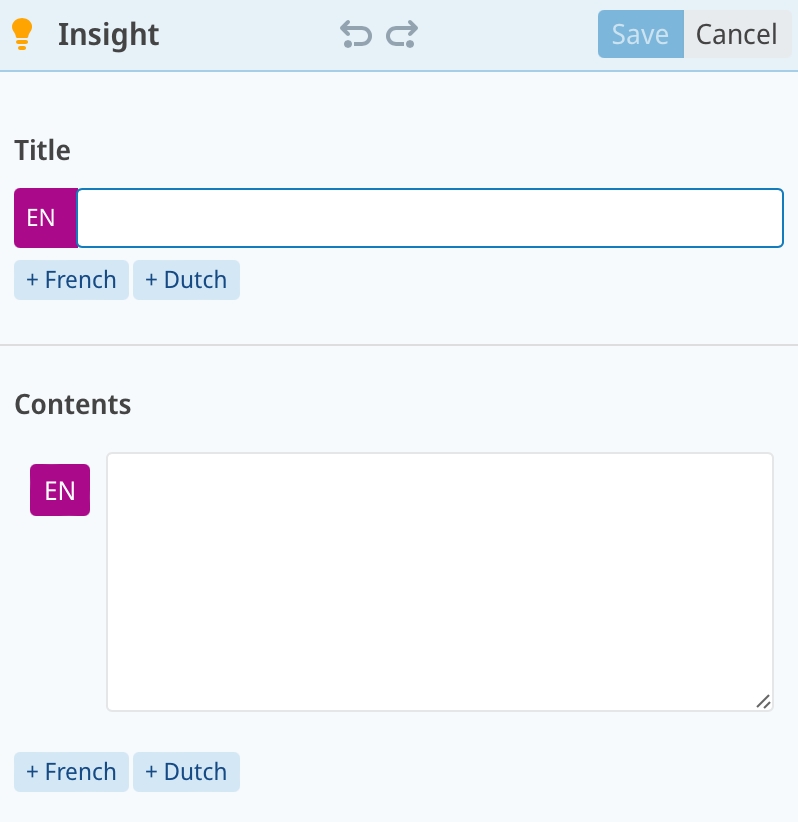
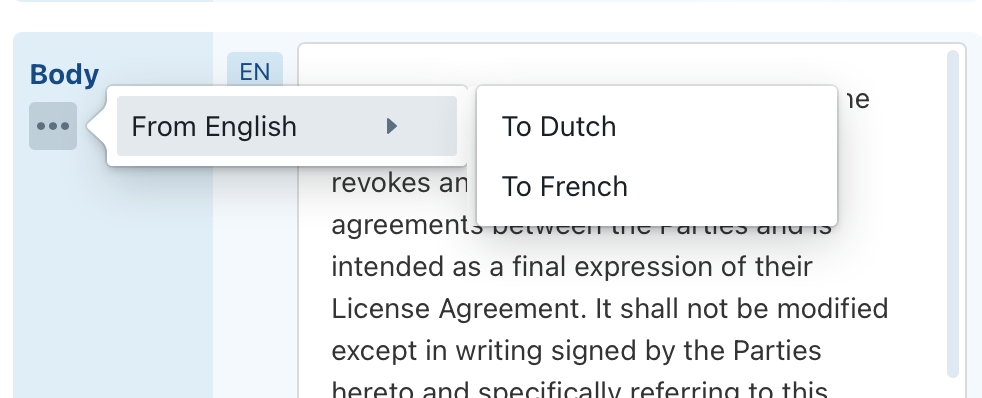
If your clause library is stored on a multilingual server (as is the case in the screenshots on this page), you will notice buttons that invite you to store translations of your legal contents.
This is an incredibly powerful feature if you work in a multilingual environment, as you can keep closely related text blocks next to each other.
ClauseBuddy will automatically propose a translation if you add a new language version of a new or existing clause. You can also use the "..." button to insert a new translation.
Machine translations have gotten much better in the last years, particularly for frequently used legal clauses. However, you should always manually review these translations, because great translations are sometimes interspersed with not-so-great fragments. Treat the machine translation as a brilliant first-year junior legal expert, who usually delights you with her work, but also makes serious mistakes from time to time — typically in a small corner of a document, where you least expect it.
Instead of adding clauses yourself, you can also appoint one or more persons in your team to take care of this task. Your administrator can appoint one or more such persons in the firm/company.
In light of the legal experience and complexity that is often required for legal knowledge management, it is actually not a bad idea to appoint such curators — in particular in larger teams, or when consistency is required.
Tip: if you are a curator, you can also send a clause to yourself. This can come in handy when you stumble over an interesting clause, but do not currently have any time to spend on the curation of this clause.
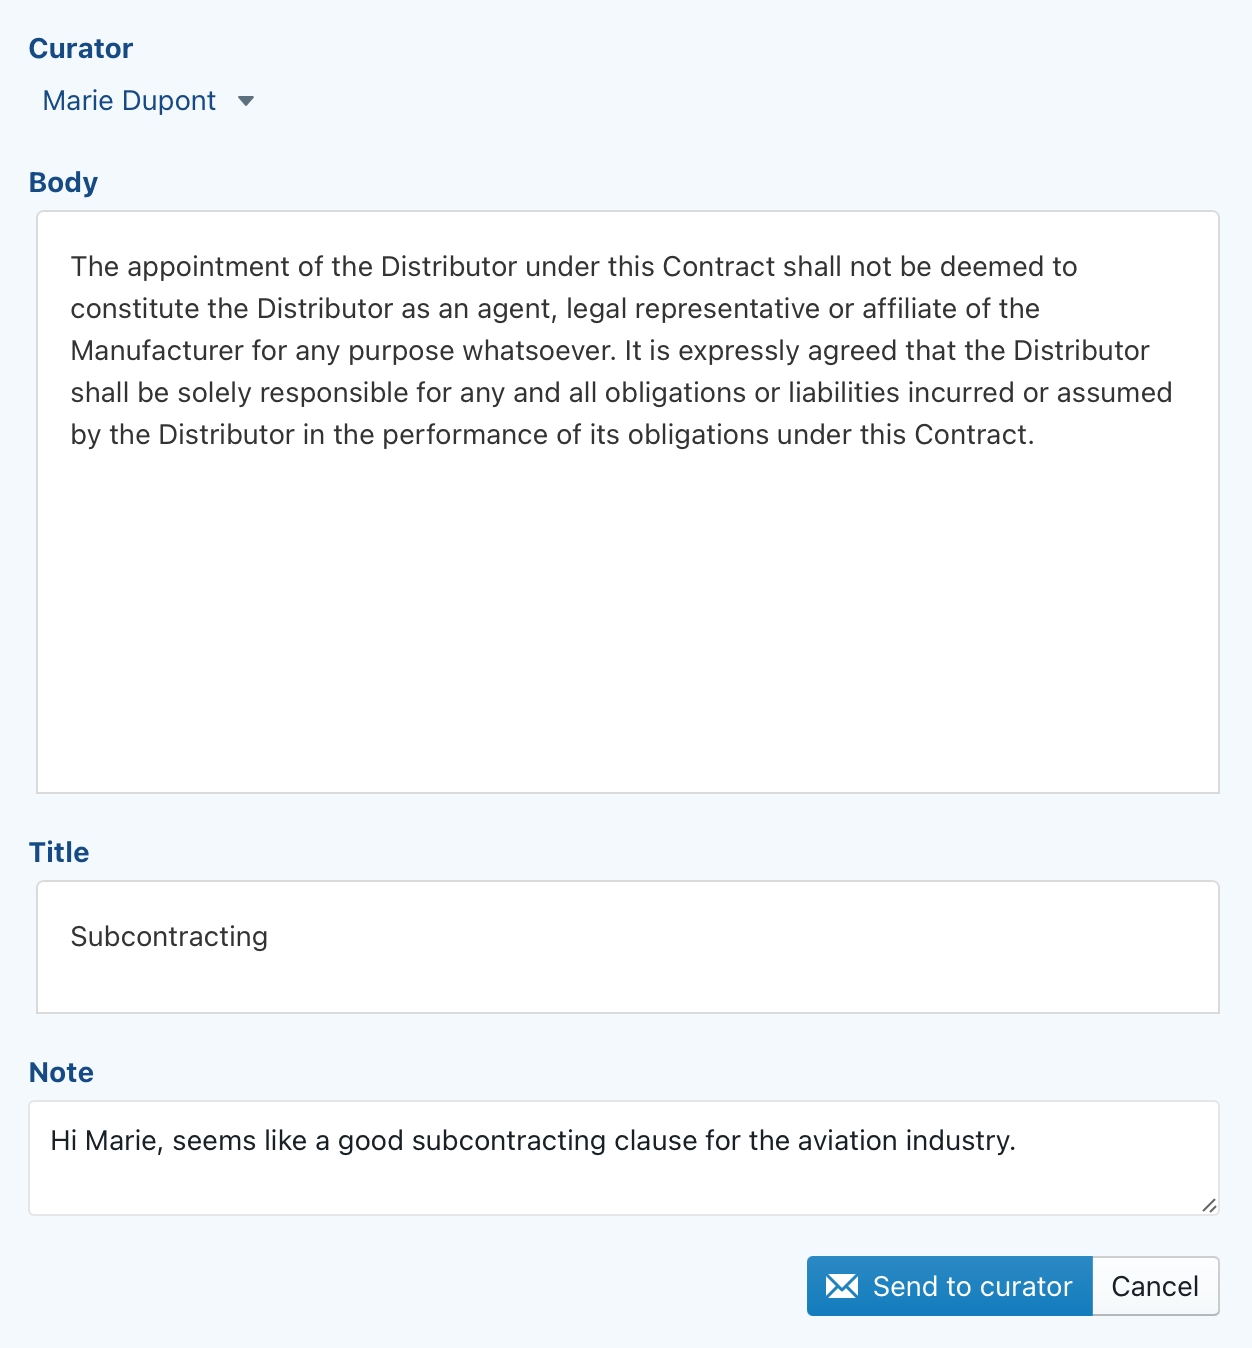
You can include a body section, an optional title and an internal note (presumably targeted at your curator).
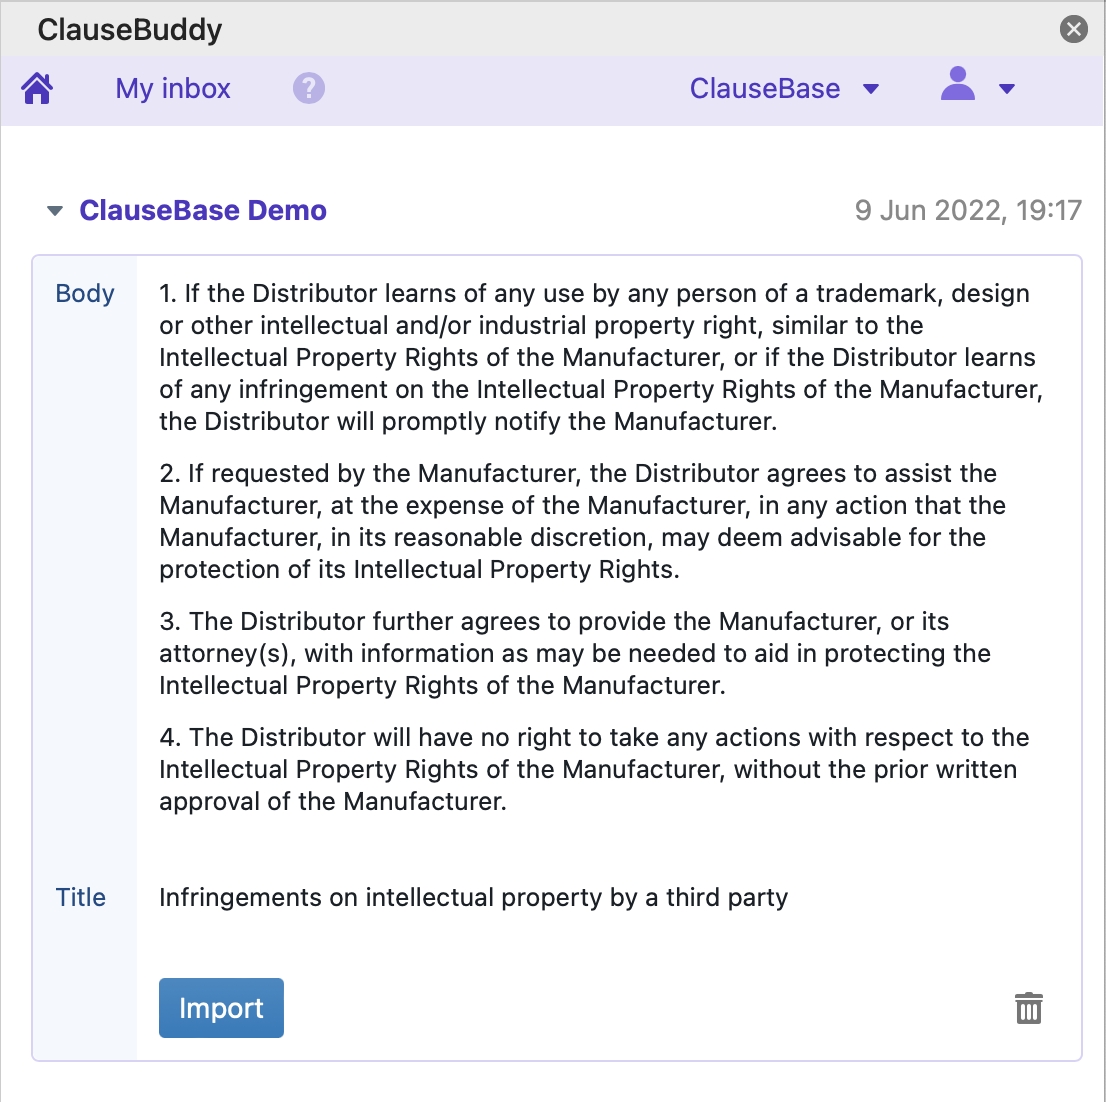
If you are appointed as a curator, then you receive the clause-related messages sent by your colleagues in your inbox.
Next time you open ClauseBuddy, the software will see how many messages are waiting in your inbox, which you can view on the home page.
When you then click on the Import button, the body and title will be imported into the clause addition dialog box described above (so from this point on, the process is identical to the situation where you would have initiated the clause addition yourself). The Note will not be imported, as it is considered a merely internal hint at the curator.
When done, you can click on the trash icon to remove the message.
If you are a curator, then you can also opt to edit clauses that are sent from within ClauseBuddy in the Clause9 environment.
This will be particularly important when you want to create dynamic clauses — e.g. clauses with automatically adapting terminology, or with conditional text.
When you click on the Import button, the title and body will be transferred to the (relevant language box in the) Content body or Content title section of the clause editor in Clause9.
When you are done adding the clause, you can then click on the trash can in the Globo panel to remove the message.
If you have the right to do so, you can edit any clause you found via any of the search/browse actions. To do so, click on found clause
You will subsequently be transferred to the clause editor dialog box described above. When you are done, you can simply click the Save button to store your modifications.
Drafting legal content in ClauseBuddy is fairly straightforward, there are just a few things to know.
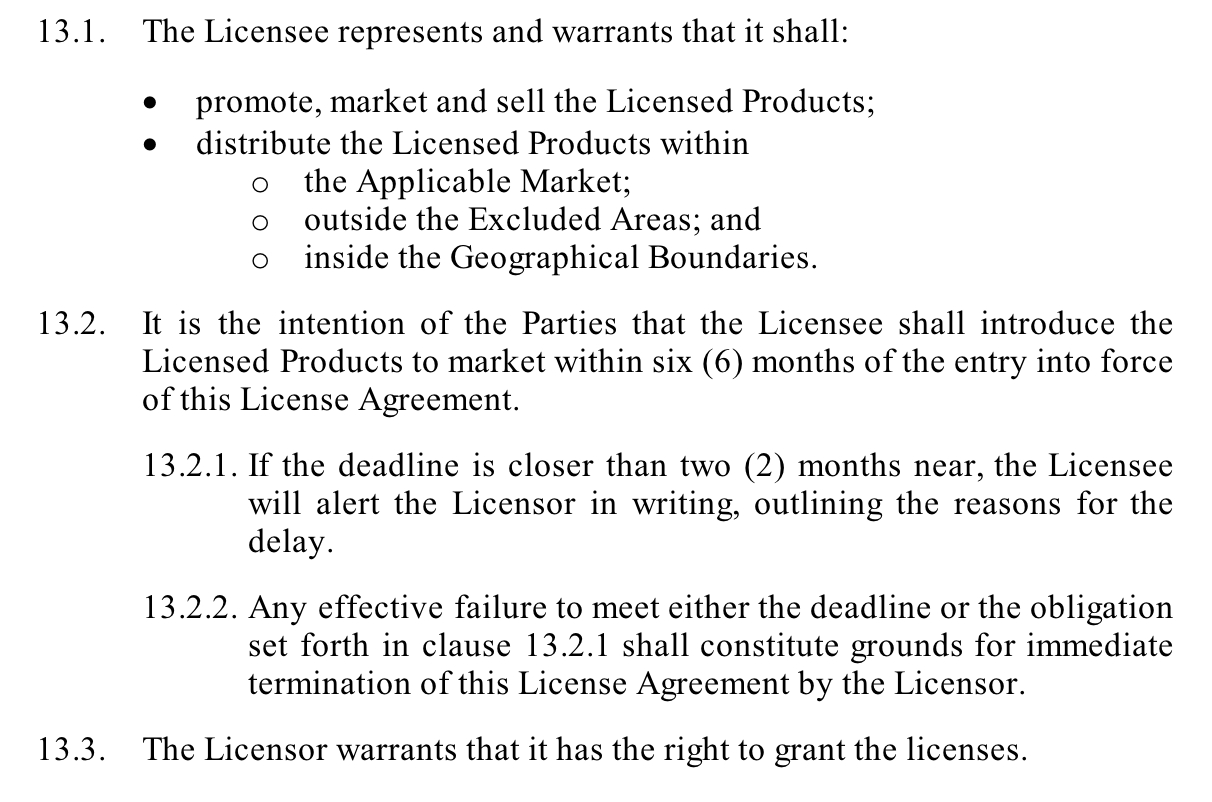
By way of example, the following clause — found in a random distribution contract — will be implemented:
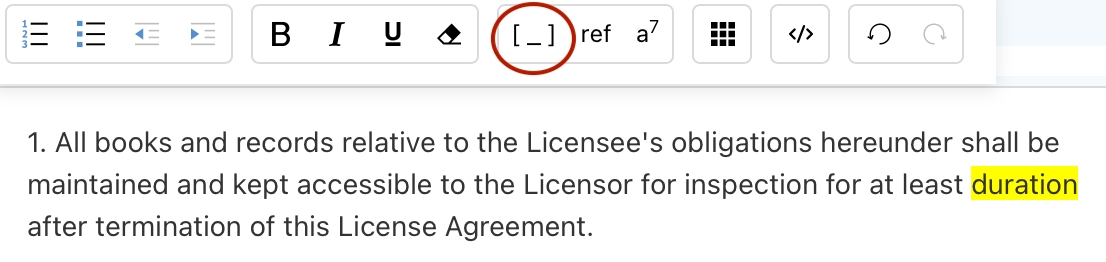
In ClauseBuddy, paragraphs can either start with a numberset (such as 1. or 1.2.3) or one or more asterisks(*, **, ***, etc).
When inserted in a Microsoft Word document, numbered paragraphs will by default get Heading 1/2/3/... style, while bulleted paragraphs will get Body 1/2/3/... style. If you have set up automatic numbering in your document, your inserted paragraps can adopt the automatic numbering. (You can, however, always request ClauseBuddy to remove the numbering before you actually insert the paragraphs into your document).
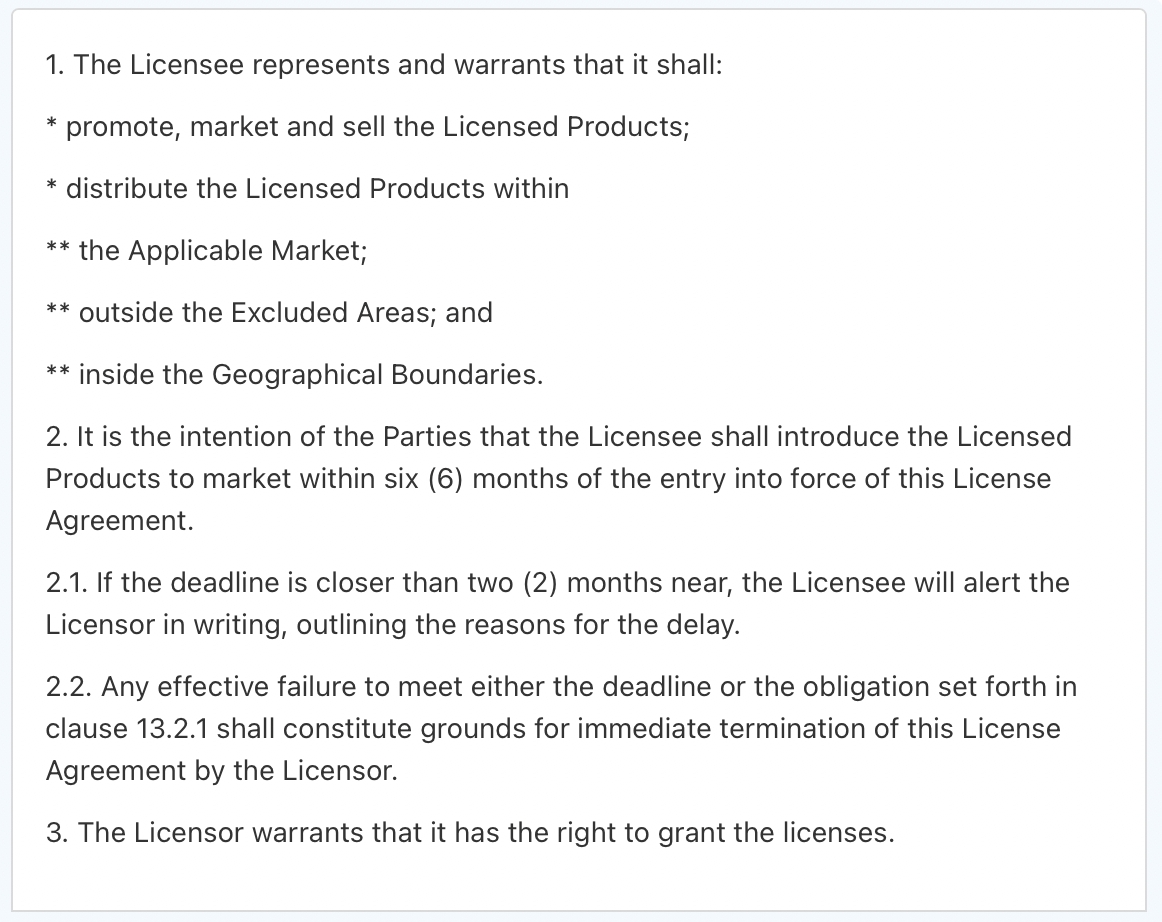
The example paragraphs above would thus become:
So notice that paragraph 13.1 simply becomes 1, while paragraph 13.2 becomes 2, and so on. Also notice that sub bullets start with a double asterisk.
ClauseBuddy can automatically detect most types of numberings, so when you pre-select content and hit the + button, ClauseBuddy will automatically convert existing numbering into 1/2/3 or asterisk-style.
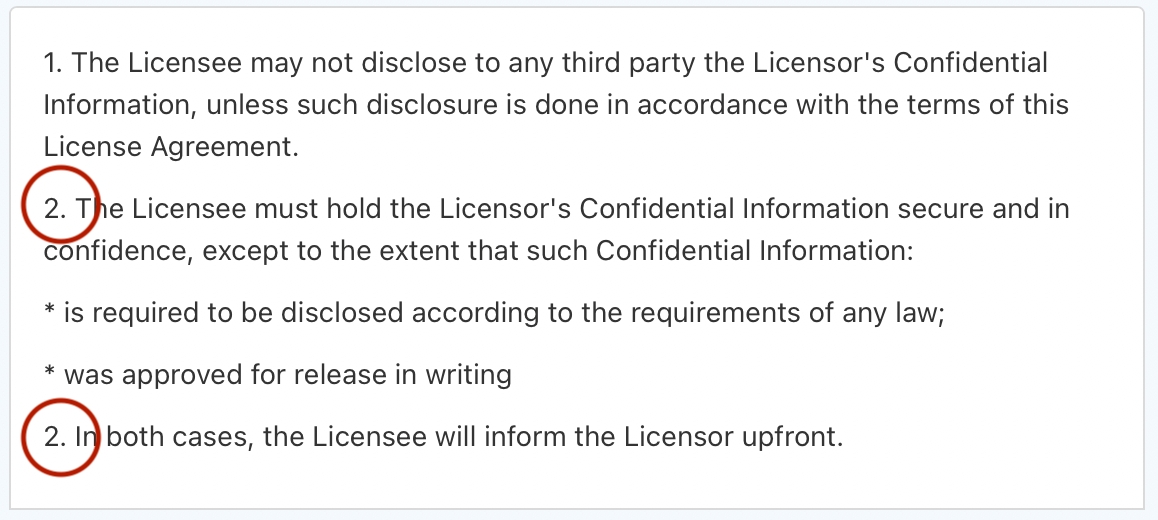
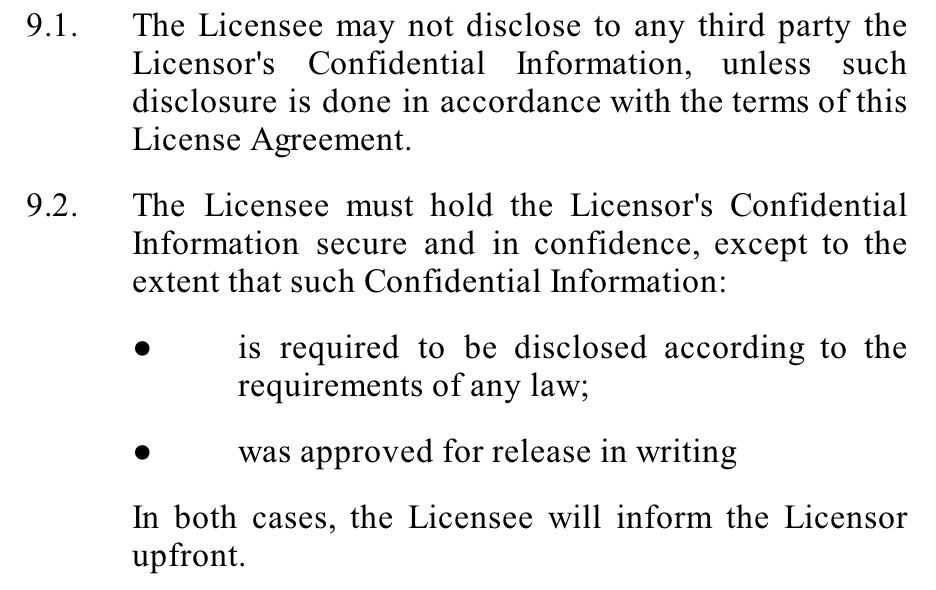
Sometimes you may want a paragraph to have the same indentation as a previous paragraph, while not receiving a certain number/bullet. For example, the last paragraph of 9.2 in the example below (In both cases...) is positioned at the same indentation level as the first paragraph of 9.2(The Licensee must hold...).
To store such structure in ClauseBuddy, you simply repeat the number of the first paragraph:
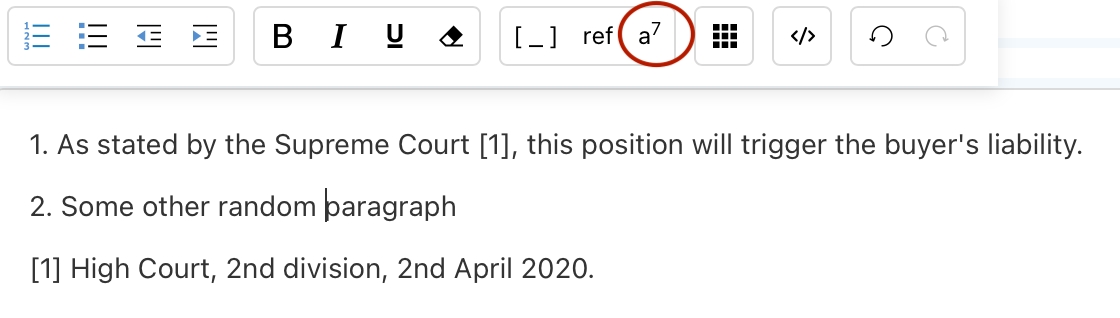
When you insert your cursor into the body or title section of a clause, a toolbar will automatically appear that allows you to apply numbering and formatting.
The leftmost button allows you to apply / unapply a number to a paragraph, while the second button allows you to apply / unapply bullets.
The third and fourth button cause paragraphs to be indented or unindented.
Unlike Microsoft Word, the paragraph(s) will not actually indent physically — instead, the numberset or the amount of bullets will change.
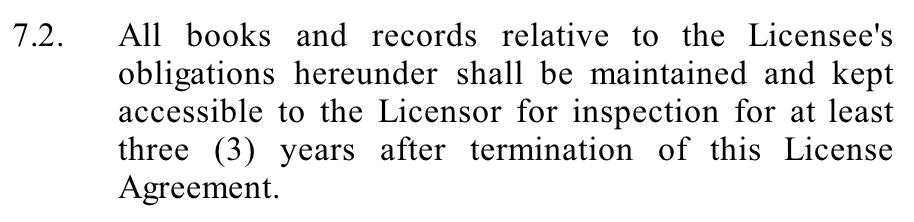
Inserting a placeholder is as simple as selecting some predefined text, and clicking on the placeholder button. For example, instead of "hard-coding" the duration of three years in the screenshot below...
... you can select the duration and click on the placeholder button. The text will then get a yellow background, indicating that it has been turned into a placeholder.
In a full-document automation context — such as in Clause9 — cross-references can be automatically kept up-to-date.
Conversely, in a clause-based product such as ClauseBuddy, cross-references will need to be manually changed by the user. In order to alert the user that references will need to be manually changed, you can mark the reference in pink by clicking on the ref button.
When inserted into a document, the text will also be printed with a pink/fuchsia background, to draw the user's attention.
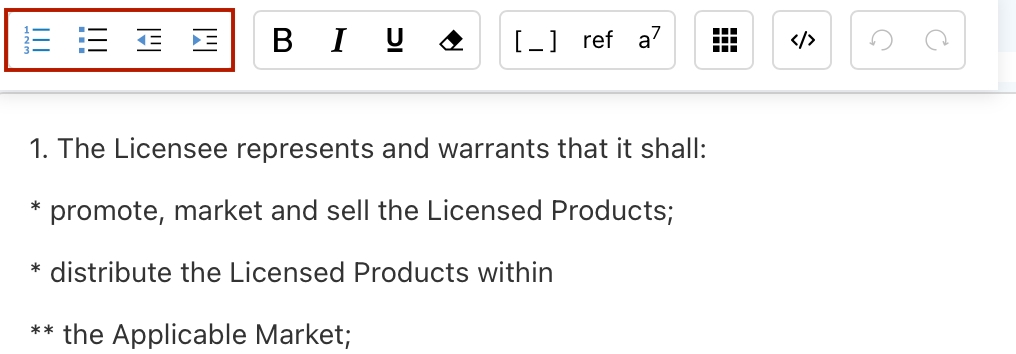
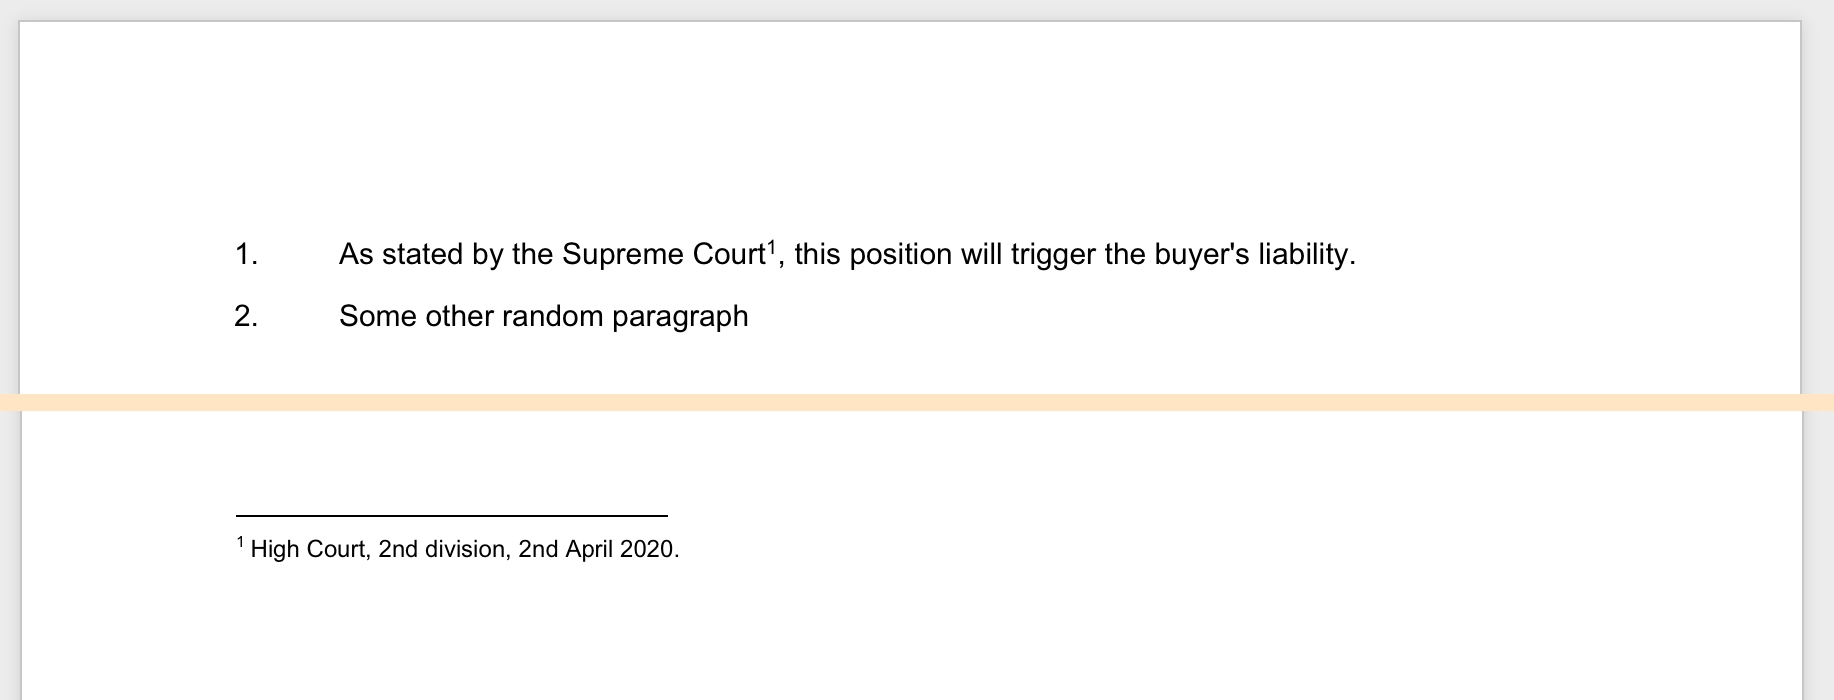
You can insert footnotes by clicking on the dedicated button in the text toolbar. Footnotes should be positioned at the bottom of the clause within ClauseBuddy. Upon insertion in the MS Word document, they will get automatically inserted in the footnote section of the document.
Result in Microsoft Word:
You can also insert footnotes without using the footnote button. Simply insert a number within square brackets in a paragraph, and repeat that same number at the bottom of the clause.
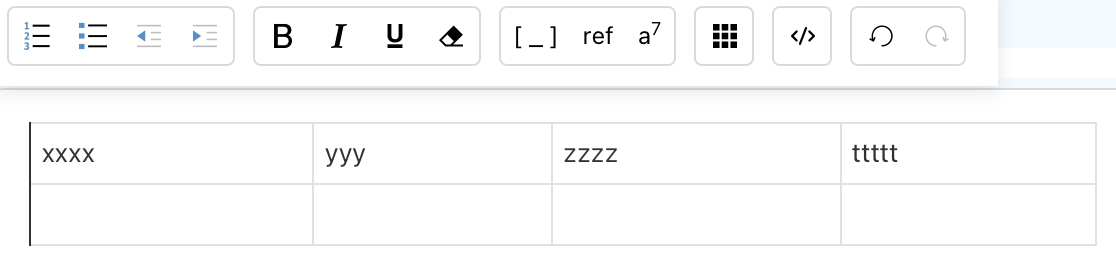
You can insert tables by clicking on the table button in the toolbar and choosing the number of rows and columns. After insertion, you can perform typical table-related operations (such as merging or splitting cells, inserting or deleting rows/columns, etc).
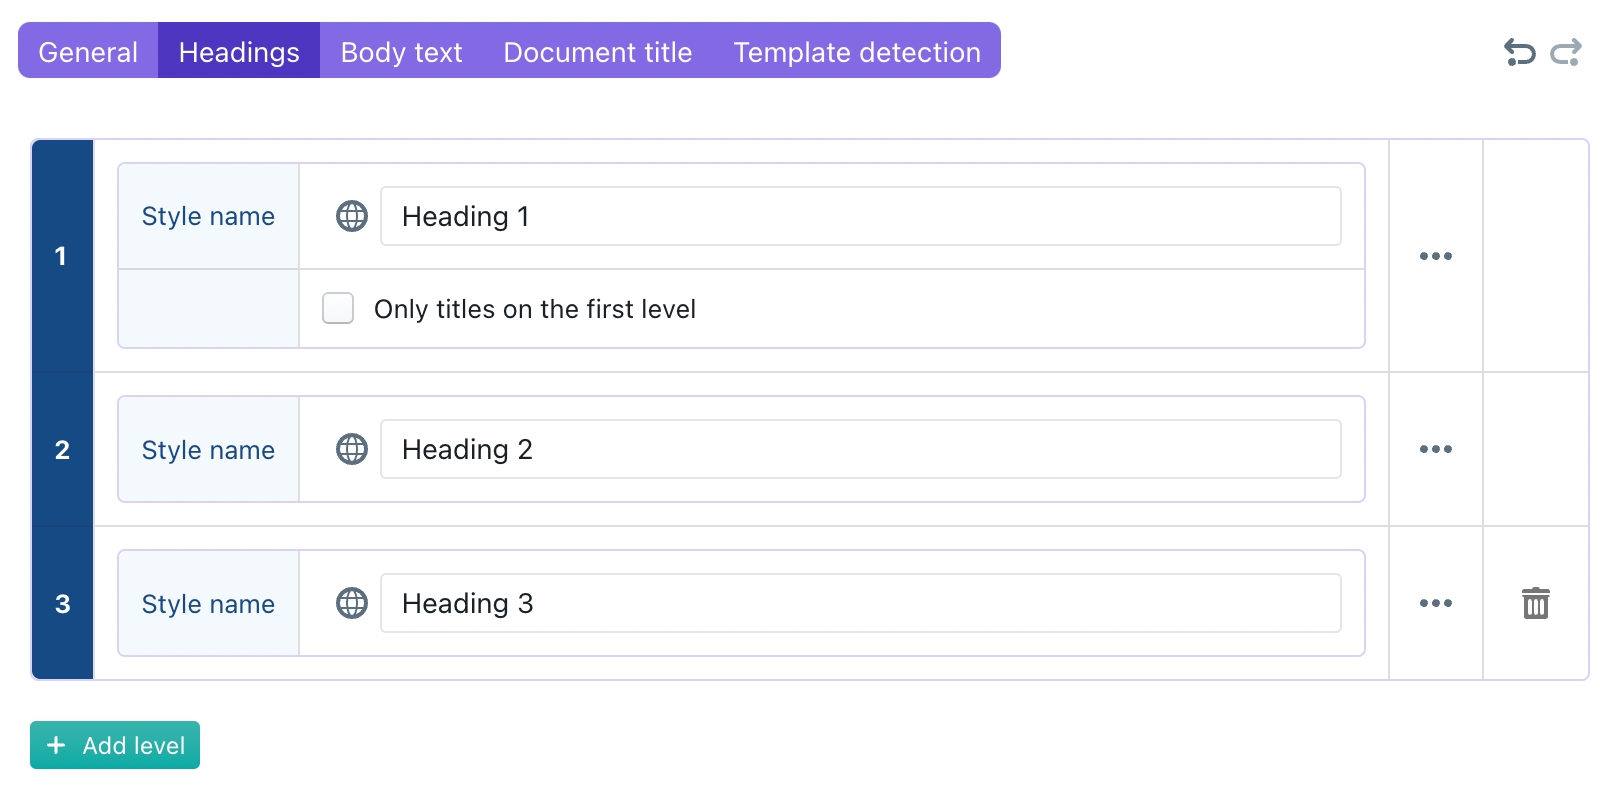
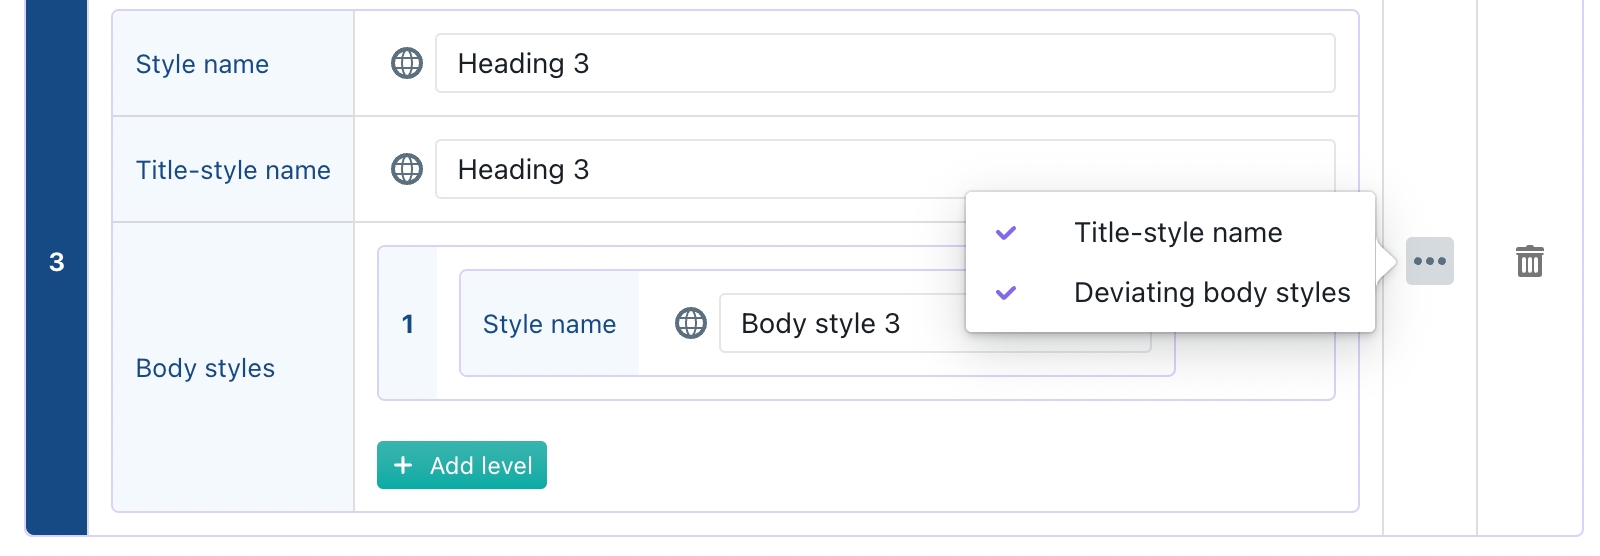
In the Headings pane, you can map ClauseBuddy's nine levels of "Heading x" and "Heading x Title" styles to your own style.
You can add a new level by clicking on the green "+ Add level" button.
You can delete the last level by clicking on the trash can icon at the right/
Many different house styles will always have a style that looks like a title on the top level (i.e., they don't allow plain heading styles at that top level). If such is the case then, check the "Only titles on the first level" option: it will only allow clauses with titles at the first level, and will force clauses without a title to use the style at the second level (Heading 2 in the screenshot).
When you click on the "..." button at the right, you can show additional options for ach level
For each level, you can optionally assign a different MS Word style name for the title style. (If such separate title style name is missing, then the same MS Word style will be used for headings and heading titles on that level.)
For each level, you can assign up to nine different MS Word styles for body paragraphs (bulleted or not) below that level. If no such separate body styles are assigned, then ClauseBuddy will use the general MS Word styles for body paragraphs that are assigned in the Body text pane discussed below.
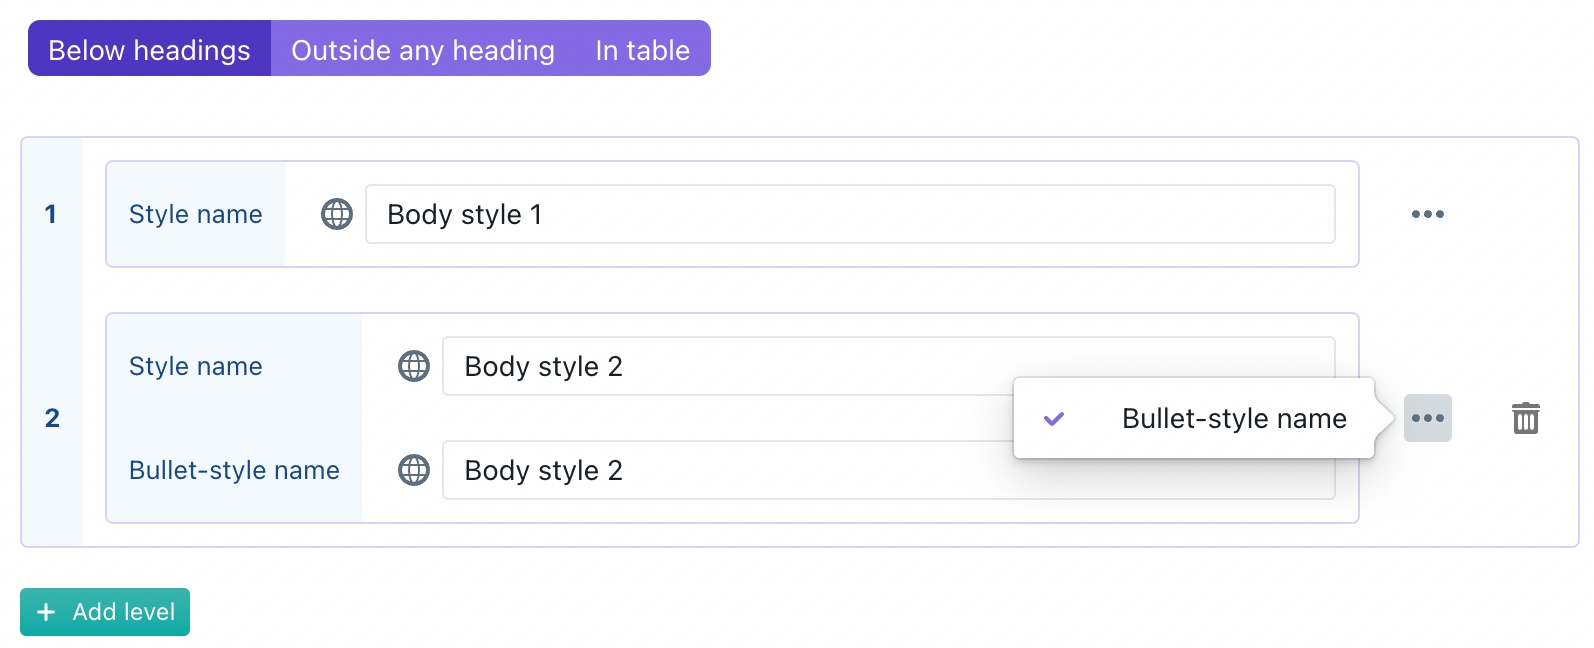
In this pane, you can define which MS Word styles should be assigned to body paragraphs (whether bulleted or not).
This pane contains three different sub-panes (Below headings, Outside any heading and In table) that all work identically.
The Below headings sub-pane covers the general styles that will be used for body paragraphs, if no special setting applies. Such special setting would apply when a body paragraph is situated below a heading level that has its own deviating body styles (as indicated in the Headings pane), or when the body paragraph would be situated outside any heading, or in a table.
The Outside any heading sub-pane covers body paragraphs that are not situated below any heading or title, i.e. body paragraphs that are situated at the top level (or below some other body level that is not situated below some heading or title).
The In table sub-pane covers body paragraphs situated within a table.
For each of the levels, you can optionally specify that bulleted paragraphs should be assigned a different MS Word style, by clicking on "..." at the right side and choosing "Bullet-style name". If no such different style is chosen, then both bulleted and non-bulleted body paragraphs will be assigned the same MS Word style.
The filtering pane primarily shows all the that you associated with the clauses you found — such as the length of a clause, its level of formality, the industry sector it is written for, the party position (e.g., favouring the customer, or instead favouring the supplier), and so on.
When searching in Clause mode, you will also see a brain-like button that allows you to filter your clauses using Artificial Intelligence. This mode of operation is .
In addition to changing terminology, you can also change the contents of placeholders (technically called "datafields") right from within ClauseBuddy. A is outside the scope of this manual, but essentially datafields are super-placeholders that allow you to dynamically change clauses. For example, they allow you to only show a certain bullet if the contract value is above a certain threshold, or hide a part of the sentence if arbitration in Paris would be chosen.
If required, you can explain that . Unlike the old generation of add-ins (which install their tentacles into the brains, guts and nerves of Word), next-gen add-ins such as ClauseBuddy are . They consist of so-called "JavaScript code" (instead of 32/64 bit executable files), and are executed by MS Word's internal web browser. This is also the reason why ClauseBuddy works in Word for Windows, Word for Mac and even Word Online.
But it is a matter of time before the old style plugins will disappear. Already, the very newest version of Outlook for Windows no longer supports the old generation of plugins: see . You can expect that newer versions of Word & Excel will suffer the same fate.
Deployment through a
As a fallback (e.g., because for some internal reason the access to the Microsoft Store needs to be blocked) some companies and law firms use the technique of "sideloading" as a fallback.
You may also check out for community-based questions.
A somewhat older
, including a very nice and detailed
, detailed instructions
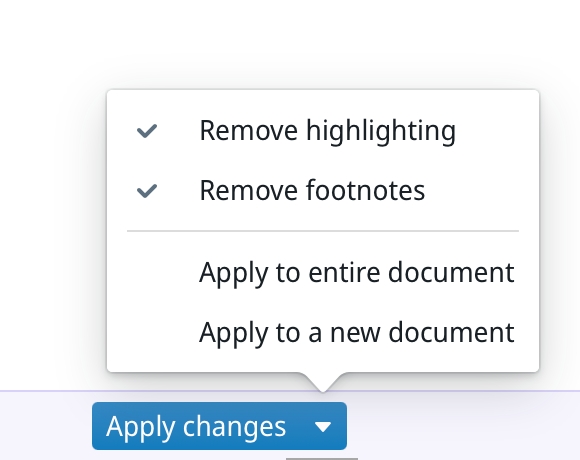
When you click on the big plus-icon (+) in the left corner of a clause, a dialog box appears where you can configure this clause's content and appearance. You can, for example, hide the clause's title (useful when you don't need a subtitle to be inserted), remove the numbering of the clause, remove any footnotes and .
Finally, the Attributes field allows you to store and manage legal metadata regarding a clause — e.g. from which party's perspective a clause is written, how nuanced it is, whether it is treated as the organisation's standard clause, etc. Read all about it on our .
In the Extra keywords field you can add additional keywords on the basis of which this clause should show up as a result when .
You can find clauses sent to you by opening the , accessed from the button in the top-right corner. Next, you have to click on the "Curation" subpanel on the left side.
The placeholders can actually be configured in pretty cool ways, allowing you to select from predefined values. Checkout the !


Simple clause libraries only allow you to store plain blocks of text, and require you to manually apply styling once text is pasted into a document. ClauseBuddy allows you to easily store clauses together with their internal structure — title, headings, subheadings and bullets — and can ensure that such internal structure is respected when clauses are pasted into an MS Word document.
ClauseBuddy incorporates "layout-awareness", which means that ClauseBuddy will do a lot of complex calculations under-the-hood to figure out the styling of your currently opened Word-document, and tries to make your clause fit in there, without you having to do anything.
About 80% of the time this automatic styling works correctly and there is no need for custom styling. In other words, you can probably skip this entire section about custom styling.
However, many legal documents have mediocre to even very poor technical layout quality, so ClauseBuddy is facing an impossible task and may fail. Furthermore, it may be the case that you have very special inhouse layouts or templates, for which you want to provide better layout guidance.
For these situations, you can configure custom styles in ClauseBuddy, that will take precedence over the automatically calculated styling. Once your house style is properly implemented, (almost) perfect layout results are guaranteed when you paste clauses into documents conforming to that house style.
Implementing this custom style / house style in ClauseBuddy is, on itself, not difficult, but requires a deep understanding of how styles and templates really work in MS Word. In our experience, few lawyers really master this area, and tend to simply use whatever styling happens to be available in a template.
Your house style is implemented by manually mapping every layout option in ClauseBuddy to your house style's layout structure (further called a "style scheme"). You can even store multiple style schemes, e.g. one for contracts, a separate one for legal briefs and yet another one for formal letters.
Optionally, you can also offer the software identification clues for your style schemes, so that the right one will be pre-selected when the user opens ClauseBuddy from within such a template.
All users of your organisation will automatically receive a copy of your style schemes (as well as any updates to it) when they load ClauseBuddy with an account linked to your organisation. These style schemes are then stored locally within MS Word's configuration and are automatically applied when there is a match between the currently opened document and some loaded style scheme.
Note: the "Clause9" style scheme is automatically loaded by the system without users having to configure anything. It applies to documents created with Clause9.
See Settings > Styles. Note that only administrators can configure custom styles.
Once configured, the house style will be automatically applied when there's a match with a template through the template detection. Also clauses inserted through Truffle Hunt will make use of the house style in such situation.
ClauseBuddy (and Clause9) offers a refined layout structure, that is probably be much more flexible than your house style in some areas.
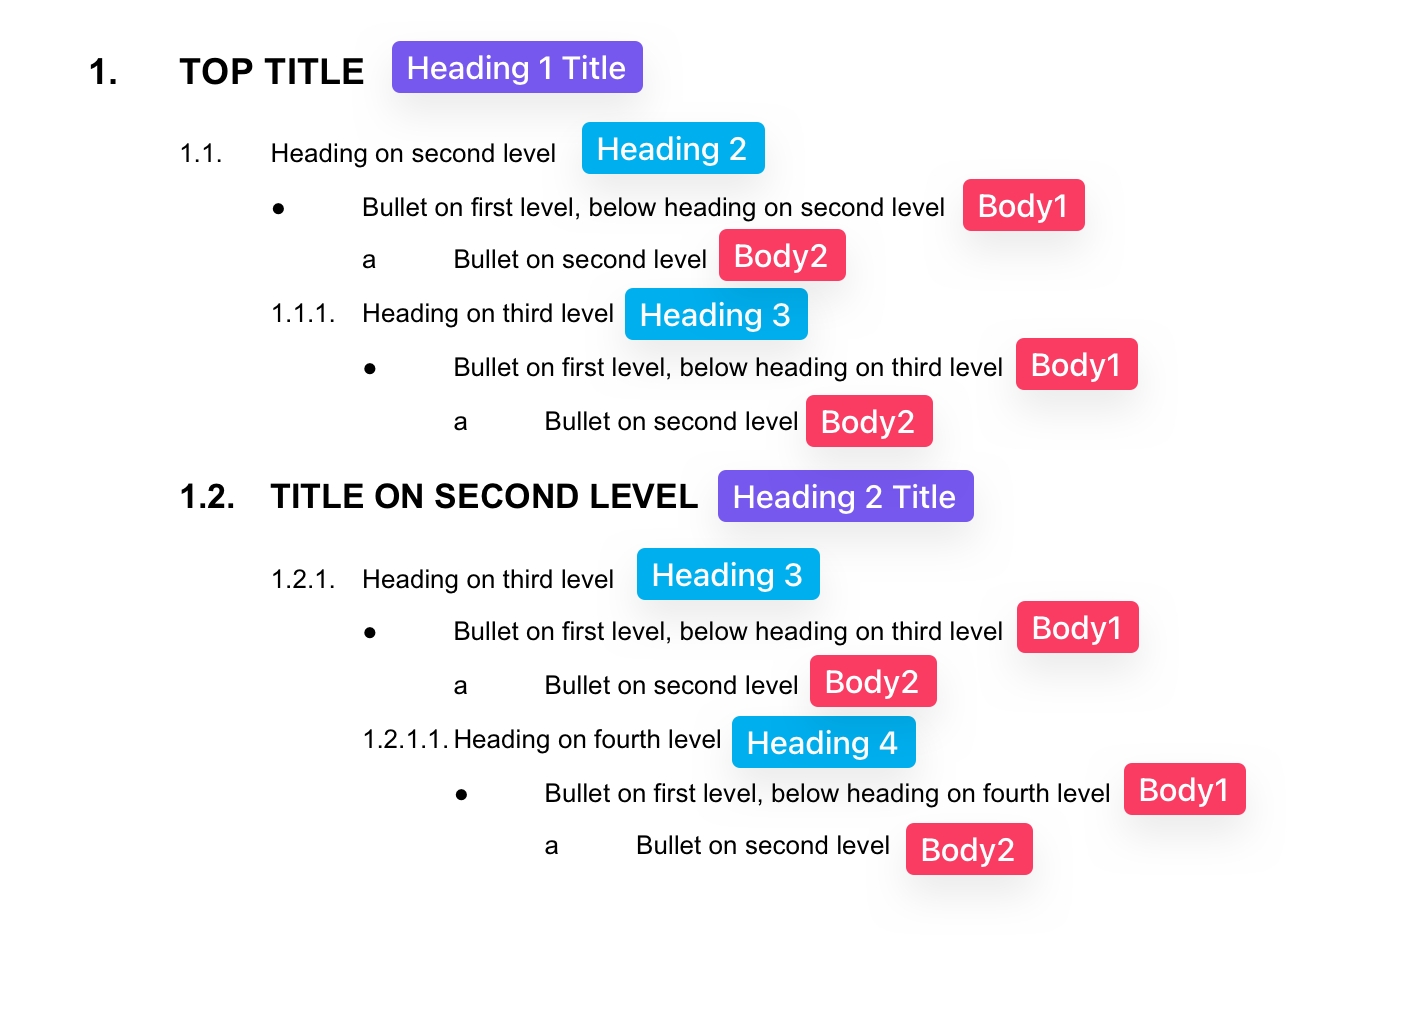
Essentially, the ClauseBuddy layout structure is subdivided into nine different levels. On each level, you can encounter a title style (typically bold and/or coloured), a heading style and up to nine different body styles. Each title and heading can have a number, while each body paragraph can optionally have a bullet. Finally, there is also a separate style for the title of the (sub)document itself.
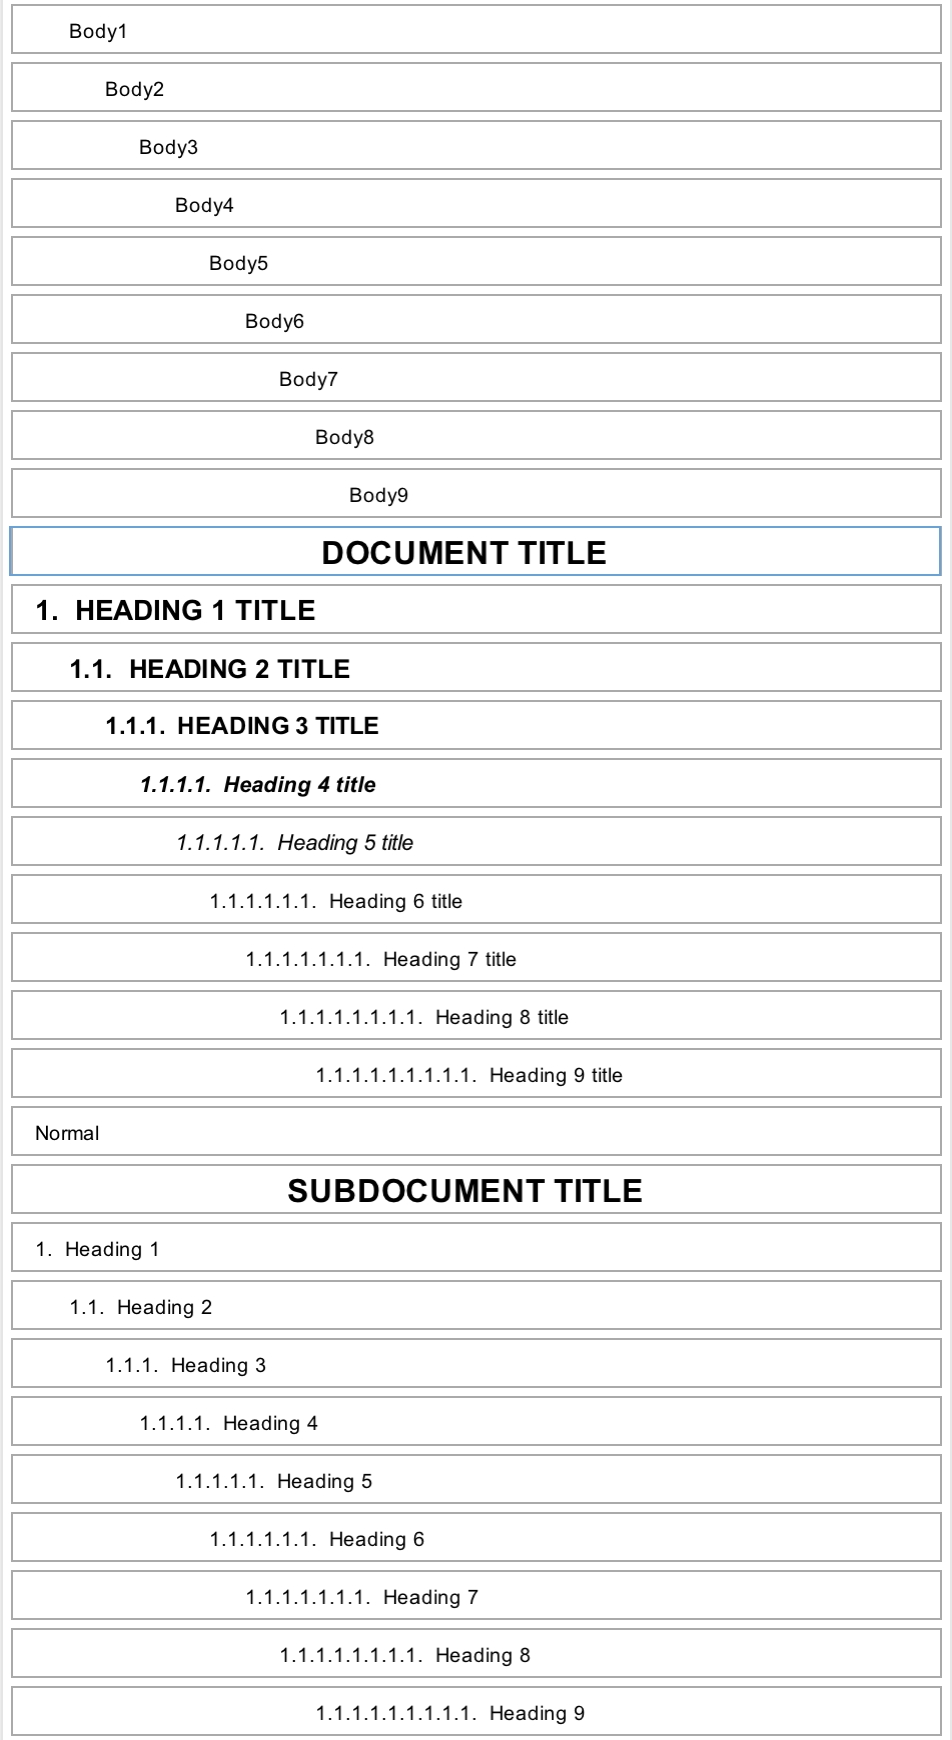
ClauseBuddy's Word style structure thus look as follows:
Note that the set of nine body styles is used below each of the title/heading styles, although the indentation can differ. The underlying idea is to have a consistent approach towards bullets, so that if (for example) the first level of bullets is a filled circle and the second level of bullets is (a) (b) (c), those two types of bullets are always used in such way, whether below top-level titles/headings, or instead sub-sub-sub titles. Example:
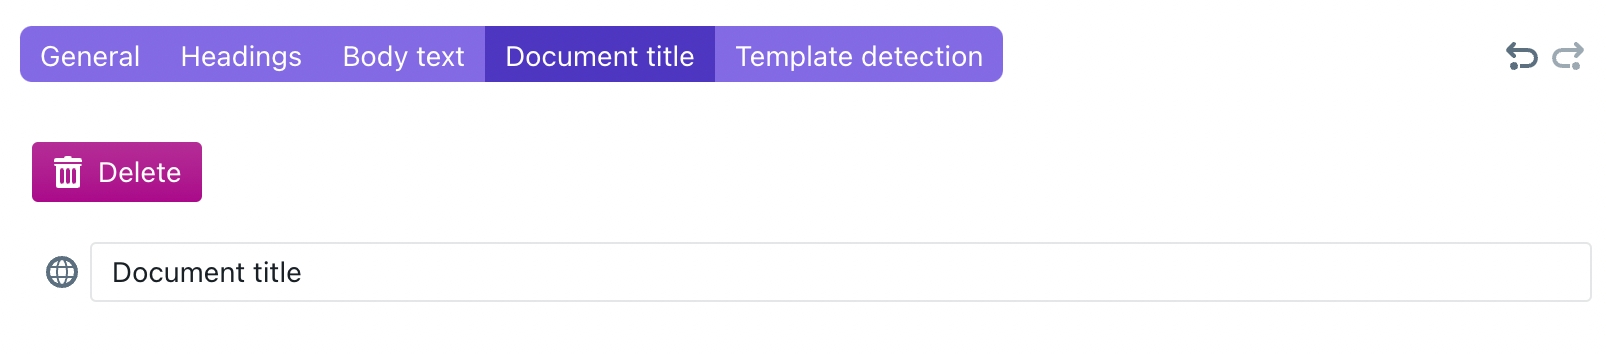
In the Document title pane, you can specify the MS Word style that should be assigned to (sub)document titles.
ClauseBuddy allows you to insert simple placeholders using the toolbar.
In their simplest form, these placeholders will turn up as text with a yellow background within your MS Word document.
But that's only the beginning. Read on for all the options you can play with!
Instead of simply inserting a clause into your MS Word document, you can also configure it by choosing the Configure clause option of the dropdown-menu:
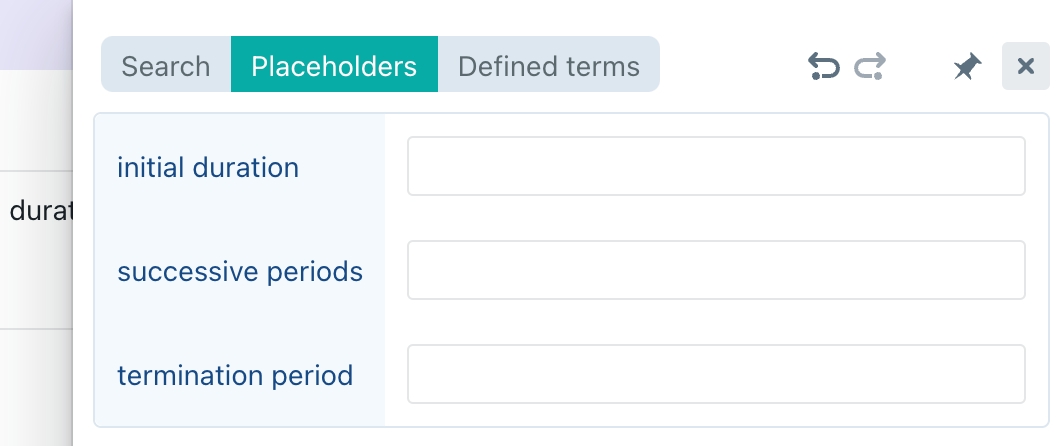
You are then taken to a separate dialog box, where the placeholders are grouped together, either at the bottom of the window (when there's not a lot of horizontal space), or at the right (when ClauseBuddy has sufficient horizontal space):
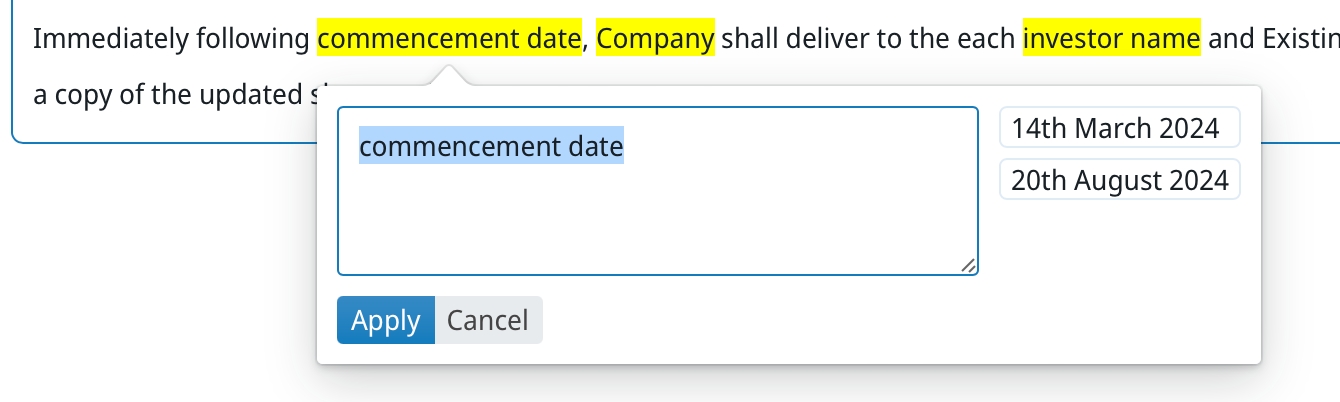
You can then click on a placeholder to enter a value. You will notice that the placeholder gets replaced by the value you choose. Click on the trash-can icon to remove the assigned value again.
Anywhere you use exactly the same placeholder in your clause, it will be replaced by the same assigned value. This is one of the most powerful features of the placeholders, as the placeholders will then act as a kind of super-fast "find & replace".
For example, suppose you have the following clause:
When you then configure this clause, you will notice that only three placeholders are shown in the placeholders-panel:
When you fill in any of those placeholders, you will notice that all of the instances of that placeholder will be immediately replaced by the text you typed in. For example:
If you frequently assign the same text to the same placeholders, you may want to consider adding those texts in the placeholder itself. You can do so by putting a pipe-symbol (vertical line) between the various options. For example, when you use
Then ClauseBase will show you the following options in a dropdown-menu:
You can then simply click on "Mr." or "Mrs." to choose that predefined option, or alternatively type in some custom text in the box at the bottom.
You can even use two level of options, by inserting sub-options within square brackets after the name of your main category. For example:
... will then be presented with submenus, as follows:
ClauseBuddy will remember the values you assign to each placeholder. Once you assign some text to a placeholder in one clause, it will automatically show up in other clauses that use the same placeholder.
ClauseBuddy will not only remember the value while it is loaded on your screen, but will also store that value in the "properties" (metadata) of your DOCX-file. This means that next time you open the document, it will remember the texts you assigned to the placeholders.
As always with Clause9, the custom styling configuration can be applied to all the users (customer-wide), or per group, or even per user.
Have a look at the available options on how you can stylize the placeholder:
And all colours are at your disposal:
In other words, don't be afraid to involve your organisation's (internal or external) MS Word expert to implement your house style in ClauseBuddy. We also offer and support on a consultancy basis, please check our .
Under the hood, ClauseBuddy relies on the powerful Clause9 drafting engine, which allows many types of customisations. If you have access to Clause9 (or can involve someone who has access), then you can to have a different background-color and/or use a different style of placeholder when inserted. (It will still show with a yellow background, but once inserted into your MS Word document, it will look differently.)
If you want even more automation, then you probably want to turn to document automation, using the feature of ClauseBuddy. And if that's not enough, you can also use the enormous power of Clause9 to create highly dynamic, multi-lingual clauses. Those clauses will then be available right from within your clause library in ClauseBuddy, ready to be customised and inserted into your MS Word documents.


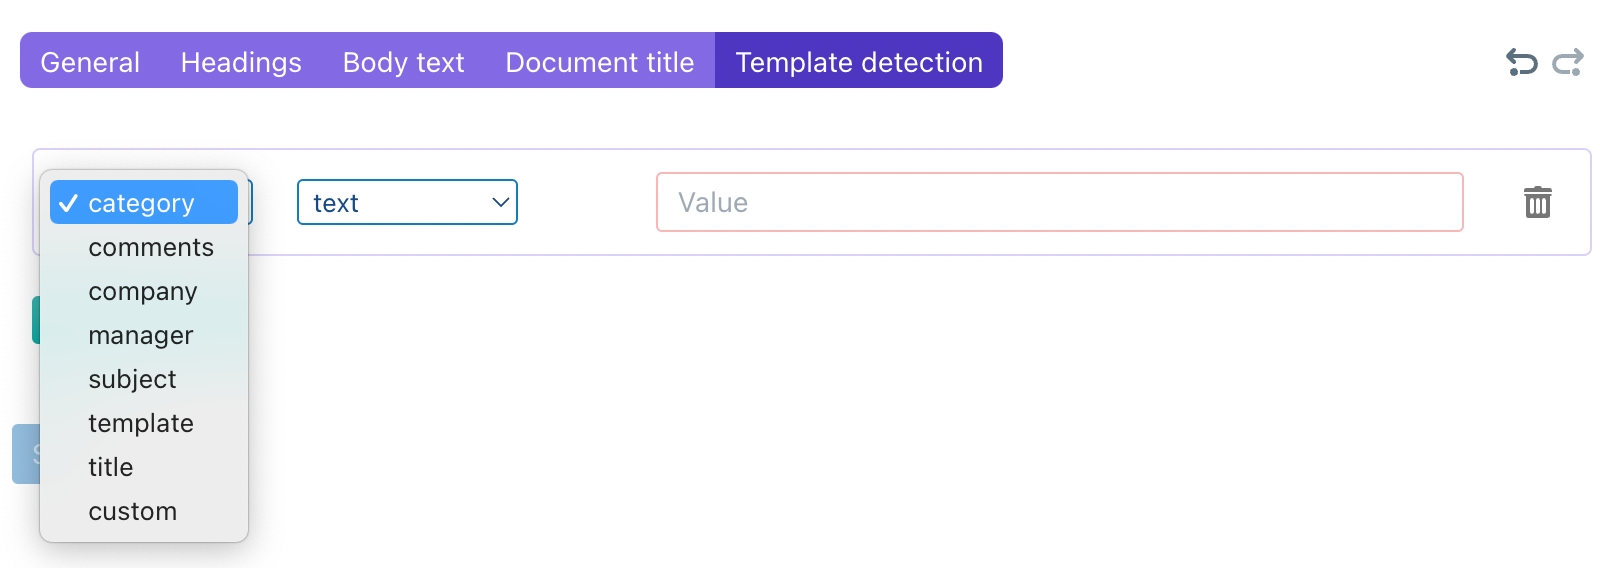
Once a style scheme is configured, you can optionally assign a "detector", that will apply that style scheme if the associated template is detected.
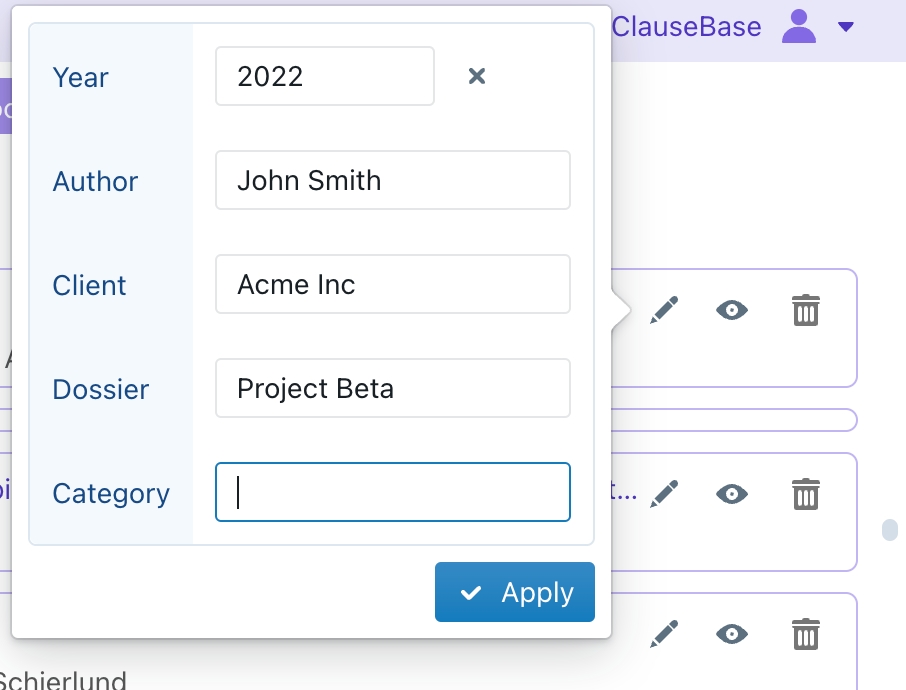
The detector uses the information within the metadata of a DOCX file, i.e. the information available in the file's Properties.
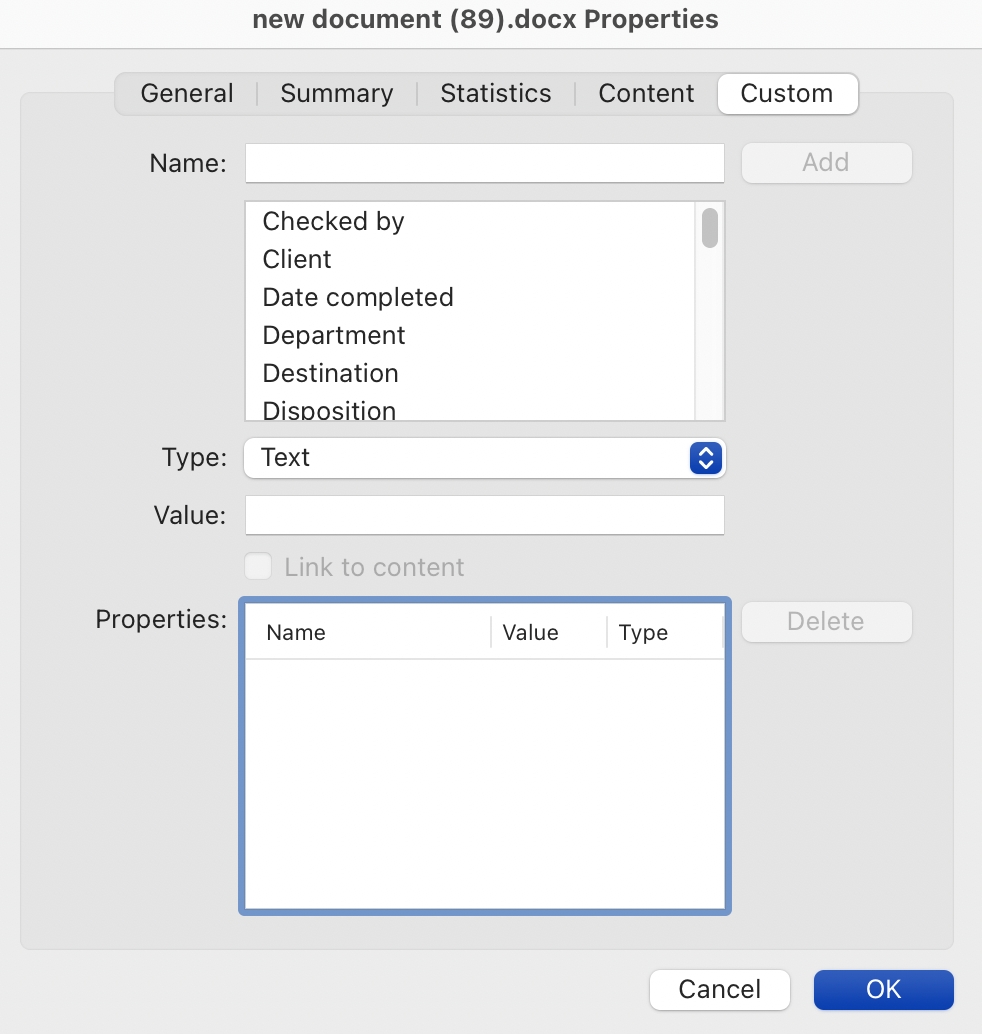
In the first dropdown list, you choose the metadata type. Except for "custom" (discussed below), those fields correspond to the fields availble in the "Summary" pane within the MS Word properties dialog box:
The custom option corresponds to the contents of the "Custom" pane of the same dialog box.
For example, documents generated with Clause9 contain property "SX-version", with some text indicating the current version (usually "101").
In the second dropdown list, you can specify how the text should be recognised:
If you choose text, you will match the value specified on the right side with the entire contents of the text field. For example, if you would specify "Alpha Beta" as the text value for the "Subject" field, then ClauseBuddy will select the style scheme if a DOCX file contains "Alpha Beta" in its metadata subject field. Conversely, if a DOCX file would contain "Alpha Beta Gamma" or "XXX Alpha Beta", it would not match. (Leading/trailing spaces and capitalisation are, however, ignored.)
If you choose partial text, then there will be a match as soon as the text value specified is found as part of the value in the DOCX metadata. For example, value "Alpha" would match DOCX metadata "Alpha Beta Gamma" or "xxAlphayy".
If you choose regex, then there will be a match based on so-called regular expressions, while partial regex would perform a partial match with such regular expressions.
You have added a clause to your library and saved it in a folder. Now you want to move the clause to another folder.
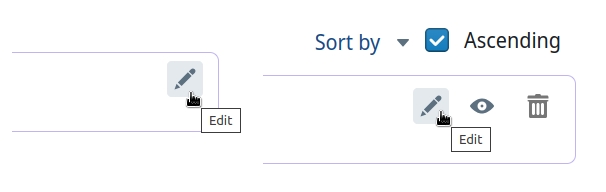
Navigate to the clause you wish to move and click on the “edit clause” icon:
Afterwards, you can choose a new location under “Location” and then save this change:
Regular expressions are very powerful validations, that allow you to perform advanced matches, e.g. "match text that starts with "x", is then followed by at least three different letters, is then not followed by a number or by a slash, and ends with at least two underscores".They are written in a standard mini programming language that defines what a piece of text should look like. There are many websites online that allow you to learn about, and interactively experiment with, these regular expressions. A good example is (the regex “dialect” used by Clause9 is the JavaScript Regex). Many introduction tutorials exist — see, for example, .
Purple clauses are those created in ClauseBuddy, green clauses are those created in Clause9 (another software we offer). Both are visible and usable in ClauseBuddy.
Do note that only the purple clauses are editable in ClauseBuddy.
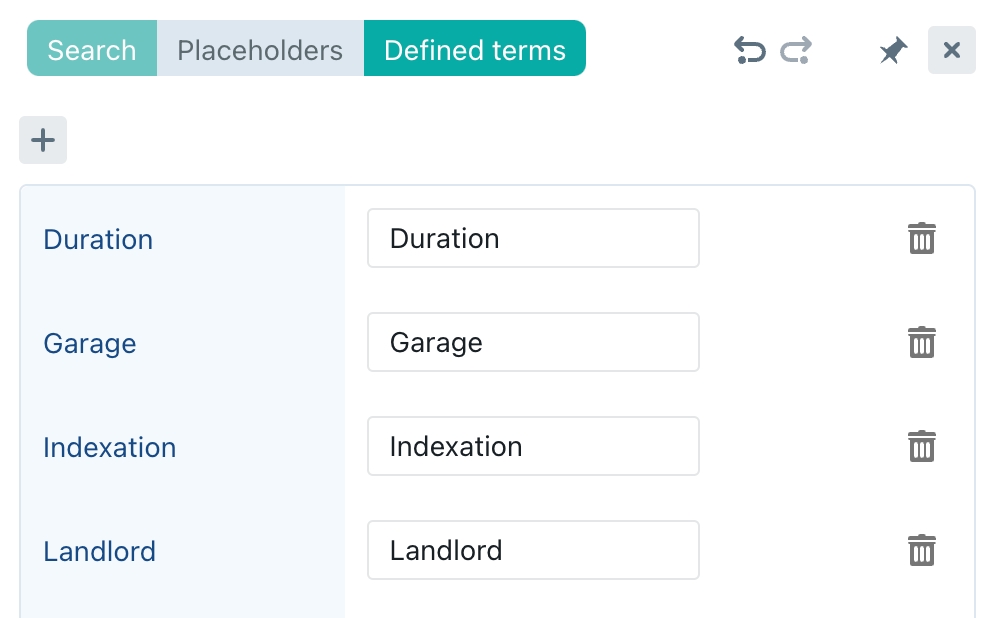
This is because only the attributes assigned to the clauses in the Library are displayed. For example, if there is no clause with the term ‘Termination’ that has a ‘length’ attribute, it will not be visible.


In the user settings, go to “Manage folders”:
Next, click on the folder whose name you want to change and click “Rename”:
NOTE: if you cannot see the “Manage folders” menu, ask your Administrator to enable this functionality for you.
When you add a clause to your library and you don't have an existing folder to save your clause, you can immediately create a new folder when you assign a location. Click on the location button and select the folder under which you want to save your clause and click on the three dots:
And then click on “New folder”:
Navigate to the clause you wish to insert. Click on the clause in the library and click on the plus-icon in the upper left corner.
Click on "Configure clause":
Now you can click on the text with a grey background (on the bottom) to complete any placeholders:
Do note that you first have to mark the placeholders as actual placeholders. This can be done when creating/editing the clause:
In the user settings, go to “Manage folders”:
Next, select the folder you wish to delete and click on “Delete folder”:
NOTE: if you cannot see the “Manage folders” menu, ask your Administrator to enable this functionality for you.
You do this via the ‘manage attributes’ in your account info:
NOTE: if you cannot see the “Manage attributes” menu, ask your Administrator to enable this functionality for you.
Then click on ‘Custom attribute model’. More info can be found :
You can use a status for the phase of the clause (e.g. experimental). In principle, you can also create these as attributes, but then it is important not to use status and attributes interchangeably.
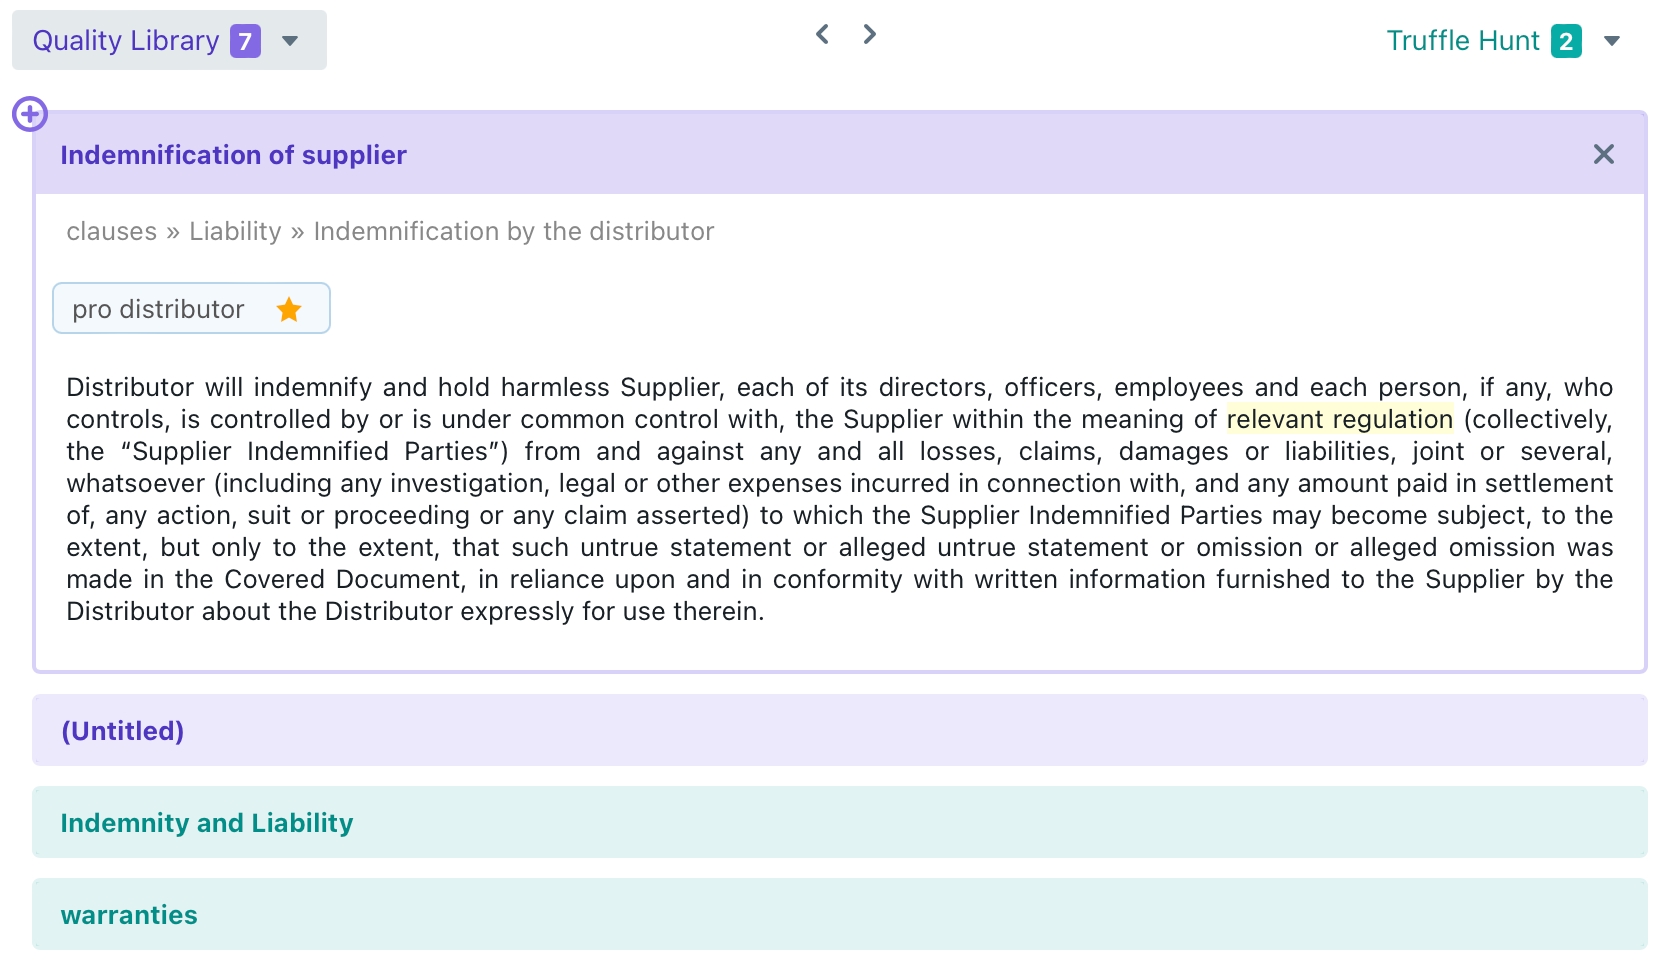
The Quality Library and Truffle Hunt share one common goal: searching for clauses to insert into your document.
The way they go about achieving that goal, however, is vastly different:
The Truffle Hunt allows you to search for useful clauses in the way that most legal teams are accustomed to: diving through dozens, if not hundreds of precedent documents by way of a keyword search.
Truffle Hunt helps you to find this needle in the haystack by centralizing the precedent documents to search through, automatically extracting clauses from it, and giving you a range of different tools (besides simple keyword searching) to find the needle.
The Quality Library is similar to Truffle Hunt in that it is ultimately a repository for clauses. It differs from Truffle Hunt in that its focus is not on quantity but on quality. To continue the analogy: whereas you build a haystack in Truffle Hunt and hope you will find the needles later on, Quality Library is all about collecting the individual needles in one place.
To that end, Quality Library is much more suited to organisations who wish to standardize their legal drafting, e.g.: by collecting company standard clauses and fallback positions. It would be virtually impossible to achieve this goal in Truffle Hunt, where these clauses are accompanied by hundreds or thousands of other clauses with no way to tell their significance.
Truffle Hunt allows you to make full use of your drafting history. It allows you to upload DOCX & PDF documents in order to:
visually search through these documents
automatically have interesting clauses extracted from them and line up similar clauses
insert relevant content into new documents with the click of a button
easily add clauses to your Quality Library
In a way, you can consider Truffle Hunt to be a specialised "Google for legal documents & clauses". Or as your specialised instrument to search for golden nuggets hidden in piles of irrelevant things. In fact, that's where the name and icon come from: finding truffles within a large forest, using a specially trained device.
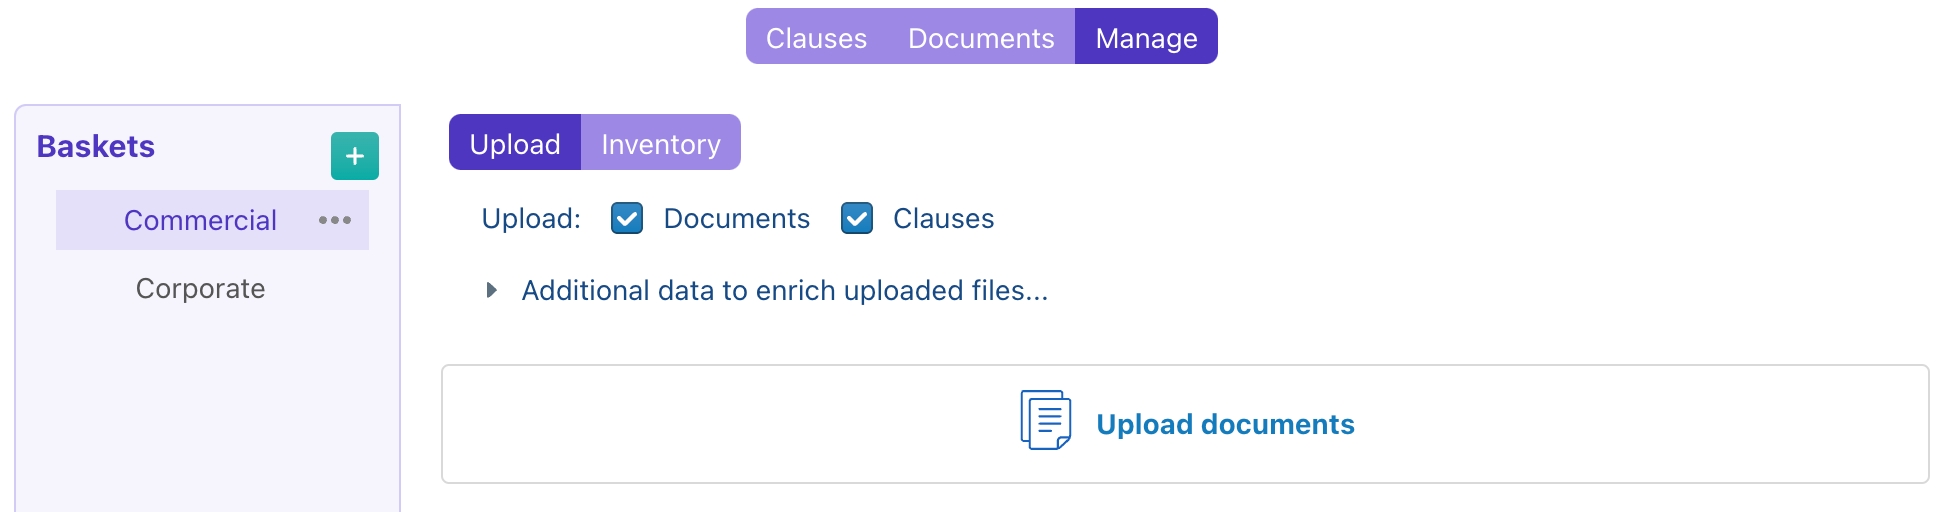
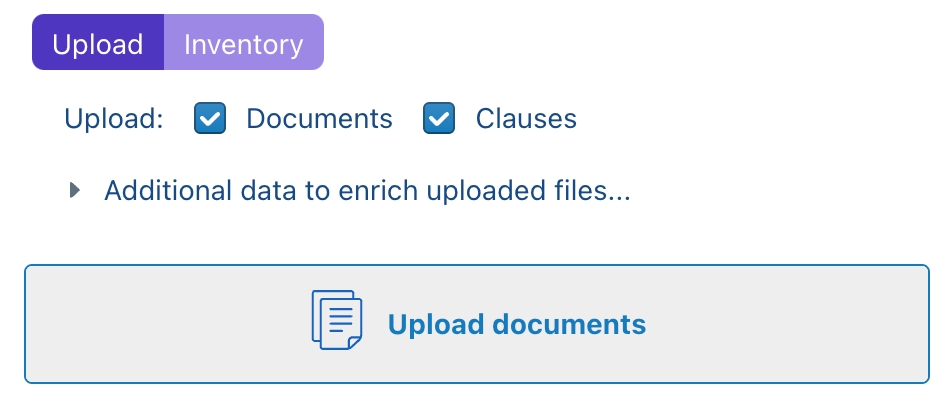
Truffle Hunt offers three separate modes, visualised by three separate tabs at the top of the screen:
The Clauses mode allows you to search through all your automatically extracted clauses, typically lined up with similar clauses.
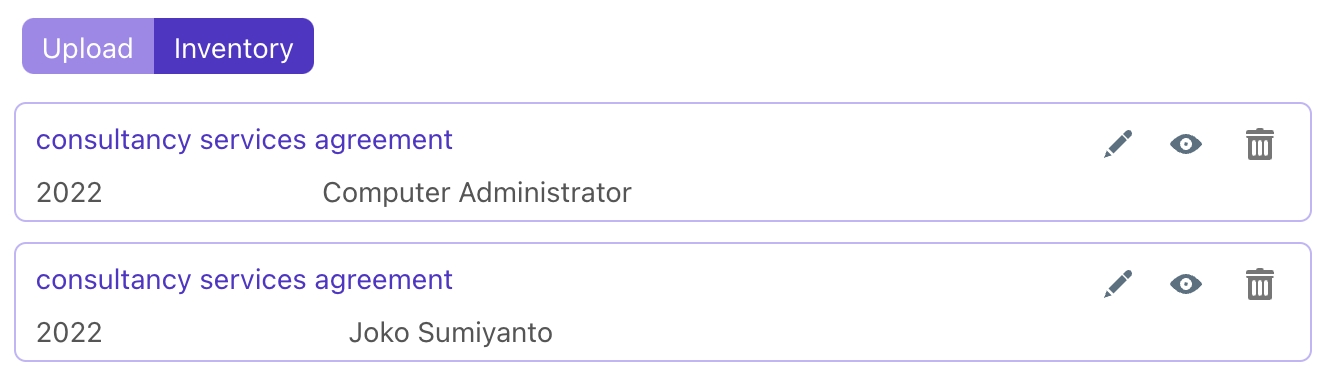
The Documents mode allows you to search for entire documents. You can then either use a found document as a whole (to start from for your next drafting task), or extract interesting paragraphs from it.
The Manage mode allows you to upload documents, and have the clauses automatically extracted.
You may wonder what the conceptual difference is between the Clauses and the Documents mode, as the "Documents" mode also allows you to search for interesting clauses. Of course, both modes are targeted at finding good clauses in previously drafted documents. However, the journey towards those clauses is very different in both modes. Both modes have different use cases, and different advantages and disadvantages — but it's an and/and and not an either/or, because you can use both modes interchangeable.
Document Mode
Clause Mode
Concept
Visual searching through entire documents
Mass-search through documents
Functionality
Show documents in their entirety, and clauses in their original context
Line-up of extracted clauses. Clauses do not show their original context.
Clause methodology
Quality focused: assess clauses in their original context.
Quantity focused: find clauses by comparing them to similar clauses, even though their original context is not immediately visible.
Truffle Hunt combines three distinct but typical use cases in legal teams:
Search through your set of precedent documents, i.e. the set of "go-to" documents that many legal experts build for themselves over the years (even take with them to new employers), and which they tend to go to over and over again when searching for inspiration. Typically, these documents have good quality, are well-known and are frequently used within a team. While they are typically not as high-quality as the curated Quality Clause library in ClauseBuddy, these documents are usually cherry-picked from the enormous amount of documents that legal experts tend to see on a weekly basis. Truffle Hunt allows you to easily search through these documents, to select relevant clauses or the relevant template to start from for your next drafting task. After all, the average legal team tends to have a stash of about 200 to 300 high-quality precedents, but individual legal experts tend to use only a small subset of those documents, ignoring the wealth of other documents that are available within the team's stash.
Mass-extraction of clauses from large amounts of old documents. This solves the typical frustration"I have written this clause in the past, but I cannot find it easily". In this use case, you will typically uploads thousands of old documents, in order to have all their clauses automatically extracted from them. This use case is therefore heavily focused on quantity. Many legal teams start with this use case, because it seems like the most appealing: almost zero effort and significant benefits. However, while this mass-extraction looks interesting, but has the downside of resulting in a lot of noise in the search results. For example, if a team of commercial lawyers uploads even only 500 commercial contracts, it will likely end up with 425 confidentiality clauses, which — after the automatic removal of semi-identical clauses — likely results in about 300 different confidentiality clauses. This seems like a plus, until you realise that you will spend a lot of time reading those clauses during your search actions.
Treat Truffle Hunt as a transitionary phase towards a Clause Library. Due to the problems associated with the mass-extraction, many legal teams will eventually learn that a good Quality Library is actually much more useful than a noisy quantity-focused pile of clauses. Over time, they will cherry-pick the best mass-extracted clauses, copy them into the Quality Library, and then either remove the unused mass-extracted clauses, or only use them as a fallback.
Of course, you can also mix-and-match these approaches. For example, (1) create a few baskets with good templates that anyone can start from; (2) populate a Quality Library with clauses that where cherry-picked from baskets uploaded into Truffle Hunt and then afterwards delete; (3) create a basket that is only accessible to senior lawyers, and contains a pile of mass-extracted clauses from the past, to search in when the Quality Library does not deliver any results.
Almost all document management systems and case management systems will allow you to search through your documents. However, those systems are document-focused and very few of them offer a mode optimised for finding drafting inspiration. In fact, they're actually very slow when you scroll through their result lists, hunting for inspiration.
Suppose you want to find a good assignment clause. In a typical document management system:
You must complete a complicated search form in which you enter your search term.
The system will present search results per document, because these systems are document-focused.
You must then click on each individual document, go to the search menu of MS Word or Adobe Acrobat, enter your search term again, scroll to the relevant section, and then assess whether you like what you're seeing.
The system will usually not search for semantically similar content and words that are grammatically close to your search term.
The system is usually not integrated within MS Word, or at least does not easily allow you to copy/paste content into MS Word.
When the original document is a PDF document, copy/pasting usually results in an ugly mess of paragraphs that are broken up into separate lines.
Truffle Hunt offers an optimised experience for legal drafters. With one click of a button, you can copy an interesting clause, insert the clause into the MS Word file you are currently working on. And all of this for both DOCX documents and PDF documents.
For most legal experts, a nicely ordened clause library should be the first location to find a clause, as it will generally be the fastest approach during use, with the highest quality, ideally also providing do's and don'ts for each clause.
However, as every legal expert knows, there are situations when you are looking for inspiration. Truffle Hunt can then be an interesting avenue to explore, because it allows you to quickly search through hundreds or thousands of precedents.
If you are like most legal teams, you will be tempted to think that using the automatic clause extraction of Truffle Hunt will save you time and that it's not necessary to dedicate some time to building a Quality Library. However, the opposite is usually true: while you will indeed save time upfront by limiting yourself to the automatic clause extraction of C-Truffle Hunt, you will pay back for lost time during day-to-day use, because you will have to read through all the found clauses with every single search. Conversely, with a Quality Library, you can immediately navigate to the right folder and/or filter on legal characteristics (such as in whose favour a clause was written), and read the nice one-line summary of each clause.
As you can see in the table below, it will all depend on how many clause searches will be done by an entire team. If you do not frequently need to search for clauses, then the upfront investment of building a Quality Library will be high, as compared to the benefits you get from it. Truffle Hunt is then obviously the better solution from a speed perspective.
Conversely, if 5 team members each insert 10 clauses on a single day, then relying on the automatically extracted clauses will take much more time than a Quality Library for each single day. Obviously, this adds up over time, so that the investment in a quality clause library is typically "recouped" after a few months of usage.
Time upfront
Day-to-day time (average)
Quality
No dedicated software
None
3 - 10 minutes per clause
Low
Truffle Hunt in Documents Mode
1 - 30 minutes
1 minute per clause
Medium
Truffle Huntin Clause Mode
1 - 30 minutes
Immediate hit: 30 seconds, otherwise 2 minutes
Low to medium
Quality clause library
Hours
30 seconds
High
You should also not forget that speed is not everything — in fact, for a typical legal team, quality is much more important than speed. Particularly when young lawyers are involved, a Quality Library will lead to much better guidance and higher quality.
If you wish to save a clause with similar content, ClauseBuddy will notify you of this. It does this as soon as there is similar content. In other words, even if the clauses are not exactly the same, but look hard alike, this notification will come:
Truffle Hunt's Clauses mode enables you to search through thousands of extracted clauses from hundreds or thousands of old documents, to quickly find a relevant clause. ClauseBuddy will then search through those files and extract fragments of text that seem relevant. You can then quickly search through all extracted clauses, in search of good clauses.
The biggest advantage of Truffle Hunt's clauses mode is that it requires almost no effort to build a collection of clauses: simply upload documents once, and have everything processed automatically for you. This is extremely tempting for busy legal teams, who are always pressed for time, yet still want to benefit from low-hanging tech fruit.
Using this mode is ideal when you know exactly what you are searching for, and you do not need any surrounding context to assess the merits of a clause. If those circumstances apply, then it will allow you to retrieve clauses quicker than extracting clauses from the Document mode, or curating a Quality Library of clauses.
You should be aware, however, that there are tradeoffs:
You will save time upfront, but pay later with each and every search. For a typical legal team, the time spent on a day-to-day basis will exceed the time spent on curating a Quality Library.
Legal quality will suffer, because clauses are extracted from their context. Quality clause libraries simply offer much better guidance, particularly towards young team members.
ClauseBuddy automatically extracts clauses from your uploaded documents. This requires zero effort from your side — just a little bit of patience, about 1.5 seconds per document if you have a good internet connection.
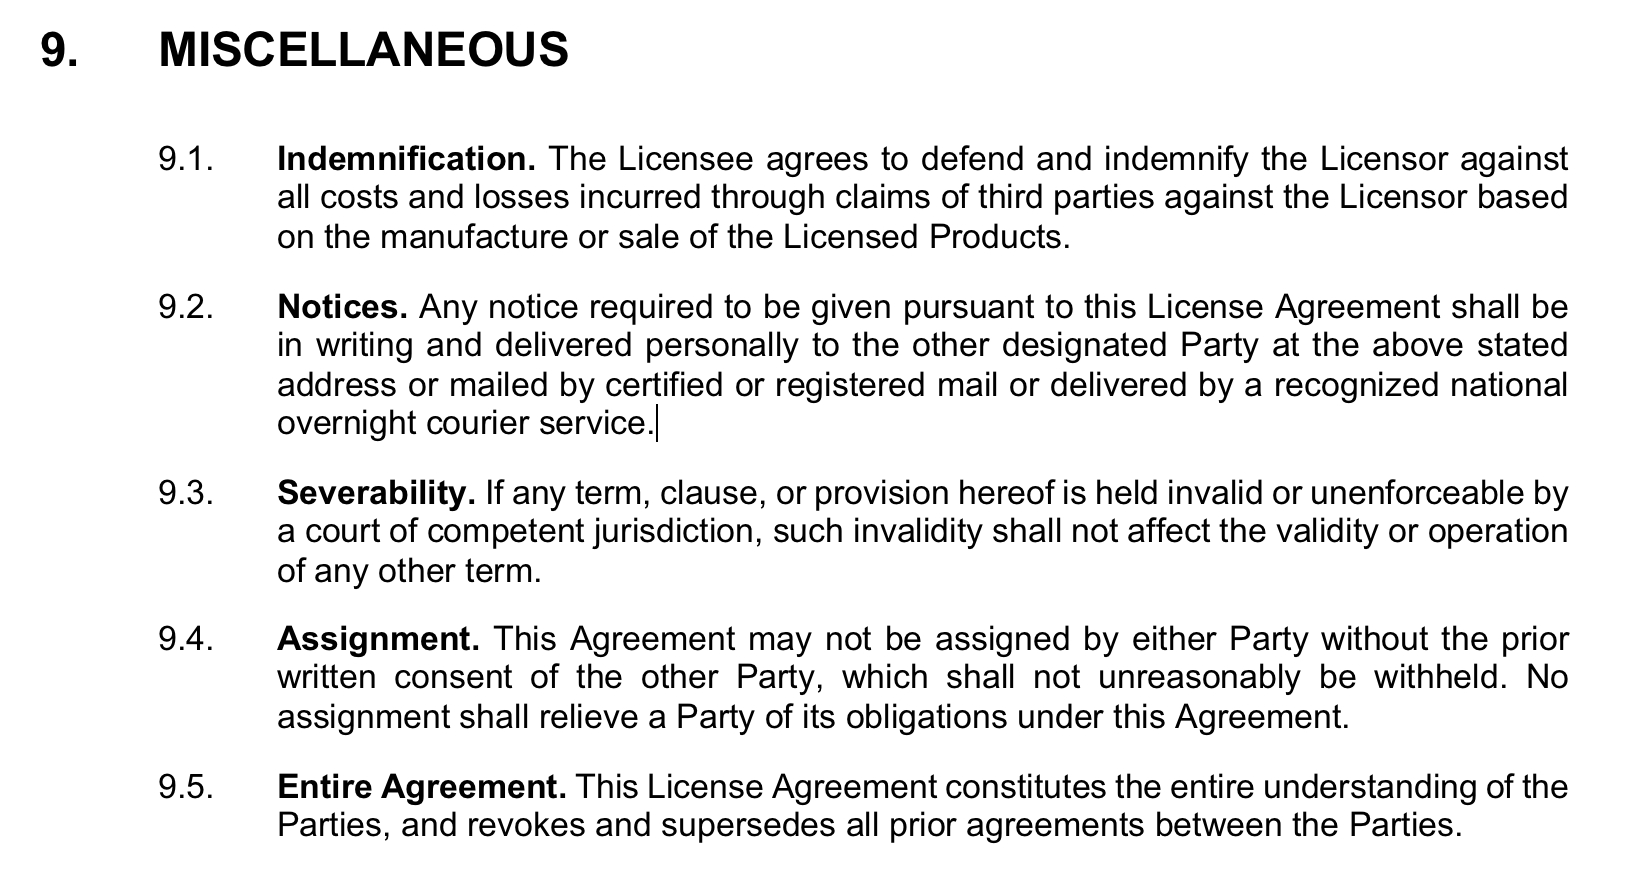
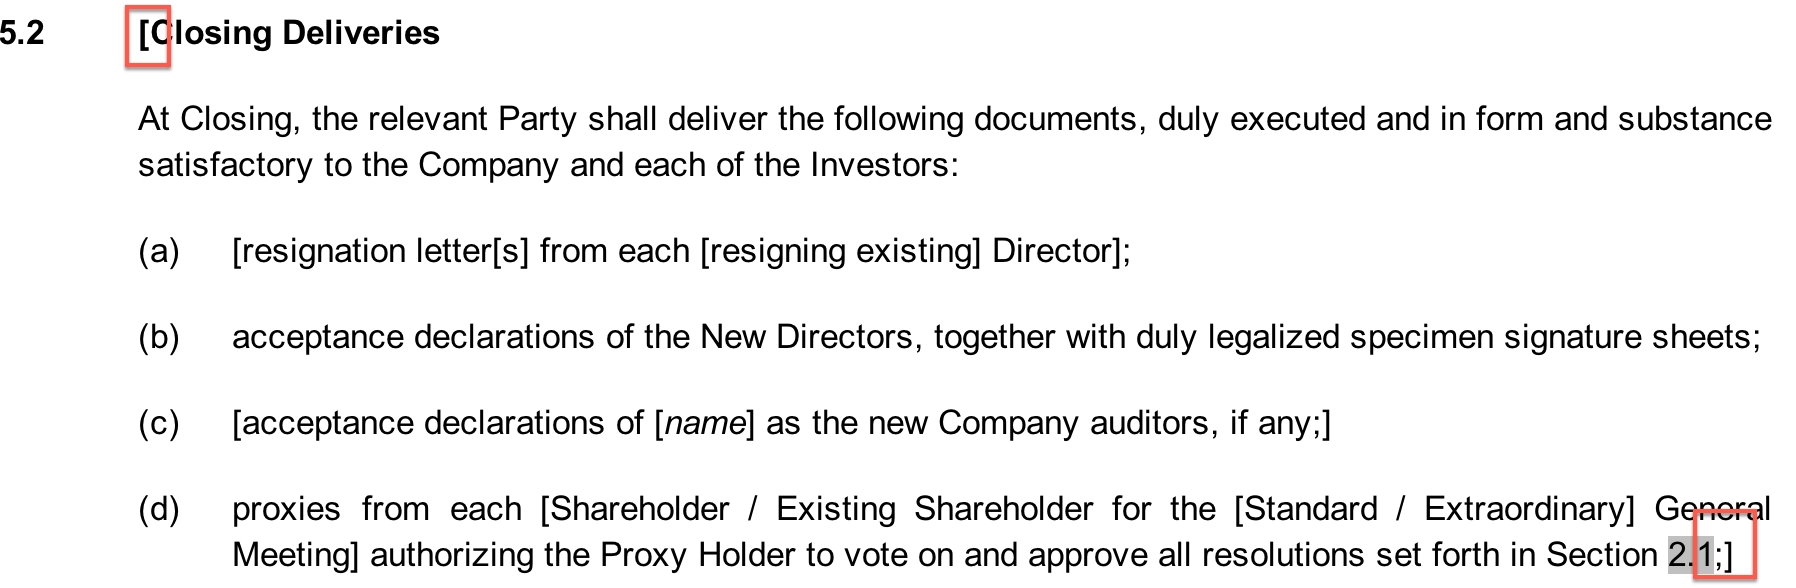
However, you should be aware that automatic extraction is hit-and-miss process. For example, have a look at the clause below. Assuming you think it is wonderfully written and you want to include it in your clause library, how would you deal with it? Keep it as a whole and insert it as-is, because that’s the nature of such a “miscellaneous” clause? Or store each of the individual paragraphs? Or perhaps store both?
ClauseBuddy uses advanced algorithms and some fast artificial intelligence (not GPT) to extract only relevant content, and split the content in a reasonable way. But do not expect this to be perfect: there will be many situations where you would make a different splitting assessment, erroneously considers text to qualify as a title, or where the software inadvertently ignores certain paragraphs, or instead extracts irrelevant paragraphs.
While we continue improving the extraction process, this is simply the tradeoff of having everything extracted automatically, as opposed to manual clause curation. The quality of the extraction will depend on the type of document (the software is trained on contracts), the language, the formatting (automatically formatted documents work much better), and so on.
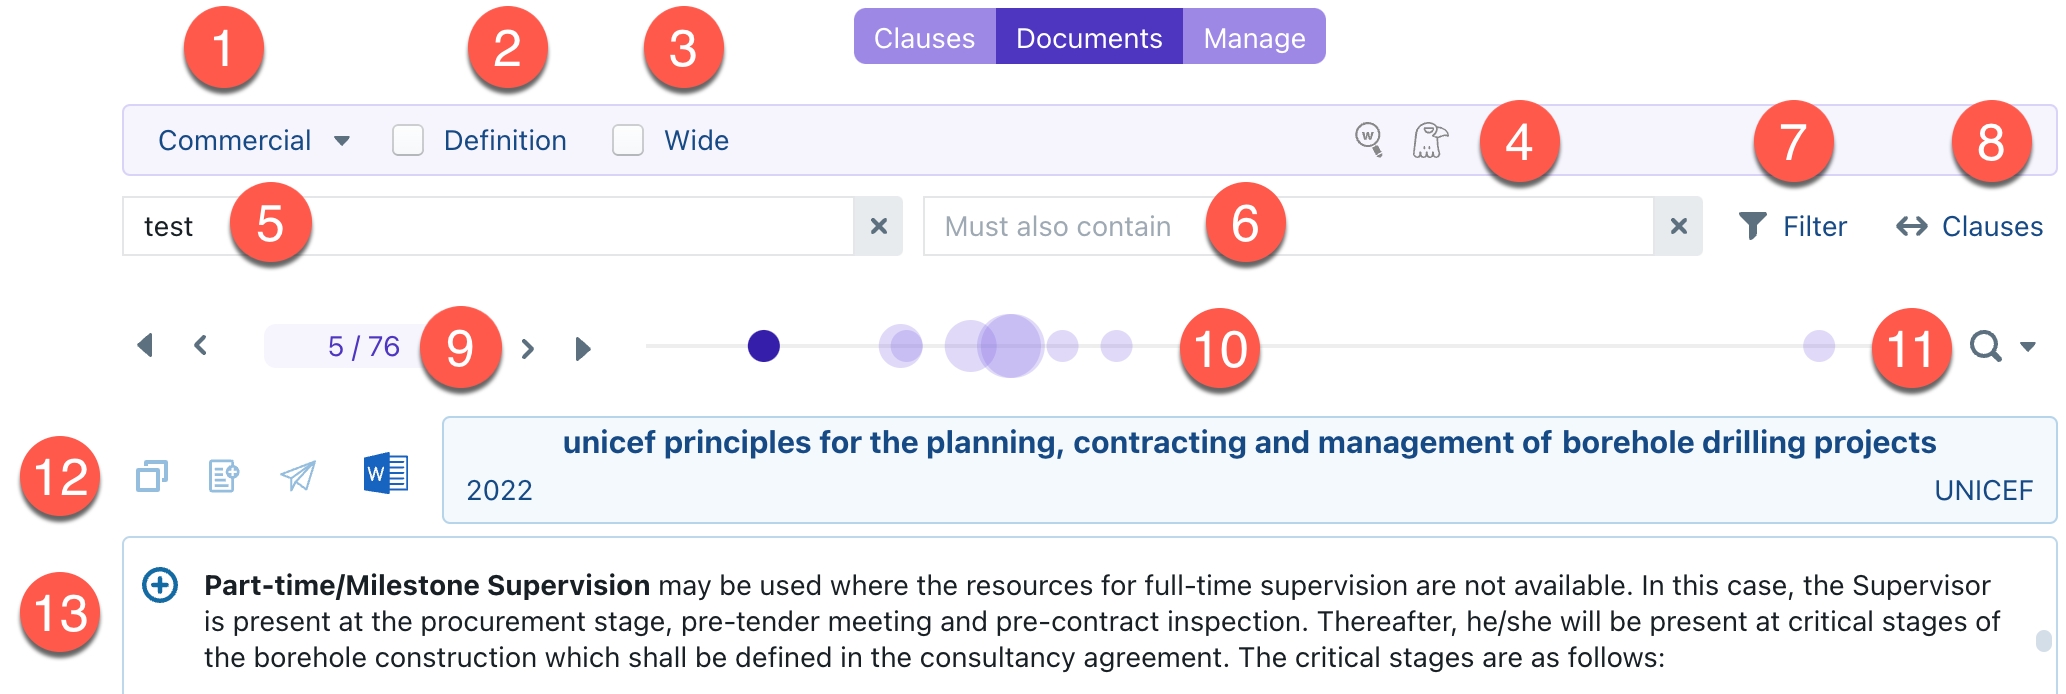
Getting started with Truffle Hunt's search mode is quite easy, but there are actually quite some additional search tools that you may want to read about.
The Basket Selection allows you to select different baskets to search in.
The Definition checkbox allows you to limit searches to clauses that were identified as definitions inside a contract.
The Strict Search checkbox allows you to search for content in a more literal way.
The Undo/Redo buttons allow you to go back and forth in your search actions.
The Switch Buttons allow you to transfer your query to other search modules (when available): keyword search in your Quality Library, or Samples Hunt.
In the Primary Query box you type words that should be present in your clause. If you checked "Definition", then this box will instead allow you to search for the legal term. In the Secondary Query box — not currently shown, it is only visible when searching for definitions — you type words that must also be present in the definition's body text.
In the Filter panel you can narrow down found documents to certain categories, authors, years, files or titles.
The Words slider allows you to filter clauses by their length.
The Add to Quality Library button allows you to store a clause in your Quality Library.
The Send to Curator button allows you to send a clause to a curator in your team.
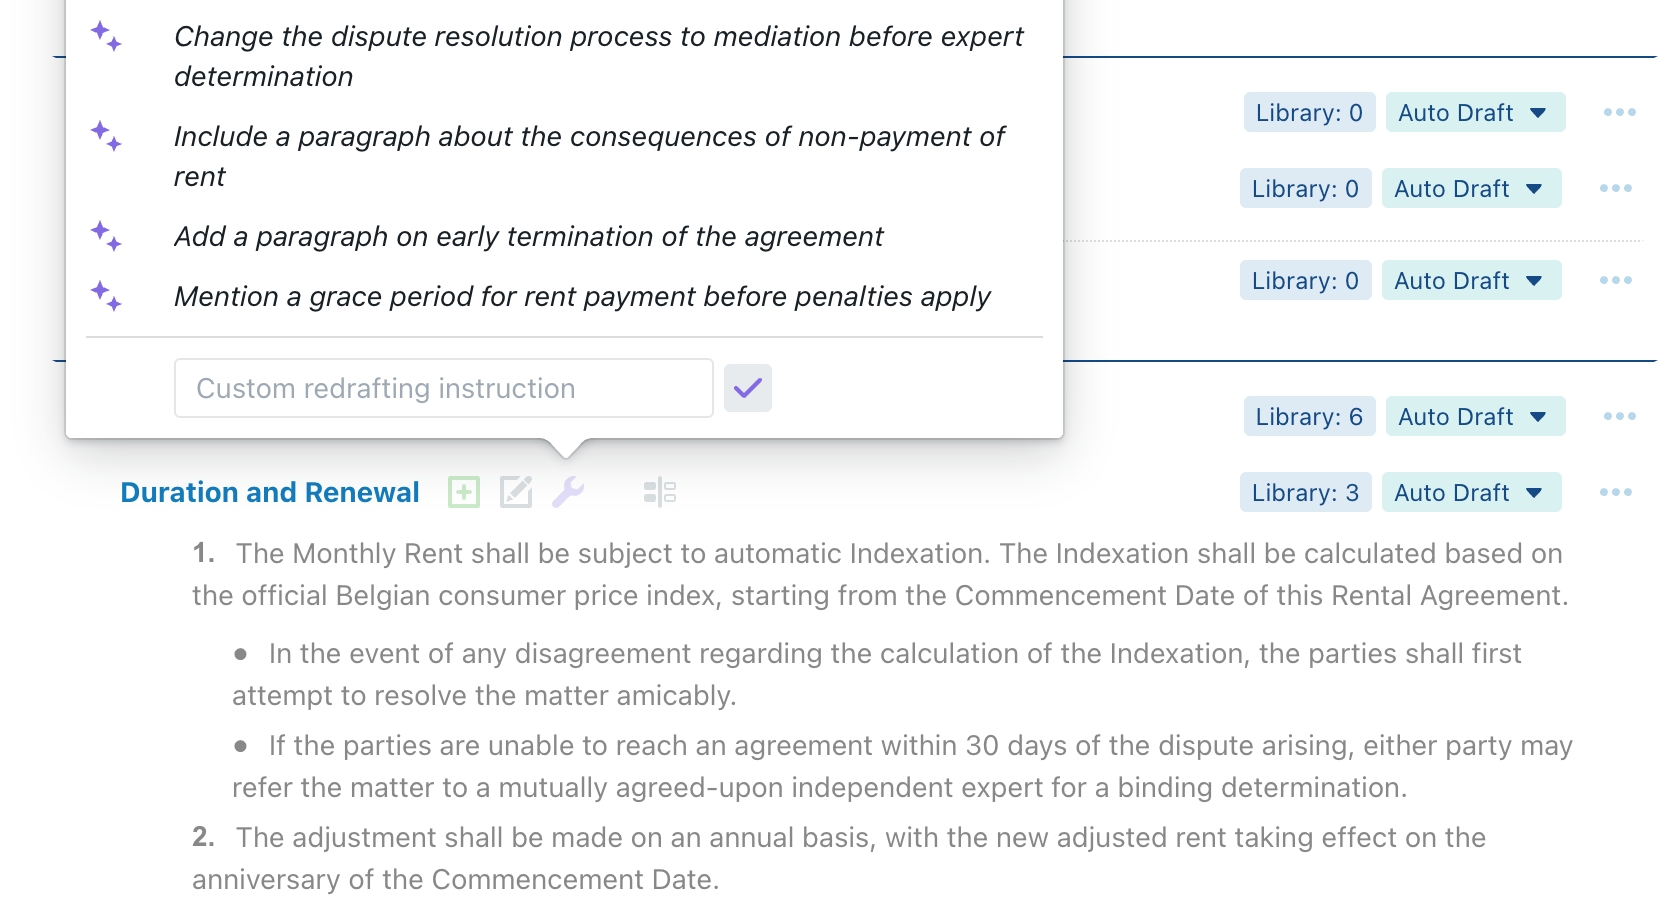
the Redraft button allows you to redraft clauses using artificial intelligence.
The Insert/Copy button allows you to insert the clause into your Word-document, or (when used outside MS Word) to copy the clause to the clipboard.
Title of the clause
Information regarding the document from which this clause was extracted. When you click on this bar, you will be taken to the entire document.
The Language selection dropdown list
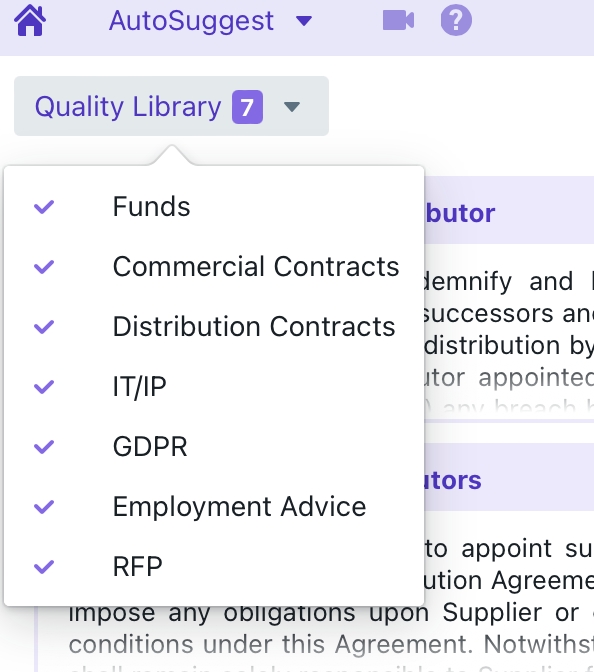
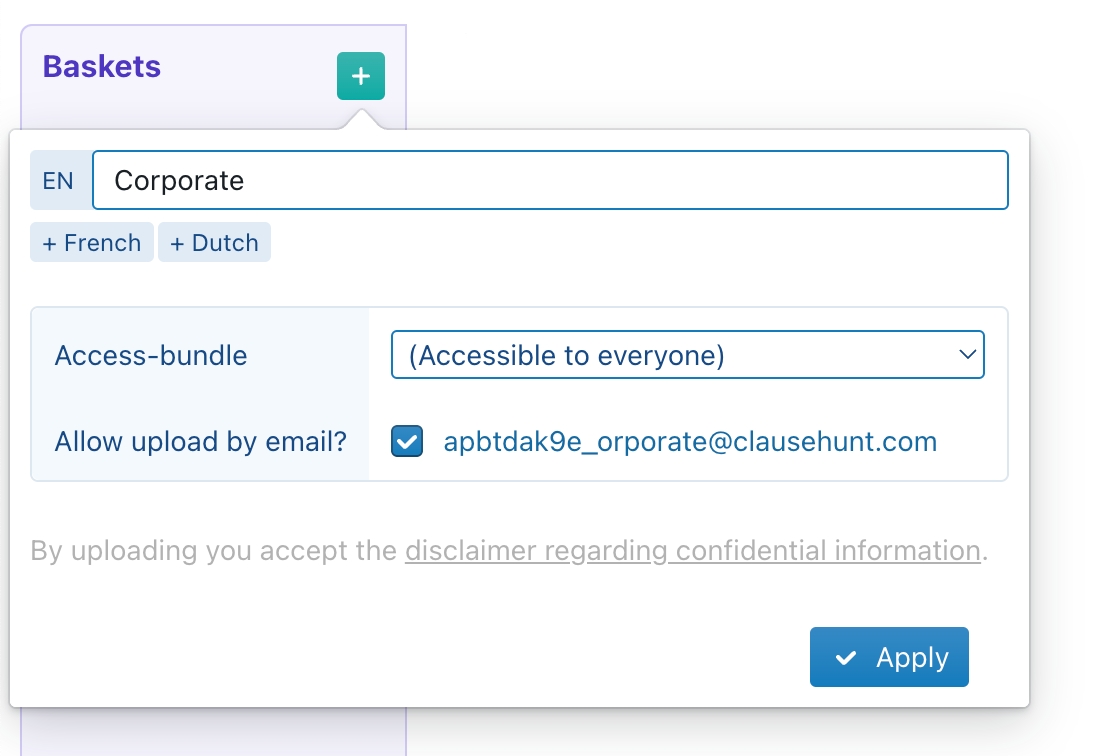
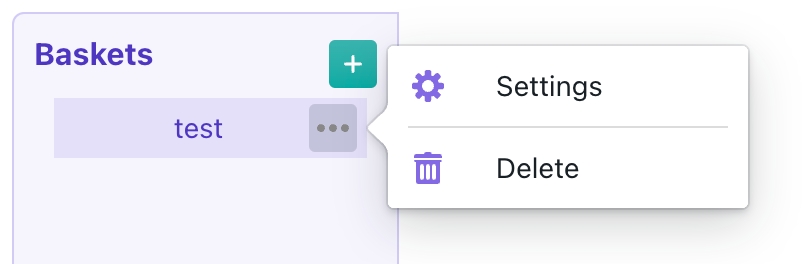
Truffle Hunt allows you to create different "baskets" with clauses — e.g., one for the Corporate department, one for Employment, one for IT/IP, and perhaps also a personal basket for every legal expert.
When you switch between baskets, Truffle Hunt will re-submit your current search query. So if you do not find any useful results in one basket, you can easily try in another basket to which you have access.
When checked, the Primary Query box will be used to search for the legal term, and the Secondary Query box will be used to search for words in the body of the definition. See the explanation below.
ClauseBuddy allows you to search in two modes: smart and strict.
The default search mode is smart. In this mode, ClauseBuddy uses an intelligence layer to search for clauses that semantically match what you type in. The search will not be literal, so that descriptions and synonyms will usually also result in the right clause being shown at the top.
You can also search in strict mode, by enabling the checkbox to the right of the search box. In strict mode, the search is performed in a literal way. Even though grammatical variations are allowed (e.g., searching for "claims" will also find clauses containing the singular "claim"), clauses that contain synonyms of your keywords will not be included in the search results.
With these buttons, you can go back & forth in your list of historical actions. So if you liked your initial search, but then made a few changes that were not so smart after all, you can go back to your initial search by hitting the Undo button a few times.
By pressing this button, you can easily switch to the other search modules in ClauseBuddy. For example, when you are searching for a clause on "assignment" in a corporate context, but you suddenly realise that it's perhaps better to search within your Quality Library, you can click on the magnifying glass to jump to the keyword search within the Quality Library. Your current search term ("assignment") will then automatically get filled in and search on.
In the primary query box (left) you type in your main search terms. Truffle Hunt will then search for clauses where those terms are found in either the title or the body of the clause. Truffle Hunt will also take into account grammatical variations, depending on the language in which you are searching.
If you have enabled the "Definition" checkbox, then the primary query converts into a defined term selector. If you want to narrow down the body of definitions, then you should enter search terms in the Secondary Query box.
For example, in the screenshot below, you can see a search for a definition of the term "material adverse change", narrowed down to definitions whose body also contains the word "merger"
Similar to searching in Google, you can quote search terms, to ensure that terms are not merely present within the clause, but are instead found next to each other.
For example, when you want to search for licensor's liability, you will notice that the software will also find clauses in which both words are separated from each other.
If you instead put double quotes around the words, only clauses that will contain both words next to each other will show in the search results.
Removing terms
By adding a hyphen to a term, you will remove search results having that term near the other terms specified. For example, this will search for clauses with the expression garden leave, but without the word executive.
In this box, you can specify other words that need to be present in the definition's body. See explanation above.
In this panel you can filter found results on criteria such as the document's title, year, author, client or dossier name.
The numbers to the right of each result in the popup dialog indicate how many unique clauses match this filter, taking into account all the other filters and criteria. For example, in the screenshot above, 8 unique clauses with the words "material" and "adverse" were found in documents entitled "development agreement". If other criteria would have been specified as well (e.g., the clause length, or the year, ...) then those would also have been taken into account when determining the number to the right.
This slider allows you to filter on the number of unique non-stopwords in a clause — essentially it allows you to filter on the length of clauses. For example, in the screenshot below, only very short clauses that contain the words "material" and "adverse" will be found.
When inserting into a Word-document, you can opt to insert the change using "track changes". Click on the name of the author ("ClauseBase Admin" in the screenshot below) to swap it to some author.
You can also change the layout of the clause, e.g. to avoid inserting the title or avoid bullets. See our separate page on inserting clauses.
When multiple languages are enabled, you will see the language selection dropdown box. This will determine the language of the clauses in your search results.
You can quote keywords if you want the keywords to appear next to each other. For example, "holiday entitlement" will only find clauses that contain the word holiday and the word entitlement (or linguistic variations of those words) next to each other.
You can insert a hyphen before a keyword to remove clauses containing that keyword from the search results. For example, when you want to find clauses containing the words "holiday" and "entitlement" but not the word "termination", you can enter holiday entitlement -termination in the search box.
Smart mode works best if you submit several keywords at once (e.g. confidential information exclusions), or even a short description (e.g. liability limitation with a maximum equal to the invoiced amount). Similar to how you would confuse humans when only giving one word (e.g. confidentiality), smart mode does not work so well if you provide only one word.
If multiple languages are enabled then, even though the results will be in the language you selected in the dropdown list, you can use keywords in any language you want. For example, by searching for "responsable du traitement" in French, while having English selected, you will find English clauses relating to privacy.
In strict mode, you can combine multiple keywords to narrow down your search. For example, if you are searching for employment clauses and enter holiday entitlement, ClauseBuddy will find clauses that contain both the word holiday and the word entitlement (or linguistic variations of those words). Note that both words do not need to be next to each other in the clause, in order to be found.
ClauseBuddy will ignore stop words, i.e. keywords that have no information value — e.g. words such as the, that, if, and so on (depending on the language).
If you would like to export the results of any particular clause search to either a Word or Excel document, click the ... button toward the right of the toolbar and select 'Export truffles'.
Once you have made your selection of export options and clicked 'Export', a file download link will be prepared for you. Wait a couple seconds for it to appear then click to download the file.
Due to the sheer volume of clauses extracted, you may run into issues. If you are like most legal experts, you are subject to client confidentiality rules, non-disclosure obligations, data protection rules and various internal security rules. No matter how secure ClauseBuddy is, storing thousands of confidential on external systems for mere efficiency reasons, is usually a bad idea.
When reading the above, it should be obvious that we here at ClauseBase have mixed feelings about merely relying on automatic clause extractions, instead of (also) curating a Quality Library. In fact, we wrote an , where we described how we had initially developed a module like htis, but then threw it away once we saw how our initial testers started using it.
The brain-like button Process results with AI is not shown on this screenshot. It is .
This button extracts the title and boy of the clause, and inserts it into the Add clause dialog box.
This button allows you to send the title and body of the clause to your , who will then decide whether (and how) to add it to your team's library.
This button allows you to have artificial intelligence redraft the contents of your clause (e.g. to make it shorter or longer, or to synchronize the terminology with the terminology of the document), through a simple prompt. Afterwards, you can then request a comparison between the original text and the new text.
This button allows you to insert the clause into your Word-document, or (when used outside MS Word) to copy the clause to the clipboard.
ClauseBuddy is layout-aware and will usually be smart enough to match the styling of your current document. However, there is an (advanced) possibility to implement your own house style, if you want to offer more guidance towards the software on how to format certain elements. Check out the page on , which uses the same mechanism.
Smart mode is relatively smart: it is a lot smarter than the strict search (which uses literal matching), but it deliberately does not use "GenAI" Artificial Intelligence to filter your results. Accordingly, expect it to be smarter than strict search, but at the same type not human-like smart. If you don't like the results results and want deeper intelligence applied, you must use the brain-like button, as .


The Documents mode of Truffle Hunt allows you to visually browse through a selection of your best documents (typically templates), in search of inspiring fragments of text.
Its biggest selling point is that it allows you to quickly jump to relevant locations in a document, and then assess candidate clauses within their original context. So if you are looking for inspiration, but don't know exactly what you are looking for, and therefore want to be able to assess clauses, the Documents mode is ideal.
While Truffle Hunt allows you to search through thousands of documents, it's usually a bad idea to upload thousands of documents if you are mostly focused on the Documents mode.
The ideal set of documents to upload, instead, consists of your set of favourite documents. For legal experts, this is a set between 20 and 50 documents (sometimes a bit more) per lawyer that you often go back to when you search for inspiration. Most legal experts have such a set of favourite documents — they even tend to take it with them wherever they professionally go, because they like those documents, they are high-quality, and so on.
For an entire team, this will typically boil down to a few hundred documents for the entire team.
Getting started with the Document mode's search is quite easy, but there are actually quite some additional search tools that you may want to read about.
The Basket Selection allows you to select different baskets (folders) to search documents in.
The Definition checkbox allows you to limit searches to paragraphs that resemble contract definitions.
With the Wide checkbox, you can widen the extent of the "neighbourhood" in which words within the Primary Query box can be found near other.
These buttons allow you to easily switch to another search module within ClauseBuddy, automatically taking your current search term with you.
In the Primary Query box you type words that should be found near each other in a document.
In the Secondary Query box you type words that should also be present in the document to be found. (Unlike the Primary Query box, those words do not necessarily need to be near each other.)
In the Filter panel you can narrow down found documents to certain categories, authors, years, files or titles.
The Clauses Amount filter allows you to narrow your results to documents containing a certain range of extracted clauses.
The Results Amount shows the number of results, while the Previous/Next Document outer buttons and the Previous Highlight/Next Highlight inner buttons, you can navigate through the document.
The Clusters Bar graphically shows you where terms are found in the entire document, and how they are "clustered" together.
The Term Highlighter allows you to select another term to visually highlight in the documents.
These buttons allow you to insert or copy the text you selected within the document, copy that text to the Quality Library, and download the original file as a DOCX file.
The "+" button opens a menu in which you can copy the current clause, insert it directly into your MS Word file, or search for similar clauses.
Truffle Hunt allows you to create different "baskets" with documents — e.g., one for the Corporate department, one for Employment, one for IT/IP, and perhaps also a personal locker for every legal expert.
When you switch between baskets, Truffle Hunt will re-submit your current search query. So if you do not find any useful results in one locker, you can easily try in another locker.
If you enable this checkbox, then the search results will be limited to paragraphs that contain the word "means "or "meaning" close to the primary search query (or translations thereof — e.g., "signifie" and "sens" in French).
Note that you will typically not only find paragraphs in a definition list, but also paragraphs that contain an "inline" definition in the middle of a contract.
This checkbox widens the perimeter of how far words specified in the Primary Query box can be apart within the documents to be searched. Technically speaking, words can then be about 275 words apart from each other, and still be considered to be near each other.
By pressing this button, you can easily switch to the other search modules in ClauseBuddy. For example, when you click on the magnifying glass, your current search terms will be copied to the search box of the Quality Library, and ClauseBuddy will jump to that search module.
In this box you type in your main search terms. Clause Hunt will then search for documents where those terms are near each other (i.e., maximum about 150 words apart).
For example, when you enter confidentiality liability as search words, you will find documents where both words are near each other.
Note that the words may also be spread across different paragraphs, e.g. when searching for change of control:
Similar to searching in Google, you can quote search terms, to ensure that terms are not merely within each other's neighbourhoud, but are instead found next to each other.
For example, when you want to search for paragraphs dealing with the concept of background intellectual property, a search such as the following may lead to undesirable results:
While a quoted search will be much better in this case:
You can also combine different terms. For example, when you want to search for results where the expressions "background IP" and "foreground IP" are in each other's vicinity:
By adding a hyphen to a term, you will remove search results having that term near the other terms specified. For example, this will search for documents with the expression garden leave not in the vicinty of the word executive.
Be aware that the software will always remove stopwords from your search terms, i.e. common words without much informational value, such as "the", "will", "shall", "if", "further", and so on.
In this box, you can specify other words that need to be present somewhere in the document. Those words do not need to be in the vicinity of the words of the primary query. For example, the following query would search for documents where "material", "adverse" and "effect" are near each other, while the word "hazardous" is also present somewhere (but not necessarily near the three other words).
Note that the word "hazardous" will not be initially highlighted in the document. You can, however, use the Term Highlighter to highlight this word.
In this panel you can filter found results on criteria such as the document's title, year, author, client or dossier name.
The numbers to the right of each result in the popup dialog indicate how many documents match this filter, taking into account all the other filters and criteria. For example, in the screenshot above, 6 doucments with the word "test" were found that are entitled "development agreement". If other criteria would have been specified as well (e.g., the number of extracted clauses, the year, ...) then those would also have been taken into account when determining the number to the right.
The Clauses Amount filter allows you to narrow your results to documents containing a certain range of extracted clauses.
Note that while this tends to align with the document's length, it is not the same metric, as the number of "extracted clauses" depends on the number of individual clauses that were identified, without taking into account the length of each individual clause.
The results amount indicator tells you how many documents were found, and which document you are currently seeing.
With the outer buttons, you can go to the next or previous document in the search results.
With the inner buttons, you can go to the next or previous cluster of results in the current document (except when you are at the end of the document, in which case you would jump to the first cluster of the next document).
This bar is probably the coolest feature of Clause Hunt, as it graphically shows you how all the search terms of your primary query are spread across a document. When search terms are near each other, they will get clustered into a bubbles — the bigger the bubble, the more search terms are located near each other in a particular part of the document.
By simply moving your mouse over the visual clusters bar, you can jump between different clusters/bubbles. Alternatively, you can click on the inner back & forth buttons [6].
This popup allows you to specify which terms should be highlighted.
For example, when your primary query consist of the combination of "material adverse effect" and development, while your secondary query consists of pledged, you will see the following list:
When you select any option in the popup, the Clusters Bar will be updated to show where in the document the selected term is located. This is particularly useful for highlighting terms in your secondary query.
You can even highlight words not located in the primary/secondary query, by using the bottom input box.
In the top left part of each document, you can find four export buttons that allow you to use the content in the document
This button allows you to insert any selected text into the Word-file you have currently opened. (If you are using ClauseBuddy in a browser, instead of inside MS Word, then this button will turn into a copy-button, that allows you to copy the selection to your computer's clipboard).
This button takes the selection and inserts it into the Add clause dialog box.
This button takes the selection and, instead of directly adding it to your clause library, sends it to one of the curators in your team.
This button opens the original file that was uploaded to the locker.
If Truffle Hunt detected a clause in a document, then it will show a big "+" icon to the left of it, within the document itself.
This popup menu then allows you to immediately insert a clause in your current Word-document, or to perform a similarity search for other clauses.
When inserting into a Word-document, you can opt to insert the change using "track changes". Click on the name of the author ("ClauseBase Admin" in the screenshot below) to swap it to some author.
The AutoSuggest feature allows you to search for interesting clauses while typing or browsing through your Word-document. This feature has two typical use cases:
Allowing you to very quickly search clauses while you are typing new paragraphs. For example, if you are drafting a new paragraph and type in "indemnification duty", and then pause typing for a second, the software will immediately search for clauses that match those words.
Quickly finding alternative clauses, i.e. clauses that are similar (but not identical) than the text you have selected. By simply putting your cursor within a paragraph (or selecting multiple paragraphs at once), the software will be instructed to find clauses with similar content.
In both cases, you can then insert a found clause with just two mouse clicks.
The user interface is deliberately simple, with only a few settings to control.
In the top bar, you can choose the sources in which the software must search for relevant content:
At the left side, you can choose which "search folders" within your Quality Library should be included. By default, all the search folders you have access to will be included, but you can simply uncheck the ones that are not relevant for you.
At the right side, you can choose which Truffle "basket" should be targeted.
Both types of sources have their advantages and disadvantages:
The volume of suggestions within your Quality Library will likely be smaller, so this may result in less matches. At the same time, the quality of the contents will be higher.
Clauses in the Quality Library may included tags, ratings, comments, descriptions, descriptive titles, etc. that will help you assess the relevant material.
You can request ClauseBuddy to search for relevant clauses in three different ways:
By simply typing in contents (presumably in an empty paragraph). As soon as you have typed a few letters and pause for a moment, the software will start searching for a match and show it to you. Each time you change your text, it will search again.
By browsing through a Word-document. Simply positioning your mouse in a paragraph will cause the software to start searching for a matching.
By selecting text across paragraphs in your Word-document. If you select multiple paragraphs at once, ClauseBuddy will take the contents of all those paragraphs into consideration when searching. Note that you do not need to select all text of the paragraph — just a part of a paragraph is also enough.
Depending on what you select, ClauseBuddy will perform a different type of search:
If a small number of characters is selected, then ClauseBuddy will primarily search in the title of the available clauses, trying to match your selection literally. For example, if you type in "Confidentiality", then ClauseBuddy will first try to find clauses with that exact title.
Otherwise, ClauseBuddy will perform a semantic search between the selected text and the contents of the clause. In a semantic search, software will take into account the meaning of text during search, so that it will not only find clauses that literally contain the specified keywords, but also clauses that contain related terms — e.g. if you search for "intellectual property", you may also find clauses that mention "copyright" or "patents". This can be particularly helpful when searching for alternative clauses.
Due to space limitations, ClauseBuddy only shows a maximum of four different results — equally divided between the quality library (purple) and the truffle baskets (green) when enough material is available.
You can click on the Previous result and Next result buttons to retrieve additional clauses. At some point, when either source is exhausted but more search results are available in the other source, the software may only show results from one source (so one colour only).
When you see an interesting clause, you can click on it to "pin" it:
When a clause is pinned:
it will remain on the screen, and will not be replaced by other search results when you navigate to some other paragraph, or change the content of your existing paragraph
it will show a big "+" button, that allows you to insert the contents of the clause into your Word-document. When you hover over the "+" button, you can change the appearance of the clause-to-be-inserted (e.g., whether numbering and subtitles should be inserted) and change the styling settings.
Within the Truffle Hunt Clauses mode, the AutoSuggest functionality and your Quality Library, you can filter down your clauses using the help of Artificial Intelligence:
How this works is mostly self-explanatory, but let's go through some of the details nevertheless.
Essentially ClauseBuddy will send your currently visible clauses to a Large Language Model (LLM, aka the new type of "GenAI" Artificial Intelligence), along with your search query or selected text. The AI will then be asked to judge each of those clauses, filter them where necessary, reorder them and send back the ordering.
Truffle Hunt, AutoSuggest and the Quality Library use "smart" search by default, meaning that a superficial layer of artificial intelligence gets to look at your clauses to provide some level of intelligence that goes beyond a literal ("dumb") matching, as is the case with the "strict search". This level of intelligence is very fast (can process thousand results in less than a second) but the downside that the level of intelligence is superficial.
When you involve GenAI, however, a very deep level of intelligence is looking at your clauses. This takes several seconds and cannot encompass hundreds of clauses, but the results are much better though-out.
So all in all it's a balancing act with the current state of the technology, between strict search (super fast but dumb & literal), smart search (the default: reasonably fast, some intelligence) and post-processing with GenAI (slow, but very intelligent). As with all things in life, there are tradeoffs.
The Process results with AI button starts from your current selection of clauses.
The AI post-processing is currently limited to the top 50 clauses. While this amount may go up in the future (when GenAI gets faster) it is therefore very important that you first do a pre-selection with the other tools at your availability, such as the length & content filters in Truffle Hunt and the attributes in the Quality Library.
Once you have a rough selection, you then click on one of the options.
ClauseBuddy will send your search query along with the truffles/clauses to the GenAI-engine. When the query contains multiple words, this is usually enough for the GenAI to figure our what you mean — for example, when your search query would be "liability invoice maximum", then the GenAI will probably figure out itself that you're looking for clauses that relate to liability and some invoicing maximum.
However, you can help the LLM in its job to filter your clauses by providing an additional hint in the Optional prompt box. For example, you can type in there "Only clauses limiting the liability of the supplier", or perhaps something like "don't include clauses relating to payment defaults".
When you click this button, you'll see the GenAI group your clauses into different categories, with each clause in the same category sharing some legal "features". Clauses can belong to multiple categories at once.
For example, in the screenshot below, you can see that about fifteen categories of clauses were created — such as "insurance requirements" and "procurement procedures".
You can then select one or more categories of legal features to filter down what's visible on your screen. For example, if you select "Information security", you'll notice that only three clauses are selected, that all contain something related to information security.
If you then click another (non-light) category, you would further filter down. For example, if you also click on "Data Access and Processing Restrictions", you'll see only those clauses that both talk about information security and data access/processing restrictions.
You can click on the small X at the right to remove the legal features view and return to the normal view.
AutoSuggest is all about getting clauses that are somewhat similar to your currently selected text. The most important post-processing functionality is therefore to simply reorder your current results, so that the most relevant ones — i.e. the most similar ones — are shown first.
The LLM will essentially take your currently selected text, and then figure out how much the clauses in the visible results relate to that selected text.
The Keep if option allows you to write down the criterion for keeping clauses in your result.
If, for example, your confidentiality clauses were extracted from both employment contracts and shareholder agreements, then you could envisage writing "about employees & employers" if you only want to keep the employment-related clauses.
This is the opposite of Keep if. If most results are OK but you want to get rid of a few, go for Remove if.
Due to Truffle Hunt's sheer power and speed, you may be tempted to start uploading thousands of old documents, which you then share across your team. Depending on your jurisdiction, legal domain and the types of documents you are working, you may run into compliance trouble.
Attorneys are bound by strict client confidentiality rules. While the rules differ across jurisdictions, they generally require you to ensure information is reasonably protected against leakage. In-house legal counsel and other professions are often subject to similar rules.
Even if you are not bound by such rules, you will probably be subject to various non-disclosure agreements that go in the same direction. It's therefore generally a really bad idea to store an outsourcing agreement that you worked on 4 years ago, and then make that agreement accessible to your whole department — that agreement may very well still be in force.
As anyone knows, the risk of information leakage increases exponentially with each additional person who gets access to information, even when each additional person is also bound by rules of confidentiality. This is the reason why non-disclosure agreements tend to contain an obligation to only allow access to confidential information on a need-to-know basis.
You should therefore carefully consider whether you want to make documents available in a large team, particularly when team members tend to rotate.
You may be tempted to argue that Truffle Hunt is, in se, not so different from a typical content management system, or even a traditional drawer with paper files. After all, in most teams, all team members can also gain access to files in those systems.
The EU General Data Protection Regulation (GDPR), and similar legislation such as the Canadian counterpart, contains similar rules that require you to treat personal data confidentially/securely, taking into account factors such as the type of data, technology, cost, etc.
Because personal data is interpreted in a very broad way — basically anything relating to a potentially identifiable person — the scope of the GDPR's obligations is at the same time larger and smaller than the scope of typical non-disclosure agreements.
For example, personal data will also cover data that is not necessarily "confidential", such as fairly trivial information about a person. Conversely, some data that may be highly confidential (e.g., a multinational's internal financials) will not be within the scope of the GDPR obligations, because they do not relate to a natural person.
Accordingly, even if no non-disclosure agreement or professional secrecy rules would apply, the GDPR may impose limitations on how you treat documents.
Article 1.c of the GDPR explicitly requires personal data to be minimised. Conversely, when you start uploading thousands of files into Clause Hunt to ensure that you have access to all potentially interesting clauses, you are performing data maximisation instead. While there are some grey zones, the position of most data protection authorities roughly states that you should not be collecting data that is only potentially useful.
Less known is the subtle repurposing prohibition of the GDPR, which applies separate from the confidentiality obligations.
Article 5 of the GDPR states that personal data shall be "collected for specified, explicit and legitimate purposes and not further processed in a manner that is incompatible with those purposes".
Article 6.4 then states that in situations when no consent was obtained, several factors must be taken into account to assess whether reuse of personal data is compatible. These factors include the link between the initial and the new purpose, the context, the type of personal data and the impact on the persons concerned; and the security safeguards.
In other words, completely separate from its confidentiality & security obligations, the GDPR may outright prohibit storing documents in Clause Hunt, because the purpose of storing them in Clause Hunt (i.e., for getting inspiration during drafting) is quite different from the initial purpose for which this data was stored (i.e. for handling a file, e.g. contract negotiation, litigation, legal advice, etc).
All of this depends on all the factors mentioned. It remains a gray area, but notice in particular the factor of the security safeguards. Applied to Clause Hunt, this probably means that making content available to a wide range of persons will negatively contribute to the compatibility between the initial and new purpose.
The GDPR requires an explicit legal ground in order for the processing of personal data to be lawful. Article 6.1 GDPR lists the six possible legal grounds. While processing personal data for handling client files is perfectly fine (6.1.a: consent, or 6.1.b: necessity for the performance of a contract), only the grey zone of the "legitimate interests" of article 6.1.f can be invoked to process personal data for efficiency or quality reasons, as is the case when uploading documents to Clause Hunt.
It remains to be seen to which extent uploading documents with personal data to Clause Hunt is "strictly necessary" for efficiency/quality reasons, as there exist equally valid alternatives (such as manual cleaning and uploading to a quality clause library, which in our opinion is a much better idea from a quality & time-saving perspective).
Also interesting to note is that the ECJ did not accept "product improvements" as a reason, in light of the scale of the processing that Meta/Facebook undertakes, as well as the fact that the consumers did not expect that their data was used for this reason. This is highly relevant for our discussion here, because legal teams will want to do the clause extraction for service improvement reasons.
Limit the amount of persons who have access to a certain basket with documents. For this reason, Truffle Hunt allows you to create an unlimited number of lockers, so you can segment as you see fit.
Limit the persons who have access to a certain locker to those who already had access to the documents in that basket (e.g., because they were previously involved in handling the file).
Consider subdividing an individual department into separate sub-baskets. For example, in a law firm, you may want to consider creating a basket for each partner, and grant access to only that partner and the associates it closely works with on a day-to-day basis. Similarly, for inhouse legal departments, you may want to create a basket per subject matter.
Also consider allowing creating personal baskets. We often hear from legal experts that, even if they are strongly inclined to share content in a clause library, it "feels" different to bluntly share significant amounts of past working documents with random colleagues, particularly when those documents have their own "history" that is only known to the original author.
Don't blindly upload all existing files into Truffle Hunt; instead, make a selection of your the best (favourite) documents.
Don't treat Truffle Hunt as a document archive. Instead, upload copies of selected documents you find in your document management system, and upload copies thereof.
Do not upload very old files, as the likelihood that the information they contain is outdated, will obviously be higher. Take into account that the GDPR contains several provisions regarding data quality and a "right to be forgotten".
Upload templates if possible (instead of actual contracts). Usually they contain no confidential or personal data.
Manually clean your old documents, so that they do not contain any confidential or personal data.
If you are subject to the GDPR and rely on the "legitimate interests" legal ground to reuse the data of previous files, then remember to transparently inform your data subjects — upfront, i.e. not afterwards.
For all reasons above, we deliberately do not support importing your entire content management system in one go (e.g., an entire iManage or NetDocuments hierarchy). Such blind mass-import is a very bad idea, as this is all about data maximisation (the opposite of what the GDPR requires) and also because the signal-to-noise ratio of relevant documents versus irrelevant documents will be very bad. We therefore require you to do at least a minimum of prefiltering in your documents before uploading.
Of course, an even worse idea would be to automatically synchronise your content management system with ClauseBuddy, so that essentially every new file that would get added to your content management system will automatically end up in ClauseBuddy. In terms of compliance nightmares, this obviously trumps everything, and we don't want to be part of it.
Truffle Hunt allows you to create different "baskets" with documents & clauses — e.g., one for the Corporate department, one for Employment, one for IT/IP, and perhaps also a personal basket for every legal expert.
Creating different baskets is not only recommended to create a primary segmentation within your clauses (i.e., most of the time an employment lawyer is not interested in finding IP-related documents & clauses), but is also useful for compliance reasons and to ensure internal information rules are met.
Baskets can be managed by clicking on the "Manage" top of the screen. You will then see the following interface, containing a list of all your baskets at the left side.
To create a new basket, you click on the big green plus icon, configure it, and click on the Apply button.
The label should contain a friendly description of your locker/basket (e.g., "Commercial Templates" or "Mary Johnsson's Documents") — if relevant even translated into different languages.
When you activate the Allow upload by email? option, authorised users can upload documents by sending an email to the specified email address. See the separate section below for more details.
The primary way to get documents into Truffle Hunt is by dragging them onto the "Upload documents" button from your Windows Explorer or Mac Finder window. Alternatively, you can click on this button and select one or more documents through your operating systems' file selection dialog box.
Some tips & tricks:
You can drag multiple files at once. In fact, you can even drag an entire folder that contains subfolders, sub-sub-folders, etc. ClauseBuddy will completely ignore the folder structure and extract all your DOC/DOCX/PDF files from it.
There is a limit of 1000 files that you can drag in one go. Technically a basket can contain as many documents as you want, although in practice — to avoid noisy results — you will probably want to limit yourself to a few thousand documents anyway.
There is a limit of 15MB per file. PDF files are usually much larger, but you can get around this by converting the PDF file to Word and removing any images.
If you upload less than 20 files at once, then ClauseBuddy will process them in real-time for you, meaning that ClauseBuddy will send a file to the server, wait for it to be processed, and only then send the next file.
If you upload more than 20 files at once, then ClauseBuddy will transfer them all at once to the server. The server will then process these files in the background and send you an email once it's done.
Through the checkboxes above the "Upload documents" button, you can indicate whether you are interested in both the full document's content and the extracted clauses, or only one of them. If, for example, you do not want clauses to be automatically extracted for a particular set of documents, you can uncheck the "Clauses" checkbox.
ClauseBuddy will automatically extract metadata from the DOCX/PDF file that you are uploading. However, you should be aware that the information in these files is generally noise — as most lawyers know, the DOCX properties often refer to the law firm that happens to have created the first draft, perhaps more than 15 years ago. If you want to manually set the author, year, client, dossier, etc. for an entire batch of files before uploading them, then you can do so through the Additional data to enrich uploaded files... form. Alternatively, metadata can be edited on individual files after upload — either on the same Upload tab or the Inventory tab — by clicking the 'Edit' icon:
Uploading documents by email can be a very convenient feature to gradually upload documents, considering that most legal experts make heavy use of email. When an interesting document is drafted — e.g. a new template — you can simply forward this file to the specified email address, instead of having to manually drag in the file.
Notes:
Any PDF, DOC or DOCX attachment will be automatically extracted from the email, and uploaded, as if you had manually dragged the file onto the "Upload documents" button.
You can attach multiple files to the same email.
The software platform will check the sender's email address; if the user is not allowed to manually upload documents to a basket, then sending by email will be refused as well.
All the other data within the email (subject; body; persons in CC or BCC; etc.) will be completely ignored.
It can take about one minute for the file to get processed; the sender will also receive an email confirmation with an overview of all the documents that got uploaded.
Immediately afterwards, the email will be completely and permanently destroyed.
The email address to which you have to send the emails looks a bit funny, but this is intended as a security measure, because the address is generated semi-randomly, so is difficult to guess. Should you ever want to change the address, you can click on the "Regenerate" button.
If you happen to use iManage as a document management system, then you can also send files or folders to ClauseBuddy using dedicated buttons in iManage. This requires a significant technical setup, so please have your administrator contact us if you are interested in this feature.
You can also upload documents in batch through our so-called "REST API", e.g. to perform server-to-server transfers of thousands of files from some filing system to ClauseBuddy. Also this requires significant technical expertise, so will need to involve your IT-team.
To edit the name, access rules and email upload settings of a basket, you click on the ... at the right-side, and select Settings.
You can edit the year, author, client, dossier and category of an individual file by going to the Inventory tab of a basket and clickin on the pencil icon at the right side.
Next, you can edit all properties through the popup dialog box.
You can delete a document by going to the Inventory tab, holding Shift on your keyboard and clicking on the trash-can icon at the right side. (You must hold Shift to avoid accidental clicks.)
Alternatively, you can delete a document by clicking on the "..." button in the upper-right corner of the currently visible document in the Documents mode.
You can delete an individual clause by going to the Clauses mode and clicking on the "..." button in the upper-right corner of a clause.
You can delete a basket by clicking on the ... at the right side, and then selecting Delete.
You will have to confirm that you truly want to delete the basket, because this process will irreversibly delete all your documents and clauses in it.
However, many customers want to automatically give personal baskets to each of their users. ClauseBuddy therefore allows customers to have personal baskets automatically set up for both existing and new users.
In order to create personal baskets for existing users, you must do the following as an administrator:
Go to the Manage tab of Truffle Hunt and click on the green + button, and then the "..." button in the lower-right corner of the popup-dialog box. Choose Create missing Personal baskets in bulk
In the new popup-window that appears, choose either All (create the missing baskets for everyone), Groups (create them for a specific group of users) or User (create a Personal basket for one specific user).
You can configure ClauseBuddy to automatically create personal baskets by going to the User setttings as an administrator, and choosing New user defaults.
At the bottom of the settings pane that then appears, you can enable the Personal Truffle baskets. When you activate this option, you can see a few more settings:
The Prefix of the personal baskets, in the various languages you're dealing with. Technically speaking, the values you enter here will be used for the Category of the new basket.
The Include checkboxes allow you to specify whether the personal baskets should store clauses, documents, or both.
Most legal drafting software packages claim to be "language-agnostic". This sounds fancy, but "language unaware" would actually be a nicer term, because such software does not try to understand the words inside a document or clause. So whether you're uploading a document in English, Spanish, Chinese or Klingon — it does not matter for that software, it will simply allow you to search for individual characters.
ClauseBuddy does the opposite: it is very much language aware, and will determine the language of each document, so that you can perform a better search. For example:, when you search for "agreement" in English, it will also automatically search for "agreements" in plural; but the rules for what constitutes a singular or plural differ between languages. Similarly, when splitting a document into individual clauses, ClauseBuddy will use different anchoring points depending on the language (e.g., "Chapter 5" in English, but "Chapitre 5" in French) to decide how to split up clauses and how to understand numbering.
Truffle Hunt will automatically determine the language of your document based on its contents. While this almost always works correctly, you should be aware of a few caveats:
Truffle Hunt automatically subdivides a basket into different languages and will then search in one of the sub-baskets depending on the search term that you enter. If, for example, you search for "logiciel licence" then Truffle Hunt will search in the French sub-basket of your selected basket, and only return French documents & clauses. Conversely, if you would search for "assignment confidentiality", it will search in the English sub-basket.
If you enter only a single word, then ClauseBuddy may end up searching in the wrong basket. For example, the word "software" will be a valid word in many different languages. The solution is simple: just add one or more terms to your search query, so that ClauseBuddy can correctly determine the language and subsequently search in the right basket.
ClauseBuddy accepts .DOC, .DOCX and .PDF files. In the background, it will automatically convert all of them into .DOCX and store them in the database. Also useful to know that it is even possible to upload scanned documents.
You should be aware, however, that the conversion process for PDF-files is inherently noisy, and will always result in files of lesser quality than .DOCX files.
The EDGAR (Electronic Data Gathering, Analysis, and Retrieval) system, managed by the SEC, serves as the source for the documents included in Samples Hunt. Established in the early 1990s, EDGAR was developed to streamline the submission and dissemination of filings required by the SEC from publicly traded companies. These filings encompass a broad spectrum of corporate information, including annual and quarterly reports, insider trading disclosures, and details on mergers and acquisitions.
The underlying idea is that these documents offer some transparancy towards (potential) shareholders, to assess the state and the financial results of publicly traded companies. The documents sourced from EDGAR offer comprehensive insights into the financial health, strategic decisions, and legal obligations of publicly traded companies.
What are the licensing rights for using EDGAR documents? The documents obtained from the EDGAR database are in the public domain and can be used freely. However, users should adhere to any guidelines set forth by the SEC regarding their use, especially in commercial products or services.
Who typically authors these documents? The documents in the EDGAR database are primarily authored by the companies themselves, as they are legal filings required by the SEC. These filings are often prepared by a combination of company executives, legal teams, and financial officers.
Can these documents be redistributed? Yes, since these documents are public domain, they can be redistributed. However, you probably do not want to re-use these documents in their entirety, because (1) the formatting of the documents is fairly poor, because the SEC does not provide the original documents; and (2) for non-Anglosaxon jurisdictions, the documents tend to be too long, too specific and too American. Instead, you probably want to use these documents to search for interesting clauses.
How current are the documents in the software? Previously we included documents from 2000 to 2022, but the feedback we received from our users was that the selection was simply too large, typically with thousands of results for each search. We have therefore deliberately limited our selection to the period 2015-2023. We intend to add new years in the future, although it should be borne in mind that our use of the EDGAR database is for inspiration, so should not be used for situations where you require exhaustivity. Going forward, we may also delete old years (such as 2015, 2016, and onwards) when we add new years.
Which legal domains are included? The EDGAR database contains millions of documents; many of them are not relevant for drafting inspiration purposes. We therefore selected mostly contracts, in the field of commercial law, finance agreements, employment law and commercial law (real estate, distribution agreements, IT, IP).
As explained in the the Clause mode may be more suited for uploading thousands of documents, if you're using it to solve the frustration of "I have written this clause in the past, but cannot find it."
For you also want to avoid uploading thousands of documents, except if you would thoroughly clean them upfront. If you are like most legal experts, you are subject to client confidentiality rules, non-disclosure obligations, data protection rules and various internal security rules. No matter how secure ClauseBuddy is, storing thousands of confidential on external systems for mere efficiency reasons, is usually a bad idea.
Creating different baskets is not only recommended to create a primary segmentation within your documents (i.e., most of the time an employment lawyer is not interested in finding IP-related documents), but is also useful for and to ensure internal information rules are met.
You can also change the layout of the clause, e.g. to avoid inserting the title or avoid bullets. See our separate page on .
Tip: you can also filter your clauses with the deep intelligence of GenAI, by clicking on the Optimize search results button . This takes a few seconds to process, but thanks to the intelligence that's applied, it may well be worth the waiting... See our about this feature.
ClauseBuddy is layout-aware, meaning that your clauses will usually automatically get the layout of the document they're inserted in. However, there is an , such as your own house style, for those scenarios where the automatic styling is not what you want.
This button (located in the dropdown button below the brain-icon ) will filter your search results, so that only the clauses/truffles are kept that meet the filter.
This button (located in the dropdown button below the brain-icon ) will compare your currently visible clauses and allow you to easily make subselections.
As explained in the, Truffle Hunt is designed to allow you to easily search through your set of favourite documents.
However, Truffle Hunt's speed and ability to instantly jump between paragraphs and documents will cause team members to gain random access to various bits of information. This is quite different from a targeted search that would be traditionally undertaken when a team member would search for a specific file in a case filing system. Even if you would undertake a broad search in those systems, it would take considerably more time to get access to pieces of information, because you will have to open a file, scroll through it, and so on. Read more about this topic in our .
That "legitimate interests" legal ground is often invoked as a last resort, but it is under increased scrutiny by authorities and courts. For example, in , the EU Court of Justice emphasized that the processing of the personal data should be "strictly necessary" in order to reach the legitimate interests specified by the company, meaning "that the legitimate data processing interests pursued cannot reasonably be achieved just as effectively by other means less restrictive of the fundamental rights and freedoms of data subjects" (nr. 108).
Consider using scrubbing software before upload, such as or . However, you should be aware that the effectiveness of these tools varies between languages and documents, so you should expect their performance to generally not exceed 80%. You probably need to combine this with some human screening. (We are investigating the possibility to use "Large Language Models" (LLMs) such as GPT and Google Bard to perform the scrubbing, so in the future we may offer such tools ourselves.)
This is the unfortunate part where we have to tell you that we are really serious about the information in the paragraphs above. Please check clause 8.3 of our , where we explicitly disclaim quite a lot of responsibility.
You may want to read an in-depth .
ClauseBuddy strongly encourages you to create different baskets (Truffle Hunt) — e.g., one for your Corporate Department, one for your Employment Department, and one private basket for each individual legal expert. For , you want to subdivide a department into such separate baskets.
In the Access-bundle box you should select an , to define who gets access to a certain locker/basket, and who can upload / remove documents from it. Users need "Read & Use" rights to search, and need "Edit" rights in order to upload or remove documents from a locker/basket. See also .
Through its system, ClauseBuddy allows you precisely configure which users have access to certain baskets. Without any special facilities, it is therefore possible to create baskets that only grant access to a specific user.
The Allow upload by email? setting allows users to .
Samples Hunt merges the technology of with the vast "EDGAR" database published by the US Securities & Exchange Commission (SEC).
Please see the pages that describe . The technology is exactly the same, and works in exactly the same way as with your only documents. The only real difference is that you cannot upload new documents to Samples Hunt.


Samples Hunt obtains its clauses/documents from the EDGAR database.
EDGAR (Electronic Data Gathering, Analysis, and Retrieval) is an internal database system managed by the SEC that performs automatic collection, validation, indexing and acceptance of submissions by companies and others required by law to file forms with the SEC. The database contains a wealth of information about the commission and the securities industry that is freely available to the public via the internet.
Yes, in addition to Word and normal PDF documents, ClauseBuddy can also read scanned PDF documents.
ClauseBuddy offers two search modes: Smart and Strict.
The default mode is smart. Here, ClauseBuddy uses an intelligence layer to find semantically matching clauses. The search is not literal, so descriptions and synonyms usually also show the correct clause at the top.
Strict search is possible by checking the box to the right of the search bar. A literal search is performed in this mode. Grammatical variations are allowed, but synonyms are excluded from the search results.
This can be done by clicking on the green strip below the clause title:
There are a couple of things to keep in mind when using Truffle Hunt to look for clauses.
As is the case with other search engines, using a single word is never recommended, except when it’s a fairly unique word that you can expect to see show up in just a few clauses. It’s simply too broad and you will easily get many results. Using a single word is particularly not recommended in ClauseBuddy’s standard smart search, which searches for clauses that are semantically related to your search term. As this involves a specific type of artificial intelligence, and it’s quite a new way to search.
A couple of things to keep in mind are:
“Semantically related” means that the overall meaning of a certain clause must roughly “correspond to” the overall meaning of your
The shorter your search query, the more difficult it becomes for artificial intelligence to treat an entire clause as “corresponding” to your search term, because you're comparing a text that bundles together perhaps 15 different conceptual ideas, with a single word that expresses just one concept. That’s like asking “Do you think a fruit basket and a banana are similar?”: most people would probably disagree. Conversely, if you would ask “Do you think a set containing a banana, apple and pear are similar to a fruit basket?”, the answer is more likely to be positive
Note: While semantic search involves a certain type of artificial intelligence, it doesn’t think “deeply” about your search query (like ChatGPT is able to think about what you ask), as that would be much too slow in a database with thousands of clauses. You should therefore not expect ClauseBuddy’s speed-focused artificial intelligence to “deeply” understand your search query and/or the clauses in the database.
Solutions to use the Truffle Hunt search more efficiently:
Always avoid single-generic-word searches
Check the option “strict”, in which case a literal keyword-search is conducted. In such literal keyword-search, the artificial intelligence and semantic meaning deduction are deliberately avoided.
Use a more descriptive semantic search (you don’t have to type in a sentence: combining multiple keywords is usually also sufficient)
Don’t treat the search engine as an intelligent lawyer, as the artificial intelligence is focused on speed. Also, unlike Google, it cannot guess your search intent as deeply, because it operates in the law firm’s private silo, so cannot rely on the search feedback of billions of users.
Yes that is definitely possible! When you search for clauses in Truffle Hunt, you can immediately export the results to the Quality Library:
No, any change you make like redrafting is temporary. The underlying clause remains unchanged.
No that is not possible at the moment. Searching for clauses is done by basket.
No, this is not possible. However, it is possible to adjust it on a document-by-document basis. You can do this as an admin in the manage tab of Truffle Hunt. More info can be found .
If you wish to adjust the terminology before inserting a clause in the document, you can do so by clicking on the wrench icon :
Next, a new menu appears where you have the option at the bottom to replace a term in the clause with a custom term chosen from the open document (or by entering a term in the field next to the term):
After choosing the term, you simply click on ‘Redraft’, and the clause terminology will be adjusted with the terms chosen by you:
The clause with the adjusted terms can then be inserted into the document using the plus icon.
Yes there is. You can easily upload your active (opened) document to any basket by clicking on “upload active document” in Truffle Hunt:
As in other ClauseBuddy tools, the Truffle Hunt takes into account file duplication.
In the Truffle hunt result list, de-duplication is done as follows:
All clauses are converted to lowercase (so that differences in capitalisation are ignored)
Punctuation is removed (so that differences in that respect are ignored)
Stop words are removed (so that differences in words like "and", "the", "will", etc. are ignored)
In the end, what it boils down to is that if you were to upload the same document, it would also end up in the basket (which should not be an issue. After all, Truffle Hunt is an inspiration module)
But, an identical clause will not be displayed twice in the results.
So for example, let's say you would upload the exact same document 8 times in a basket. Then a clause from the document is not going to appear 8 times in the results, only once.
The philosophy behind ClauseBuddy is that the future is hybrid: human + traditional software + GenAI. The new type of Artificial Intelligence ("Generative AI" or "GenAI") is here to stay, and will bring a lot of changes to the legal sector. However, not even the brightest and fastest GenAI will replace the human lawyers, and traditional database technology is also more relevant than ever for legal professionals.
When working with GenAI, you will notice that it is very creative, so that it can be at the same time produce brilliant results. Yet it is also highly unpredictable and will also sometimes produce quite inferior results. As former lawyers ourselves we know that this will turn off some legal lawyers, because the results are often far from perfect — but if you avoid the technology, you'll miss out on all the brilliance it frequently offers you and the speed at which it offers those results.
The question is therefore how to get most of the brilliance but avoid the bad results. GenAI is a new software tool on your legal toolbelt that any modern legal professional must master, just like any other tool.
ClauseBuddy offers GenAI-based features and buttons across the entire app, in roughly all modules — for example, also the traditional Quality Library hosts many GenAI functionality. However, the modules shown in pink on the homepage are 100% dedicated to GenAI.
Drafting clauses with the LLM is easy: you go to the Write & Rewrite module in ClauseBuddy, click on Draft new text and enter a query. The software will then come up with an answer after a few seconds, which you can insert into your document, ready to be inserted in the same layout (usually).
Above we talked about contract clauses, because those will be the most frequently produced paragraphs of text. However, you can also ask the LLM to draft other types of text — from short summaries of some legal rule, to grammatical enhancements of certain fragments to text, to even poems (legal poems, of course!).
Instead of drafting a new clause, you may want to redraft existing text:
Through the Write & Rewrite module, you can even automatically optimise your clauses for one party (e.g., the buyer versus the seller), or submit your text for automatic proofreading (as if you asked your junior colleague to do a last check of your text).
You can ask the LLM to create a summary of some selected text. You can do so going to the Summarize module, selecting text within your MS Word document (or pasting text when you are using ClauseBuddy outside of Word), and then clicking on the blue Summarize button.
By default a summary is 'Simple' — i.e. a short, single paragraph. But it is also possible to produce more structured summaries like so:
Selecting Custom > New opens a summary format editor. Here, you can modify, save, and load settings for subsequent summaries. For instance, a summary rendered as a table with columns for the Date, Party, and Content of the clauses in the selected (or pasted) text.
The way you use the resulting summaries is similar to drafting clauses, as described above.
You can instruct the LLM to generate an entire outline of a document, and then interactively add clauses to them — either from your own clause library, or generated by the LLM.
GPT3 and its successors has surprised the legal world, and many legal teams and law firms have published warnings about being careful with this technology — particularly as regards the hallucinations that may happen for very factual answers (much less a risk for typical contract clause drafting)
Warning. You should be aware that GenAI technology is 100% stable from a technical perspective. Accordingly, you will sometimes get errors from the service, for inexplicable reasons.
Also, you should be aware that Microsoft (similar to OpenAI) applies content filtering on the prompts and the answers. Any profanity, sexual content, semi-illegal content, etc. will therefore likely be refused by GPT4.
By default, ClauseBuddy integrates with the GPT4o "Large Language Model" (LLM), as . However, that's just the default, because ClauseBuddy is "LLM-agnostic" and actually allows you to use most of the custom LLM's on the market, such as the EU-based , or .
See also: if you want to bring your own LLM.
Read more about it on our for Composing full-Documents.
The Manage reviewing rules and Review document are not shown in pink on ClauseBuddy's home page, but they are also 100% GenAI-focused. They allow you to create custom rulesets ("playbooks") to automatically review legal documents against your internal standards.
ClauseBuddy uses Microsoft Azure's version of GPT4o by default, which does not reuse your data to train the AI (as the free version of the LLMs does, which potentially causes confidentiality leaks). As , Microsoft only reserves the right to look into your data to investigate abuses or technical failures.
For more in-depth information about this topic, see the section on "confidentiality" in our .


The Write & Rewrite module allows you to either draft new content, or to redraft existing content selected in your opened MS Word document.
Highlights of this module:
It is layout-aware, by analysing your existing document and trying to mimic the styling and numbering.
It is context-aware during drafting, because it takes into account the content of the surrounding paragraphs (or even of the entire document).
It allows you to interactively experiment by having unlimited undo/redo and allowing you to keep redrafting paragraphs until you are ready.
It allows you to insert content with changes being marked ("track changes").
You can open multiple tabsheets in order to draft/redraft multiple paragraphs at once.
This module offers different submodules: draft new content, redraft existing content, AutoCheck, AutoPolish and Checklists.
Drafting new content involves five steps:
Choose a starting location in your MS Word document.
Write a drafting instruction.
Submit the drafting instruction to the AI engine
Optionally rewrite some fragments
Insert your content into your MS Word document.
Before drafting new content, you are advised to go to the location in your MS Word document where you want to insert the new content. (Typically you will want to insert your text cursor in an empty paragraph, but it's also OK to select one or more paragraphs that will be replaced by the new content).
The reason why you are advised to select the right location in your MS Word document is that ClauseBuddy is layout-aware and will take into account the paragraphs surrounding the position of your cursor, to decide about the numbering, layout and content of the newly drafted paragraphs.
As a second step, you need to write a drafting instruction for ClauseBuddy's AI engine in the dedicated box at the top.
load one of your recently used drafting instructions
When only one AI engine (LLM) is installed, all you have to do is click on the blue Draft button. Conversely, when multiple AI engines are available to you, you may want to first choose the right one by clicking on the dropdown triangle.
The AI engine will then get to work and draft one or more paragraphs, as per your instructions. This generally takes 5 to 10 seconds, depending on the length and the complexity of your drafting instructions
When the initial result is proposed, you can then either click on the green Amend result button, or instead click on the Retry button to give it another try.
When you click on Retry, the same instruction will be submitted once again to the AI. Note that the AI is completely unaware of what it previously generated, so the new results may be completely different, partially similar and occasionally (with very specific instructions) even exactly the same as the previous results. You can use the undo/redo buttons in the top right corner of ClauseBuddy to go back to the previously generated results if in the end you decide that the new results are actually worse.
Once you have accepted the initial drafting results by clicking the Amend results button, you can tweak either or one or more individual paragraphs, or even rewrite the entire text, through additional drafting instructions.
Rewriting individual paragraphs can be done by first highlighting one or more paragraphs, either by clicking on a particular paragraph, or by dragging with your mouse over multiple contiguous paragraphs. You will notice that the blue button below the instruction box will then change to Redraft highlighted, and that an additional grey Clear highlighting button is shown (which allows you to remove the highlighting again).
You can then either enter a new drafting instruction and push the Redraft highlighted button...
... or alternatively select one or more redrafting instructions from the Recent or Suggestions dropdown menus.
Rewriting the entire text is probably less interesting than rewriting just a few paragraphs, because if you're really not happy with the text that was generated by the LLM, then it's probably easier to simply press the Retry button after the text was generated.
Even so, sometimes it's useful to let the LLM add a few additional things throughout the text. To tweak the entire text, just enter a new drafting instruction (or change your existing drafting instruction, or press the Recent or Suggestions buttons) and press the blue Redraft entire text button.
ClauseBuddy will then send the text that was previously created, together with your new drafting instruction, towards the LLM. The LLM will then send back a written text. If you're still not happy, you can undo the operation, or perform yet another redrafting operation, or perhaps even start over completely.
When you're happy with the results you see in ClauseBuddy, you can insert these results into your currently opened Word-file.
You can do so by going to the purple + Insert button and choosing one of the options.
When you have highlighted one or more paragraphs in ClauseBuddy's Write & Rewrite module, you get the option of only selecting those highlighted paragraphs (instead of all text visible in the module).
When you have selected one or more paragraphs in your MS Word document, you get the option to insert the text with changes visible "track changes".
You can also copy the text to the clipboard of your computer, so that you can paste it anywhere. Note that this will strip most of the styling, and will also cause the automatic numbering to get hardcoded.
Instead of drafting new content, you can also ask ClauseBuddy to redraft existing content. The process is partially similar to drafting new contents from scratch, and essentially entails the following steps:
Select the content to be redrafted.
Write a drafting instruction.
Submit the drafting instruction to the AI engine
Optionally rewrite some fragments
Insert your updated content into your MS Word document.
The most important differences with draft new content from scratch is that ClauseBuddy will introduce changes within the content selected in your MS Word file. For an LLM, rewriting existing content is actually harder than writing new content, because it needs to pay attention to existing styling, and needs to make insertions/deletions/moves — all of which have an impact on the quality.
The quality of the output will depend on the amount of text that needs to be redrafted.
If the LLM's task involves completely rewriting large chunks of text (i.e., if the LLM has to generate completely new chunks of text), then you are strongly advised to rewrite only a few clauses at a time — certainly not more than roughly one page at a time. As LLMs get better over time, this limit will probably improve, but for the moment we advise you to keep your redrafting selection relatively small.
It is possible to ask the LLM to review many pages at once — e.g., asking it to proofread an entire document looking for obvious mistakes, or to change a certain party from singular to plural. In such case the amount of text that must be produced by the LLM is not so substantial (typically only a few descriptions of words that need to be changed), so often this works reasonably well. However, you are strongly advised to pay attention to what the LLM drafted, because mistakes will arise.
When you redraft existing text, ClauseBuddy will show the changes in red (deletion) and green (insertion). You can toggle this visibility using the Show changes checkbox above:
When an entire paragraph got inserted (green), you can remove it again by clicking on the little undo-button at the right of the paragraph:
You can also remove individual words by clicking on them again — clicking on an inserted word (green) removes it again, while clicking on a deleted word (red) will reinsert the word again. In the example below, clicking on subject to the terms and conditions set forth herein would remove that insertion again.
You can load a previously saved drafting instruction by clicking on one of the predefined instructions at the bottom. ClauseBuddy will then append that instruction's text to whatever text is already written in the instruction box.
You can also save an instruction you've written, in order to reload it at a later moment. You can do so by clicking on the "..." button at the top right and choosing Save.
The instructions are saved on ClauseBuddy's server and are personal to you. Accordingly, they are not shared with your colleagues.
ClauseBuddy will automatically send the paragraphs surrounding the selected paragraph in the MS Word document to the LLM. The LLM will therefore get a merely partial view on the entire document.
For many drafting & redrafting tasks, this is more than enough. Moreover, you may not even necessarily want the LLM to know more about the entire document, e.g. because of compliance reasons, or because you fear that the LLM may get confused because you are asking to (re)draft in a way that is quite contrary to the rest of the document.
However, there are also situations where it would be very useful for the LLM to get a better view of the surrounding document. This is what the Include document context checkbox is for.
When checked, ClauseBuddy will ask the LLM to first create a summary of your existing document, as well as the legal terminology (such as defined terms). It will then send all that information along with the (re)drafting instruction.
You can inspect the summary and the defined terms by clicking on the blue information-icon. You can also hit the Refresh link at the bottom to generate this information again (e.g., when the document or its terminology would have changed so substantially that this terminology is no longer accurate).
Writing good AI-prompts is a skill, just like writing good queries for search engines such as Google. It requires a bit of experimentation to fully realise what an AI can write really well, and where it will do a poor job. In general, however, take into account the following rules of thumb:
More instructions is generally better. For example, you'll get decent output when you simply say "Draft a copyright assignment clause", but it's doubtful whether you'll like the results with such an open-ended prompt.
Usually it's a good idea to specify the following elements:
Which party you are acting for, i.e. for whom the clause must be optimised from a legal perspective.
How long the new content should be, specified in absolute terms (e.g., "at most 10 sentences" or "at least two paragraphs"). For some types of content relative terms (e.g., "long" or "short") may work, but that's the exception — not the rule.
Which specific elements must be included or avoided, e.g. whether typical exceptions must be included to the obligations imposed on the parties.
You can give limited layout instructions: the LLM can convey towards ClauseBuddy that words must be put in bold, italic, underline or with highlighting. You can therefore give an instruction like "Put a short summary in bold (max. 3 words) at the start of every paragraph."
ClauseBuddy will take great care in keeping your cross-references and bookmarks intact. Unlike naive drafting products, ClauseBuddy will not break/remove these elements, and will not convert them to hardcoded text.
Try to experiment with proofreading commands, e.g. “Correct obvious mistakes, as if you were a junior lawyer reading the final version of the contract prepared by the partner. Only correct real mistakes, not nice-to-haves.” With current LLMs this does not work perfectly for big amounts of text (some errors are simply ignored), but the LLMs frequently do spot mistakes that the MS spell/grammar checker would miss.
The AutoCheck submodule allows you to automatically optimise multiple clauses at once. The only thing you need to do, is to click on the purple button and chose the party you're acting for. ClauseBuddy will even automatically extract the names of the parties from your document, it couldn't be easier.
For example, a typical clause written to the advantage of the Licensor would be rewritten to the advantage of the Licensee, as follows:
AutoCheck doesn't require any effort at all, and — thanks to ClauseBuddy's layout-awareness — usually even respects the layout of your document. It doesn't get easier than this. The typical use cases include:
Getting inspiration on how you can optimise a text.
Allowing junior lawyers to learn how different parties would optimise a text for their side.
Don't say we suggested this, but also: annoying your counterparty if you don't have much time, by quickly producing some markup.
Providing impressive demos to your fellow lawyers.
AutoCheck relies on the built-in knowledge of GenAI. It cannot read your mind, it has no access to your emails, it is not "trained" on your own content, and does not know what it should do exactly. The results often feel like magic because of the lack of effort, but obviously that lack of effort is also its Achilles heel.
Due to the statistically-focused nature of GenAI, AutoCheck works best for contracts for which millions of examples can be found on the public internet (i.e., not behind any paywall, e.g. those from commercial legal publishers). This is, for example, the case for typical commercial contracts such as sales agreements, license agreements, distribution agreements, NDAs and so on.
Conversely, for local legislation and niche areas of law, don't expect the GenAI to have good predefined knowledge. The results will be less convincing, accordingly.
If a human lawyer would need more context than just the literal text of the document (e.g., background about the relation of the parties, the setup of the deal, the priorities of the parties, etc.), then AutoCheck will likely also produce poor results.
This may sound obvious, but not even GenAI can read your mind, and you'd be surprised how many things are completely obvious to an experienced lawyer due to years of experience, while none of that is even remotely obvious to outsiders. If there are no published conversations online about a certain legal subject, then GenAI is probably clueless about it. So even when every lawyer in your jurisdiction knows that you should never go to court X to file for petition Y, to the extent that everyone would consider it insane to even try this, GenAI will be clueless about it when no one writes about it online — similar to how a junior lawyer would also have to hear this information from someone.
AutoPolish allows you to optimise the wording of your text — not so much from a legal perspective, but instead from a more grammatical & common-sense perspective.
AutoPolish has two modes:
With Only correct obvious errors, ClauseBuddy will instruct the LLM to only correct, well, the very obvious errors — similar to what a senior would ask from a junior, as a last review before a document is sent to the counterparty. For example, the following changes are then made:
The use case of this feature is to go beyond Word's standard spellcheck and grammar check, which does not truly "understand" text and only focuses on well-known problems.
The Correct errors and optimise wording goes beyond this. With this option, the LLM will also propose various optimisations. This is the equivalent of asking a native speaker or editor to go through your final text — expect many things where you are positively surprised, but also expect many changes that you don't agree to!
Don't expect legal perfection from the LLMs. You will frequently get suboptimal results, and the process may sometimes even lead to no results / errors.
LLMs are not experienced lawyers, given though they have ingested heaps of legal information during their training process.
LLMs are not aware of the latest legal developments (e.g., new case law and recently published statutory texts), and are only aware of publicly accessible data sources.
Don't expect layout perfection either. In practice, the styling of most MS Word documents is particularly bad, so that ClauseBuddy and the LLM together have a difficult job in figuring out the styling. Moreover, the LLMs are somewhat unpredictable — sometimes they give good results back to ClauseBuddy, sometimes not.
The Smart Merge option allows you to intelligently merge two clauses (or selections of text) in an intelligent way, with the help of Artificial Intelligence.
Smart Merge is not a separate module that you can activate through the home page of ClauseBuddy; instead, it can be invoked before you insert a clause into your MS Word document. For example, within the Quality Library, it would be shown as follows:
Similar popup-menus can be found within Samples Hunt, Truffle Hunt and AutoSuggest.
When you invoke Smart Merge, it will show show a dialog box with two different texts:
The text on the left side will consist of your currently selected text in MS Word, or — when no text is selected at all — the paragraph your cursor is currently positioned in.
The text on the right side will consist of the clause you were dealing with in ClauseBuddy (e.g., the AutoSuggest clause you selected and for which you invoked the popup-menu through the big "+" button).
However, you can change the text at either side by clicking on either the Use selection button (which will pick up the text from your current selection in MS Word) or through the Paste text button (which will paste text from your clipboard). So even if the dialog box was initially filled with some text, you can completely change these texts however you want.
Once your left side (Target clause) and right side (Merge with) are selected, you can click on the purple Analyse button to start the AI-analysis of the two texts.
The AI will analyse your clauses to extract "legal features", i.e. relevant legal elements for the context, e.g. the way the duration of a contract is expressed, or the fact that some arbitration panel is chosen, or a certain termination right. The AI will thereby focus on relevant content-related legal differences, and skip over mere grammatical differences.
For example, the two simple clauses shown in the previous screenshot, were broken down into the following legal features:
Initially, all the legal features of the Target clause will be selected, while none of the Merge with features will be selected. It is then up to you do decide which features you want to add or remove, simply by clicking on either the green/red button or the associated text.
You can click on the eye icon at the right to see the actual text associated with this legal feature:
As you can see in the screenshot, it may also happen that legal features are "conflicting" with each other. For example, the clause on the left required complaints to be submitted within one month, while the clause on the right requires three months. You can hover over the orange or red Conflicting button to see the label(s) of the conflicting legal feature (conflicts may also exist with multiple legal features at once) :
The orange Conflicting warning merely expresses that there are potential conflicts; if you simultaneously enable two conflicting legal features, the orange will turn into red:
You will then, likely, want to disable one of the two conflicting legal features. For example, in the example below, the conflicting requirement from Merge with was deselected again
Once you have selected all the legal features you like, you can click on the purple Merge button to ask ClauseBuddy to merge the two clauses in the way you expressed. The AI will start from the target clause (i.e., the one that was initially at the left) and then:
remove undesired legal features, i.e. legal featurs that you disabled from the Target clause
add new legal features, i.e. legal features that you enabled in the Merge with clause
The AI will thereby start from the Target clause's terminology, and adapt the wording of the legal featuress taken from the Merge with clause, so that they are more consistent with the Target clause. You should however be aware that this merging operation will not be perfect, although the AI will often do a pretty good job.
In case you did not resolve conflicts and nevertheless merged, the AI will usually give precedence to the legal feature in the Merge with clause, to the detriment of the corresponding legal feature in the Target clause.
The AI will show you the final result:
You may want to check the difference between this text and the initial Target clause by clicking on the grey Compare button:
Finally, you can insert the new text into your MS Word file by clicking on the purple + Insert button. As is the case with this popup-menu elsewhere in ClauseBuddy, you can choose to either insert the new text
as-is, effectively removing the currently selected text (if any) in MS Word
with "track changes":
if no text is currently selected in MS Word, then the entire clause will be shown as an insertion
if some text is effectively selected in MS Word, then ClauseBuddy will compare the currently selected text of each paragraph with the new text that you're about to insert, so that partial insertions and deletions will typically be generated.
For example, when choosing Insert with changes while the initial clause was selected, the following result is generated in MS Word:
DocChat allows you to interactively "interrogate" your document (and even other PDF/DOCX files) with the help of Artificial Intelligence (AI). Ask a question, and get both an concise answer and an overview of all the relevant parts of the document that deal with your question.
The Doc Chat module works similar to other Generative AI chatbots, such as ChatGPT and Microsoft CoPilot. Essentially you ask it a question, it will provide you with a response, and you can then ask follow-up questions and hold a conversation with the chat bot.
The largest difference is that ClauseBuddy's chatbot is "layout-aware". If its answer consists of texts that you will likely want to insert into your opened MS Word document, then those answers are shown in green, and can usually be inserted without any layout configuration necessary.
ClauseBuddy's chatbot is aware of your current text selection. When you ask it to rewrite the selection, it will take only the paragraphs you selected.
General answers (i.e., those that you will not typically copy/paste into some document or email) will be shown with a light-purple background and can be copy-pasted through the small copy-button:
Answers that you will likely want to insert into your opened document (or email in Outlook) are shown with a light green background. They contain ClauseBuddy's special layout-aware insertion button:
The chatbot will frequently link back to relevant sections of the document. Just click on a paragraph to go to the corresponding paragraph in your document.
The chatbot has a legal filter built-in and will only respond to queries that relate to legal subject matters (in a wide sense). It will refuse to answer queries about completely unrelated subject matters, such as sports or pop songs. While there are always edge cases where the filter will be too strict or too relaxed, the filter is generally a good thing, as employers and law firms can assume that their subscriptions will not be abused for unrelated queries.
You can upload one or more PDF-files and other Word-documents, through the bottom-right corner. Just drag the document you want to "interrogate" on the upload area (or select it through your operating system's standard file section dialog box). By clicking on the Current document and an uploaded file, you can select which documents must be sent towards the AI-engine in order to be interrogated. Files that are not checked, will not be "seen" by the AI-engine.
When you don't get the light-green background, be more explicit about the fact that you want the chatbot to write (or rewrite) something for you.
The chatbot will primarily focus on your current text selection. You may want to explicitly tell the chatbot that it should consider the other parts of the document if it doesn't get your subtle hints in this regard.
In many cases you can actually ask a question in another language than the document's language.
While you can upload one or more PDF-files and other Word-documents, they are not as nice to interact with as your currently opened document. For example, you cannot click on it and scroll to the relevant section, as you can do within the currently opened document. The typical scenario in which you want to upload multiple files at once, is when documents together constitute a transaction.
The primary use-case of the chatbot is to quickly get a feeling about one or more documents. Similar to how you would use other types of AI, please do not rely on the answers provided by the software without doublechecking yourself.
Try to be as explicit as possible in your wording. Longer and more detailed questions usually lead to better results, because the AI-filter will then perceive more semantic proximity between your question and relevant paragraphs.
Do not treat Generative AI engines as experienced lawyers with deep knowledge of specific legal subjects. Instead, think about them as very bright law students that have only one year of experience with legal subjects.
Semantic search is ideal for situations where you want to quickly find something in long documents, and you are not sure which particular keyword is being used. After all, Word's standard function only works great when you know which keywords are used.
When you enter one or more keywords, ClauseBuddy will not only search for those exact keywords, but also for grammatical variations (e.g., "confidential" would also lead to "confidentially", and "disclose" would also lead to "disclosing" and "discloses") and for words that are — semantically speaking — closely related.
Examples of semantically related words:
"payment" will also find varations of the verb "pay", as well as adjectives such as "payable", nouns such as "cash" and "invoice" and "money"
"court" will also find variations such as "judge" and "trial" and "jury". Be aware that it may also find expressions such as "basketball court", if they would be present in your document
It then highlights all paragraphs that contain all those words. With a simple click, MS Word will then highlight that particular paragraph.
No GenAI involved. Unlike Chat with your document, which necessarily involves the use of a slow but intelligent Generative AI engine (such as GPT-4o), semantic search is completely calculated "locally" on ClauseBase's servers. Accordingly, no GPT-credits are being subtracted when using Semantic Search. This may be relevant for you from a compliance perspective.
Fast. DocChat can be relatively slow, because the GenAI-engine must read and understand your entire document. With each and every question you ask — even the tiniest follow-up question — it may very well be the case that the entire document will be resent for analysis. Semantic Search uses a lighter type of intelligence that doesn't go as "deep". It can therefore be much quicker than DocChat
Keyword-focused. Semantic Search is a replacement for MS Word's naive keyword-based search. DocChat is instead focused at deeper questions.
The Checklists are a bit of a hybrid, in that they involve some reviewing and some rewriting. We'll therefore treat it on a .
Instead of drafting an instruction from scratch (see below for some ), you can also
load a previously saved drafting instruction using the "..." menu in the top-right corner ( for more details)
load one of the predefined prompt suggestions that ClauseBase offers you (which may have been , e.g. to offer different standard prompts for different departments)
Before clicking on the blue Draft button, you may want to consider including the automatically generated document text, by ticking the Include document context checkbox at the top. As , this may lead to better drafting results.
Clicking on the Amend results button means that the result that was produced, is a good starting point for you. You can then take the current result and tweak it further, as per the .
Which additional context the AI should be aware of. It may be obvious to state this, but the AI cannot read your mind and is completely unaware of the context of negotiations, the power relation between the parties, precedents, and so on. You may want to explicitly include some context (or rely on the document summary that can be generated automatically, as ).
Read more about these caveats in the . If you want more guided results, you must consider . Obviously this requires more work, but you will then be able to provide background knowledge, guidance, do's & don'ts, fallback clauses, etc.
In addition, you can also invoke Smart Merge through an explicit button within , when comparing two entire documents.
In some situations it may nevertheless be helpful to configure , e.g. to accommodate your house style.
Tip: When it's important for you to be able to interactively navigate through your stack of documents when chatting about them, you may want to consider combining the documents into one DOCX-file through the module (this only takes a few mouse clicks) and then open the Doc Chat module within the combined DOCX-file.
Be aware that your entire document, split into independent clauses, will be sent to Microsoft's semantic AI engine, for conversion to semantic datapoints. Microsoft : your data will not be reused in any way, neither by Microsoft, nor by OpenAI.


Azure GPT4o applies as the default LLM, unless your administrator changed this for you.
So a general LLM applies here and not a specific legal one, unless you use Noxtua.
No, the prompts you give the AI are not used to train the AI. So it will also not know tomorrow, for example, what you had asked it today.
The Multi-document Table lives inside of the Doc Chat module. It allows you to ask multiple questions about multiple documents at once. You then get back a table with the answer to each question for each of your documents, which you can then optionally export to an Excel-file or table in MS Word.
As a first step, you need to upload the documents that you want to ask questions about.
When you initially go to Multi-document Table, your currently opened document in MS Word is selected. However, you probably want to add several other documents as well, either by dragging them on the Upload area, or by clicking on the Upload area and selecting the files from the file selection dialog box of Windows/Mac.
PDF-files will be immediately converted into .DOCX files, so that they become readable for ClauseBuddy. Take into account that converting PDF-files may several seconds or even up to a minute, depending on the length and complexity of the document.
Instead of uploading individual (PDF or DOCX) documents, you can also upload groups of documents. ClauseBuddy will keep all the documents in a group together when submitting them to the AI-engine to get answers.
The typical use case is when a contract/deal does not consist of an individual physical document, but instead consists of several documents — e.g., a main agreement and one or more schedules/annexes, or an initial document with several amendments signed during the years. When all those documents are uploaded as a group, the AI-engine will receive them together, and find answers within this group of documents.
To create a group of documents, click on the "..." button to the left of the regular upload area:
Next, you can upload one or more documents by dragging/selecting documents into the popup upload area, similar to how the regular upload area works:
The documents you upload as a group will then be shown separately.
Alternatively, instead of uploading documents into the upload-area within the popup, you can also create a group by choosing Create new group in the popup. This will create an empty new group.
Afterwards you can then move existing documents into the new group by clicking on the "..." to the right of the new group and choosing Move into this group.
In the second step, you submit all the questions that you want to ask for each of the documents.
You can either load a predefined set (e.g., because you previously saved a set of questions yourself, or perhaps because a colleague defined questions for the entire team), or you can configure your own questions by clicking on the green Create your own set... option. In the screenshot below, you can see that there is a predefined set Various contractual questions that was prepared by the team administrator.
By checking Append to questions, you can add the questions to the end of any existing questions. This allows you to, for example, add some standard questions predefined by your administrator, in addition to some specific questions that you entered yourself.
When you click on the green Create your own set you can configure your own questions (or change previously saved questions that you loaded or appended).
You can add any number of questions by clicking on the green + Question button at the bottom. For each question, you must indicate the type of information that is being asked.
You can optionally constrain the answers that can be given by the LLM, by clicking on the Constrain button. This way, you effectively force the LLM to only choose one of the predefined answers; if necessary it will choose the closest one. In other words, this is a kind of multiple-choice.
If you plan on frequently using the same questions, you can save the questions for later reuse.
Click on the Save button at the top.
Give your question-set a good name and an optional description.
By default, the question-set is only available to you. If you want to make it available to colleagues, then select relevant access-rights in the dropdown list.
If you previously loaded a set of questions and now want to save it under a new name, then click on the grey Save as new button instead. If you would click on the blue Save button, the current question-set would be overridden.
In the final step, you have to click on the blue Process documents button. (If multiple LLMs are installed in your account, then you may want to choose a specific LLM from the dropdown list.)
ClauseBuddy will then get to work, and have the LLM go through each of your documents, answering each of your questions. You will see the results flow into ClauseBuddy while you are waiting.
A few notes:
Depending on your screen size and number of selected documents, at some point horizontal scrolling with the scrollbars at the bottom may become necessary.
You can hover over the answer itself (other than the number) to get a short explanation on the reasoning behind the answer.
You can hover over a number to get a popup-window with the relevant paragraph that was used by the AI-engine to formulate its answer.
You can click on a number to navigate to the relevant part of the document.
You can click on MS Word (DOCX) or MS Excel (XLSX) to export the results to Word or Excel.
Because MS Word is limited by paper size, each document's questions are answered in a separate table.
The Excel-file will follow the currently selected "rotation" of the table.
If you like, you can go back to Step 2 and add additional answers, or even go back to Step 1 and add additional documents.
From the LLMs preferences pane click + Add new LLM and fill out the form as appropriate. Then click Save.
Notes:
Use "anthropic", "openai" or "azure" (all in lowercase) if you're using the Claude, Azure GPT4 or OpenAI GPT4 models. If those identifiers are entered, some special settings are applied behind-the-scenes.
The Query param string is entirely optional.
For Azure GPT4 (i.e. when "azure" is entered as the "Provider"):
the provided endpoint is automatically suffixed with /openai/deployments/[model]/chat/completions
if the "Query param string" is entered, then that is suffixed as well to the endpoint URL, otherwise a recent version of Microsoft's API is suffixed by default (e.g., "?api-version=2024-03-01-preview")
Your API Key is stored in an encrypted manner at the ClauseBase servers, and will not show up in this editing box in the future.
Conceptually there’s a two-step process undertaken by ClauseBuddy to determine whether a certain LLM can be used by a particular user.
As a first step, ClauseBuddy checks whether, in general, the LLM is available to this particular user.
If you add an LLM to the system, then either it is
available to everyone (= the standard setting), or
you can restrict it to a subset of your users, by checking the "Restricted" box at the bottom of the settings of a particular LLM, and then adding it to one or more user Profiles.
The second step performed by ClauseBuddy is to take the list of LLMs that remains from the list above, and then to check what the user is actually doing (e.g., drafting a clause, or reviewing a document, or ...) to find a match.
For example, assuming that GPT4o, Claude and Noxtua are added to the system.
You can then for example say that Claude is reserved to users with profile "Senior Lawyer" and "Partner".
Optionally, you can then for example also say that Claude must only be used for reviewing.
A user with profile "Senior Lawyer" will then see Claude being listed when undertaking a reviewing-related activity in ClauseBuddy. If the same user goes to the summary module however, Claude will not be listed there.
In addition, when multiple LLMs are available to users it becomes important which LLM would be used by default, when no particular selection is made and the user has not previously made a selection. Admin can configure this with 'Edit priority order' like so:
In this case the admin saved the order Claude 3 Opus (Large) -> Azure GPT4, resulting — in AI modules that support both LLMs — in the following drop-down for users with Claude 3 Opus (Large) pre-selected:
In this way, setting LLM priority order affects both:
the default LLM used for each AI module, and
the order of the drop-down that appears when multiple LLMs are available to a given AI module.
ClauseBuddy's AI Bot enables you to draft full documents by combining the power of AI with your own curated clause library. Those documents can then be exported into clean MS Word files (using your house style where possible), or can be directly inserted into MS Word.
We call this combination of your own legal expertise with the power of AI "hybrid drafting".
Upon entering the Compose Document page you will be immediately presented with a selection of examples in multiple languages (if you have multiple languages available per your Preferences). Clicking one of these will take you to the main Prompt tab, with the document outline pre-filled.
Otherwise, you can click straight through to the Prompt tab to create your own document from scratch.
As a first step, you need to instruct the AI Bot to draft an outline of your document, by writing a good prompt in the dedicated box, choosing the right language, the number of clauses and the drafting style.
As for the drafting style, you can choose whether to instruct the AI to use defined terms (i.e., legal concepts that are typically written with a capital letter). You will usually want to enable this for contracts, but only sometimes for memos.
You can also specify the section content's relative length with the slider in the popup menu. This will
When done, clicking on the Draft button.
The button will then turn green and interactively compose your outline after a few seconds. When it is completely done, you will see additional buttons appear on the screen.
The more detailed your instructions are, the better the outline will become. Some examples:
"Software development agreement, German law & courts, very short, fixed duration of 2 years, balanced."
"Rental agreement for a garage in the city of Brussels. Undefined duration, automatic renewal. Cost of 2000 EUR per month with automatic indexation."
You are not limited to contracts: legal memos, letters, etc. are equally possible. Despite this module's label "Document", you can also draft one or more isolated clauses, and enjoy the advantages of having structured paragraphs with numbering and automatic layout.
Once the outline has been created, you can start filling the individual clauses.
You can ask the AI to draft your clause by clicking on the Auto Draft button at the right side:
You can optionally add additional instructions in the dialog box that appears — e.g., to specify legal details you would like to be included in the clause that needs to be drafted.
You can press the Enter key, instead of having to manually push the blue button at the right side.
The AI will then start generating your clause, taking into account the outline, its position in the outline, and any additional drafting instructions you submitted.
The blue Library: xxx button at the right side of each clause shows you how many clauses were found in your own clause library that could be a match.
The matching of the clauses is performed on a keyword-basis (taking into account grammatical variations), so there is probably some over-fitting or underfitting in the results. In other words, even when there appear to be zero matches, you may want to check the contents of your own clause library.
You can change the keywords that were used in the search, by altering the contents of the box in the upper right corner of the popup-drawer. This will automatically instruct the server to find new clauses in your library that match those keywords.
Click on the filter (e.g., the "pro distributor" example in the screenshot above) to remove it again.
You can also edit the body manually (as a first draft, or to edit the AI's text) by clicking on the pencil icon.
Once a clause has been drafted (manually or by the AI), you can get suggestions on modifications and instruct the AI to rephrase the contents.
Yo can do so by clicking on the wrench-icon:
A first possibility is to directly instruct the AI, by drafting an instruction in the box at the bottom of the popup (e.g., "add paragraph on automatic termination", "make it more neutral", "also mention yearly indexation, and draft the amounts in full", etc.).
You can press the Enter key, instead of having to manually push the blue button at the right side.
A second possibility is to request the AI to suggest possible changes to the clause, by hitting the Suggest changes button.
The AI will then draft four possible changes that seem relevant for the clause at hand, taking into account both the current contents of the clause and the last version of your outline prompt. Simply click on one of those suggestions to effectively apply the suggested instruction.
As a third possibility, you can use the Adapt to document content option. It allows you to redraft the contents of a certain clause, taking into account the context of the document and all the terms in the defined terms panel (see below). This is very useful to "re-align" the wording of some clause you inserted (e.g., from your own clause library) with the rest of the document, e.g. to ensure that the terminology and drafting style is the same.
Finally, you can also use one of the other options in the popup menu:
Longer drafts a longer version of the current clause, while Shorter does the opposite.
Rephrase instructs the AI to simply use different wording to say exactly the same.
When you have changed the contents of a clause (either manually, or through the AI), you can click on the comparison button (at the right of the title) to get an instant comparison between the new and the old version of the clause. This can turn out particularly useful for subtle changes!
You can ask the AI to suggest additional sub-clauses to insert in your document, by clicking on the green + icon of a top-level clause.
When you then click on the Clause suggestions box, you get a list of five potentially interesting sub-clauses you can add to the top-clause. Simply click on one of those suggestions to add it as a sub-clause (and click it again to remove it if you accidentally clicked it).
When you are happy with the result, you can click on the export button.
What you will see in the dropdown menu, depends on whether you have created custom document layouts in Clause9. If you have not done so, then ClauseBuddy will use a default layout, which you can tweak with the options in the menu.
Conversely, when you have created custom layouts, you will see those listed.
If you do not have access to Clause9, then you can request us to create such template on a consultancy basis. Send us an email if you are interested!
If you are not interested in creating a stand-alone document, you can insert the generated content directly into the currently opened MS Word document by clicking on the Copy button at the top. Alternatively, if you only want to insert one or more clauses (instead of the entire document), you can click on the "..." button at the far right of each clause, and choose Insert into document.
If GPT4 uses placeholders, or you insert them themselve when editing a clause (or using existing clauses from your library), then those will be shown in yellow and picked up by ClauseBuddy and automatically collected in a list.
You can then manage that list by clicking on the document drawer button at the far right, and going to the placeholders submenu.
In the document drawer, you can then assign values to each placeholder (remove any content to turn it again in a yellow-colored text). All clauses that use the placeholder will then be automatically updated — i.e. the yellow background will be gone, and the text will be replaced by what you entered in the placeholders list.
ClauseBuddy instructs GPT4 to communicate all the defined terms it uses when generating new content. Those defined terms are available in the list in the Defined terms part of the document drawer, which you can manage by clicking on the document drawer button at the far right.
You can also manually create defined terms by clicking on the + button.
When GPT4 drafts new content, it is instructed to "take into account" those defined terms, and try to integrate them as much as possible. In addition, when you click on the Adapt content to document option (in the popup-list that appears when you click on the wrench-icon next to each clause's title), GPT4 will try to detect whether a defined term needs to be converted into a defined term from your managed list.
For example, when your managed list of defined terms would contain the word "Client", while some clause you have inserted earlier (e.g., from your clause library) would talk about "Customer", then GPT4 should replace "Customer" by "Client". Of course, don't expect too much from the AI in this regard — it is usually given very little context, and even humans could significantly argue whether "client" is the same as "customer". So stay alert...
Yes, clicking the 3 dots next to the text box and then ‘save’ will save the completed prompt as the default option:
Writing good AI prompts is an art that can significantly improve the quality and relevance of the responses you get. Make sure to be clear and specific. Only add information that is neccesary for the AI to know.
You can click on the button in the upper left corner to "rotate" the table, i.e. to switch the position of the questions (left-side by default) and filenames (top-row by default).
As mentioned in , ClauseBuddy integrates with Microsoft Azure's version of GPT4 by default. However, admin can configure additional custom LLMs like so:
Individual LLMs (including ClauseBase default LLMs: shown in italics) can be configured to be available only in the context of specific AI modules (such as or ) by editing their Settings:
If you have the enterprise-version of ClauseBuddy, you can also configure LLM settings in combination with profiles of users. See the page on for more information.
If multiple clauses are found andwere associated with one or more found clauses, then you can click on one of the grey boxes at the top to only show found clauses that match those attribute filters.
The text editor is identical to , and the same rules apply (e.g., start paragraphs with 1., 1.1, 2. or one or more asterisks). You can apply your changes by clicking again on the pencil icon.
If you have opened ClauseBuddy inside MS Word, and the layout of the currently opened MS Word document was recognised as a in ClauseBuddy, then you simply have to press the Copy button.
Conversely, if the layout of the currently opened document is not recognised by ClauseBuddy, then you will see a dropdown list similar to the one you see when (no styling for plain text, minimal styling, guess styling, etc.)
More info can be found .


The Definitions feature presents a clean overview of all the definitions and capitalised terms in your document. This can help you to:
Immediately jump to the relevant definition of a certain term, which can speed up the drafting process in a long document.
Check whether there are definitions that are not actually used within the document (aka "ghost definitions").
Check whether there are capitalised terms that are missing a definition.
This list shows all the definitions that are found within any of the definition lists of the document (whether in a bulleted list, or numbered list, or table cells).
When a definition is not actually used outside within the document, an exclamation mark is shown (as is the case with the Source Code in the screenshot above).
You can click on a row in the table to immediately jump to the definition.
"Inline" definitions are terms that are defined within the paragraph in which that term is first used, instead of being defined in a dedicated definitions list. Such inline definitions are sometimes also called interpretative clauses or definitional clauses.
Some examples are given in the screenshot below:
Similar to the Definition List, you can click on a row to immediately jump to the paragraph in which the inline definition is found.
Also similar to the Definition List, when an inline definition is not actually used outside within the document, an exclamation mark is shown.
The Capitalised Terms panel provides an overview of all the capitalised words (or word groups) that were used at least twice in the document.
When you click on a certain term, you get an exhaustive overview of all the paragraphs in which that term is used. Yu can click one of those paragraphs to immediately jump to the relevant location in your MS Word document.
If a definition is missing for a capitalised term, then this term will be flagged with a warning symbol.
When you insert or remove paragraphs, the "jump to paragraph" feature may get confused, jumping to a paragraph above or below the original paragraph.
When this happen, you must press the Refresh button in the top right corner, to instruct ClauseBuddy to re-analyse your document.
Through the power Large Language Models (LLMs), ClauseBuddy allows you to review legal documents against pre-specified rules.
Taking into account the knowledge already baked into LLMs such as GPT, you may be wondering why you would need to still specify reviewing rules.
A first reason is that LLMs are trained on information found on the public internet. Through months of training (digesting millions of web pages), they acquire knowledge about various domains of life — from biology to politics, sports and celebrities to legal information. Unfortunately, the legal information acquired by an LLM primarily consists of theoretical information, such as:
legislation, which is by definition public
case law, which is mostly public in most jurisdictions, even though a lot is also behind paywalls of publishers
limited legal doctrine, mostly in the form of blogs and newsletters from law firms, with a limited amount of publicly available in-depth articles.
What LLMs lack, however, is practical information on how to review contracts. As every legal expert knows, relatively little practical information on this topic is available in written form, let alone publicly available online. While a decent amount of tips & tricks are available for common contracts (such as NDAs), most practical information is:
orally communicated, learned "on the job" and taught by experienced by lawyers
found in small nuggets of wisdom spread across legal articles and books on specific types of contracts, almost always behind publisher paywalls
individually acquired through years of experience
LLMs have no access to this information, and will therefore have to be explicitly instructed on how to review contracts.
A second reason why the rules must be explicitly told, is that LLMs obviously have no access to your internal rules, i.e. mostly the written "playbooks" of legal departments in large organisations. However, in both law firms and in-house legal departments, there are also many unwritten rules on what you always or conditionally accept or reject.
Even though many reviewing rules will be shared between legal teams, you will be surprised how many different approaches exist, particularly for the hotly debated areas (e.g., the liability limitation or notice period for a commercial deal). For law firms, many rules will obviously also differ between clients, types of clients and types of deals. For example, when negotiating with a large incumbent with significant market power in a certain sector, the position taken will be completely different then when negotiating with a small vendor.
A third reason why the rules must be explicitly conveyed to an LLM, is that it cannot read your mind. Similar to how a client or internal business user would explain various types of information to a legal expert, you must instruct the LLM on the type of deal, how management feels about this deal, how much bargaining power you have, what type of counterparty you are dealing with, which specific risks exist, etc.
This is the reason why "questions" can be asked in ClauseBuddy's reviewing conditions. Those questions will be asked to the end-user, and the answers will be submitted to the LLM, so it can do a better reviewing job.
A last reason why it's a good idea to store internal rules in ClauseBuddy, is that it can serve as an alternative form of "playbook" for legal teams. ClauseBuddy is not intended to replace your formal playbook — so don't throw it out yet — but introducing automated legal reviews through ClauseBuddy can be a good moment to reflect on your internal rules.
You may be surprised how subtle some rules are, and how different colleagues will have different answers to the same legal question. Any information you store in ClauseBuddy's reviewing rules will therefore help in managing your internal knowledge, and will thus help in getting better uniformity across your team, accelerating the onboarding of new colleagues, and preventing knowledge drain when legal experts leave your team.
ClauseBuddy's reviewing module is primarily targeted at contracts, so in this manual we also talk primarily about contracts. However, there are no hard constraints that would prevent it from also applying to various other documents, such as memos, letters and submission forms in DOCX format.
Even though LLMs often feel like magic, we want to de-mystify the way the reviewing module operates behind-the-scenes. It is important to understand this, because it will allow you to write better rules.
When you ask ClauseBuddy to review a document, it will first split your Word-document into individual pieces (paragraphs & clauses). Next, ClauseBuddy will compile all your rules into optimised textual content, through clever prompt-engineering.
The paragraphs & clauses and compiled rules are then together fed to the LLM, with the request to go through the document, and cross-check each applicable rule (i.e., a rule for which the condition is met). The LLM will then send back its findings, together with references to the relevant clauses. ClauseBuddy will then present these findings to the end-user.
You should be aware that document review through LLMs is very new territory, and that it's really stretching the limits of what today's Large Language Model is capable of.
At this moment, you should primarily consider it to be reviewing support, to help you get a first impression of your document, and automate some mundane aspects of the reviewing process.
In other words: do not blindly trust the output of the document reviewing process, no matter how detailed you make your rules.
It is probably also not a good idea to make the reviewing module available to users that cannot assess the legal merits of a user (such as most business users). Except for documents where the stakes are very low (e.g., a standard NDA for a low-value, low-risk contract), the risk associated with mistakes by the LLM are probably too high for most legal experts' appetite, or you really get the feeling that the LLM truly understands the rules and applies them in a pretty good manner.
The good news is that this performance will automatically improve over time, when improved engines appear on the market.
The proofreading feature tries to find (potential) technical mistakes in your document, e.g. missing definitions, left-over placeholders and hardcoded numbers.
This issue flags situations where a capitalised term (or group of capitalised words) is used more than once in the document, yet is not defined in a definition list or through an "inline" definition in a paragraph.
This issue flags a situation where a definition is inserted (either in a definition list, or as an "inline" definition in a paragraph), but that defined term is subsequently not used outside of the definition list / definitional clause.
This issue flags all paragraphs in which [placeholders], highlights (in yellow, green, red, cyan, ...) or blobs (fat bullets) are still present.
These paragraphs are flagged by the proofreading module, because they may indicate a mistake from the author.
This issue flags technically broken cross-references in a document, i.e. cross-references that look fine in the Word-document, but will turn into Error! Reference source not found when being printed or updated.
By way of example: the following paragraph contains a cross-reference that pointed to a certain paragraph that was subsequently removed from the document. Due to the fact that MS Word only updates cross-references when being explicitly requested (e.g., by selecting all text and hitting F9 in Windows, or by right-clicking and choosing "Updating Fields" on Mac/Windows), the cross reference looks fine ...
... until you print or update it, and you then realise the cross-reference is actually technically broken.
This issue flags paragraphs that have a "hardcoded" number assigned to them (i.e. numbers literally typed in as such), instead of using MS Word's automatic numbering system.
As every legal expert knows, those hardcoded numbers can lead to frustrations. The most problematic situation is when most paragraphs in the document are assigned an automatic numbering, yet a few of them (typically newly inserted by some counterparty's lawyer) are using hardcoded numbers. ClauseBuddy will easily flag those situations.
In a legal team, reviewing rules are typically built by senior lawyers or knowledge managers. (It is often a good idea to even hide the Manage reviewing rules from the team members.)
Once built and tested, they are meant to be shared with the rest of the team.
You can run the rules by clicking on the Review document icon on ClauseBuddy's home page.
Note that this icon may be missing on your homepage, either because your administrator disabled it, or because there are no reviewing rules defined yet to which you have access.
Because ClauseBuddy will interact with your currently opened MS Word document (e.g., in order to rewrite text, highlight paragraphs or lead you to certain paragraphs), it is crucial that you open a Word-document and then start ClauseBuddy in it.
If you want to review a PDF-file, you need to first convert it into MS Word. You can do so easily from within ClauseBuddy by clicking on the Upload PDF area in the bottom-left corner, or by dragging & dropping your PDF file on that area. ClauseBuddy will then convert the PDF-file into a DOCX file and open it in a new window for you; you can then open ClauseBuddy in that new window.
In the first step, you need to select which rules you want your opened Word-document to check against. Simply click on the Select button next to the one you want and press Next.
By default, all rules within the review set you selected will be included. You can leave out those you don't want.
Interestingly, you can also add an Addhoc rule. This allows you to specify a temporary requirement, on top of the ones that are stored in (i.e., predefined by) the rule set.
The first box contains the title (meant for short pieces of text), in the second box you can be more elaborate towards the LLM on what it should check for.
In this third step, you can optionally answer certain questions referred to by the rules you checked in the previous step.
The answers to these questions can sometimes be crucial for the LLM to correctly review the document. For example, if some rule would state that only the state courts of the country of delivery are acceptable, then it may need to be explicitly stated what that country of delivery is.
Remember: other than generally known public information, the information available to the LLM is limited to what is explicitly written in the document.
In this step, you will finally send the document and reviewing rules to the LLM.
However, before doing so, consider the following:
If multiple LLMs are installed in your account, you may need to make a selection of the relevant LLM first (by pressing the right triangle), otherwise the previously chosen LLM will be used:
In the upper-right corner, you can choose the Quality setting through the "..." menu.
Usually, you can leave the quality to Medium. Only move this setting to High if you notice that the LLM:
is losing precision across large documents (e.g., good results in the beginning, then deteroriating towards the middle)
is unpredictable in whether it seems to understand certain complex rules (e.g., one time the LLM does seem to perfectly grasp what's being asked, the next time it doesn't)
With the High setting, ClauseBuddy re-sends the document multiple times, in order to get better results. Usually this is not necessary, but it may be worth to try it.
The results will be dripping in from the LLM, ready for you to inspect:
The following color codes are assigned by the LLM:
Dark green means "requirement is fully met"
Lighter green means "requirement is mostly met", i.e. most aspects are met
Orange means "partially met", i.e. only some aspects
Red means "not met"
Grey means "irrelevant"
You can hover over the info-icon at th right side of each reviewing result to see the body of the rule:
You can set the Status of a review result to anything you like. This allows you to write down your own assessment of what the LLM is telling.
Below the assessment, you will usually see the original paragraph(s) that were deemed relevant by the LLM for the rule. You can click on the paragraph to directly jump towards that location in your document and select the corresponding paragraph.
In terms of automation, checklists lies in the middle of this spectrum. It assumes that the checks that must be made were predefined — e.g., collectively by the legal team, or by a knowledge lawyer, or by some internal playbook — and will then be primarily checked by a human lawyer. But in doing so, the human lawyer is assisted by a computer, keeps the checklist on the computer next to the opened document, and can easily change clauses with the help of GenAI.
Checklists can help to bridge the gap between the traditional reviewing process and the fully automated process with GenAI. Not every legal professional will want to rely on the black-box approach of GenAI, and not every document is sufficiently standardised to be a good candidate for automated reviewing. That's where checklists can help.
Checklists can also serve as a simple source of inspiration. They're called checklists, but you can also use them as simply a list to keep in mind. You don't have to actually cross-off items in the list — often it is a big help during reviewing that you have a nice list of items that you want to peek at from time to time. Particularly for junior lawyers this can be a big help, to ensure they don't forget crucial elements.
You can open a checklist in three ways:
By going to the Write & Rewrite module, and:
when no tab has yet been opened yet: by clicking on the button at the bottom and choosing Open checklist
when a tab is already visible, by clicking on the green + New button and choosing Open checklist
By performing an automated review (using Review document) and converting the results prepared by the GenAI towards a checklist by clicking on the Export button inside of a review, and choosing Checklist to convert the results compiled by the GenAI towards a checklist.
Either way, checklists will present themselves on the screen as follows:
Accordingly, please consult our webpages about building rules for reviewing categories. Essentially, however, this boils down to:
Opening one of the many samples ClauseBuddy provides for you.
Converting an existing playbook or checklist into a list of rules / checklist items:
Either selecting some text in an opened Word-document that contains those rules, and using GenAI to convert an existing free-format document. The GenAI will then interpret the text and perform the extraction & conversion.
Or, if your document is well-structured (e.g., because it was based on one of the samples), converting it immediately without any GenAI being involved.
By toggling the checkbox at the very left of each item you are, well, checking an item. The idea is that a checked item means "I've checked this", as is for example the case with the Invoicing Requirements and Late Payment Interest items in the following screenshot:
When you click on a label, there are many more options:
In the Status box you can write down the status of the item. Perhaps you will for example want to say "Check with John" or "Non-issue" or "only if clause 4.6 applies".
You can assign it a colour that makes sense to you. The colour corresponds to the colouring of what ClauseBuddy uses in the automated reviewing:
Dark green means "requirement is fully met"
Lighter green means "requirement is mostly met", i.e. most aspects are met
Orange means "partially met", i.e. only some aspects
Red means "not met"
Grey means "irrelevant"
White means "haven't yet decided"
You can select some text in your opened Word-document and then click on the Redraft selection using this requirement command. ClauseBuddy will then send your selected text to the GenAI-engine and ask it to rephrase that text so that it meets the requirement in light grey (in the screenshot above No advance payment shall be required prior to delivery).
Remember that you can always Undo & Redo your operations using the buttons in the top-left corner.
Checklists are intended to be temporary tools to support your work, so loading & saving shouldn't be your primary concern. Nevertheless, you can save a checklist to continue working on it later.
When saving, it is crucial to understand that ClauseBuddy:
only saves the state of your checklist, i.e. not your currently opened document
saves your checklist on your local computer, i.e. not on the ClauseBuddy server. If you log out, all your checklists will be lost.
You can save a checklist by clicking on the Save button and then either choosing the first option (to save over the current item) or choosing Save as... (to save under a new name).
You can optionally load a previously saved checklist by going into the Saved menu item
ClauseBuddy currently doesn't let you share the contents of your work-in-progress with team members — remember, the checklists are designed to be temporary lists, easily opened and quickly dismissed again.
Even so, you can export your checklist to a new MS Word-file by clicking on the Export button. It will look like the following:
Before you can ask ClauseBuddy to automatically review documents, you must build one or more sets of rules. These rules can be managed through the Manage reviewing rules module on the home page of ClauseBuddy.
When you first load this module, you will be invited to create a new review "category". As further explained below, you can create multiple categories — e.g., per legal domain, per type of contract or even per product/service that is being sold by your company.
When you click the green button, you have multiple options, further explained below:
Each review category — however created — can be assigned a title (in multiple languages if necessary), and can also be made subject to access rights, e.g. to prevent that department X would be able to access the review rules of department Y.
Once a review category is created, you can update its properties (title and access-bundle) through the "..." button dropdown menu in the upper-right corner.
When you click Start empty, you create a review category from scratch. You literally start from a blank sheet, and it's up to you to build up the rules from there.
A second options is to invite GenAI to extract rules from the currently selected text in your opened document: Extract rules from text selection.
Use this option if you already have some document in which rules are described — e.g. some kind of playbook that was developed several years ago in your company; or perhaps a list of rules and do's & don'ts that a client has provided you.
You simply select the relevant text part in that document, select Extract rules from text selection, wait for a few seconds, and you're done with a first version of your ruleset.
If you don't yet have a playbook/ruleset of some kind: don't feel bad. Few law firms have it (and usually only for some departments), and even for inhouse legal teams of large organisations it seems a minority.
Given this reality, and the fact that everyone's struggling with the horrifying thought of starting from a blank sheet, we've compiled a nice selection (currently more than 30) of playbook samples.
You can open them through the Download a playbook template option, and they look like this:
Essentially, they are Word files of between 1 - 10 pages, subdivided into different groups. Each rule starts with text in bold, and then the actual rule.
ClauseBuddy can automatically ingest Word-files that follow this structure, and convert them into a review category without your intervention. For example, the set above would lead to the following review category:
The most important task that you must execute as a legal team, is to take one of these samples, and then have internal discussions. From what we hear from the teams we work with, you will be amazed about how many internal disagreement you will have. You may think there is alignment within the team, but once you actually start to decide on the rules, you'll notice that many assumptions in everyone's mind are not necessarily shared across the team.
You'll also notice that the samples deliberately contain conflicting rules, and probably also too many rules. But — compared to starting from a blank sheet — most teams should be happy to go through the list, delete the rules that are not required for them, and tweak the remaining rules that are relevant for them.
When you are done tweaking a sample, you can convert it into a review category by choosing Extract rules from current document.
As this process does not involve GenAI to interpret your content, you must respect a few basic constraints:
Subdivide your rules into groups.
Group headings must use MS Word style Heading 1.
Individual rules must:
consist of one paragraph (writing more is usually not recommended as the LLM may get confused by too much rules),
be formatted with MS Word style Heading 2
preferably start with a few words in bold, that contain the title of the rule (i.e., what is shown in the hierarchical tree, as opposed to the rest of the paragraph in plain text, which will be turned into the body of the rule).
The title of the document must use MS Word style "Title".
Other document elements (e.g., a TOC and some Introduction paragraph) are ignored.
If you start from one of the ClauseBuddy templates and just delete and copy/paste, the conversion will be flawless.
This sounds fancy, but basically means to create a document where paragraphs have the proper outline level set. You can inspect this as follows for an individual paragraph:
It's probably easiest to use predefined Heading 1, Heading 2, Heading 3, ... styles to structure your document in a hierarchical way, because those predefined styles should already have the right outline level set. If you are using well-designed templates offered by your organisation, chances are that the main styles are also automatically at the right outline level.
Alternatively, you can jump to the "Outline" view — which is designed for quickly creating hierarchies of paragraphs — and then prepare a document in that view.
This is actually quite easy to do with the buttons that will appear.
ClauseBuddy can import paragraphs that have outline levels, with all paragraphs but the most inner paragraphs becoming "groups" and the inner paragraph becoming a "requirement".
Throughout the reviewing module, textual elements can be specified in multiple languages, if you are using an account on a ClauseBuddy server a in multi-lingual jurisdiction. However, to avoid screen clutter (in practice, in most legal teams, most reviewing rules are written in only one language) the boxes in which you can put other languages, are deliberately hidden on the screen until you enable Multilingual in the bottom-right corner.
The translations are mostly intended for your colleagues, and are not strictly necessary to complete. LLMs such as GPT can understand multiple languages, and will understand a Requirement written in French, and be able to apply it to an English contract.
Even so, it is often advisable to create translations. The reason is that the translation of some legal concepts can be dubious. In addition, when you give explicit instructions to the LLM on what to include in (or how to redraft) a clause, you may want to avoid the uncertainty associated with expecting the LLM to perform the translation for you.
You should be aware that one of the main limitations of LLMs consists of the length and complexity of the input you feed — i.e., both the content of your document and the rules you specify. While this is one of the primary domains of research, know that LLMs are very sensitive to the length, e.g. because doubling the input size causes the processing time to be four times as long.
Accordingly, you should try to find a balance between writing your instructions in a compact way, yet at the same time being sufficiently detailed for the LLM to understand the instructions. In this regard, you may want to treat the LLM as your average junior team member: if you first ask the LLM to read 50 pages of detailed legal instructions, and then ask it to review a 4-page NDA, it may deliver a worse job than when you had written a few key elements to look out for — similar to how your junior team member would react.
Taking into account the length constraints, you may want to skip content that you can assume the LLM already knows. The LLMs are trained on information available on the public internet, and it is often surprising what they know and do not know.
LLMs know a lot of facts, e.g. the capital of a country, what certain abbreviations (such as "GDPR" or "FDA") stand for, the functionality of certain product, etc. However, you should be aware that LLMs were trained up to a certain point in the past and will not be aware of facts that happened afterwards. If those facts would be important for the review, then you need to tell the LLM explicitly.
LLMs also have a reasonably good information about well-known legal documents for which many examples exist, e.g. NDAs and license agreements, particularly in large jurisdictions such as the United States and the United Kingdom. Conversely, LLMs will have only limited information available about contracts in small jurisdictions and niche areas of law.
When you have create a category, you can add rules to them by clicking on the green "+" icon. Those rules can be one of the following elements:
A Group element allows you to add hierarchical structure to the other elements. You can organise your elements in groups, with sub-groups, sub-sub-groups, etc. any level deep. Groups are primarily intended for humans, the LLM doesn't even "see" them.
A Requirement is the most important element. It specifies a rule, and can optionally include conditions and actions.
Information extraction allows you to ask the LLM to extract information from a document (e.g., "What are the names of the signatories" or "What is the minimum order amount specified"), without any further judgement on whether it meets a certain criterion.
Literal text match allows you to perform a literal match on text that should be present (or, instead, must not be present) in the document, e.g. mandatory text that must be included in consumer contracts as per some statutory requirement. See the details in the subsection below.
A Condition element specifies that a certain condition must be met for a Requirement to become applicable. You can attach questions to a condition, which must be answered by the end-user before the review process can take place (e.g., "What is the deal size?" or "How many products of type X are being ordered?"). The end-user's answers to those questions can then be used by the LLM to analyse whether the condition is met, i.e. to decide whether or not the Requirement applies or not.
An Insight element provides background information for the LLM, e.g. to explain what your company's product "AlphaDogs" is all about, or how your support department will deal with requests in the weekend.
The Literal Text Match is provided as a specialised kind of requirement, because LLMs are very bad at looking for exact matches — they are experts at semantic understanding and grasping things, but are often "blind" for precise text being used or not.
For this reason, ClauseBuddy uses a classic (non-LLM) technology for performing literal text matches. As the name implies, a literal text matching is being performed.
In the following screenshot, the text "By submitting an Application Form, an Affiliate confirms that it has the consent of Prime Customer" will be searched in the document. Under the current settings, the rule is met when the text is present; and the rule failed when the text is missing from the document that is being reviewed.
ClauseBuddy always ignores consecutive spaces, and treats curly quotes in the same way as non-curly quotes.
When you check Find whole words only, ClauseBuddy will not find text fragments that are merely a part of a word. For example, when this setting would be active and you would search for "confidential", ClauseBuddy will not match on a word such as "confidentiality". (Of course this setting is irrelevant when you're searching for multiple words at once, as is the case in the screenshot above.)
When you check Case sensitive, ClauseBuddy will only match when the capitalisation is identical — for example, when you would be searching for "ACME", it will not match on "Acme" or "acme".
You should be aware of a few caveats when performing literal searches:
The matching is done in a very strict and literal way. This means that even a single character that's different will cause the matching to fail.
When you are reviewing a PDF-file, you must expect a level of "noise" being added to the document, because conversions from PDF-file are never perfect and conversions error may occur — particularly in documents with complex layouts, or documents converted from scans. Performing literal text matches within PDF-files can therefore easily go wrong, e.g. because characters are wrongly interpreted during the PDF-conversion, or because paragraphs are inadvertently split up in multiple subparagraphs/.
The matching is done on a per-paragraph basis. For several reasons, you must avoid trying to match on multiple consecutive whole paragraphs.
In legal documents, paragraphs will often have numbering prefixed. Sometimes that numbering will be automatic, often manual, or even a mix of both. Moreover, that numbering will often be slightly different — in some documents a target paragraph may have number 6.2, in other documents 5.1.
The longer you make your target text, the more likely it will be that even a single character will be different, so that the matching will fail. Searching for multiple consecutive blocks of texts will very often fail when performing a literal search, even though from a human perspective the text you are looking for seems to be present.
You must instead try to match on the real text substance of each paragraph, i.e. the text without the preceding numbering, and as limited in length as possible.
If you want to search for multiple paragraphs, then add multiple Literal Text Match rules. Do note that it is not currently possible to mandate that the paragraphs must be next to each other.
Performing fine-grained text searches at scale is an art on itself, often done by specialised software packages such as "e-discovery software", or even teams of dedicated developers. ClauseBuddy goes a certain way, but is focused on fast and simple searches, so don't expect it to compete with those advanced software packages / dedicated developers. For example, ClauseBuddy doesn't currently have the following features:
Support for different combinations, e.g. "paragraph A + B + C must be present, but it's also OK if C is replaced by D".
Support for "fuzzy matching", i.e. allowing small divergences, to make the matching less strict.
Searching for documents across hundreds or even thousands of files (*).
Searching across different document types than DOCX or PDF.
Requirements specify a rule, i.e. something that must be met, either by being present, or instead not being presented, or having certain content. The associated Action will be presented on the screen, regardless of whether the requirement is met.
When you edit a Requirement, you will see the following screen:
In the Title box, you can give a title to your Requirement, i.e. a short explanation of your requirement in a few words (e.g., "Our liability must be capped" or "Confidentiality obligations must not exceed 5 years"). Don't make this too long, it will be the label that shows up in the hierarchy.
In the Contents box, you can give more details about the requirement, e.g. a description on what you expect to see in a contract or clause.
Additionally, you can add the following items through the green + Augment button in the bottom-right corner:
In Context you can specify information for your human colleagues — e.g. internal hyperlinks with more information, internal contact information, "war stories" from the past on how to deal with counterparties on this specific topic, etc. This information will not be submitted to the LLM at all (it will only be presented towards the human end-user), so do not feel constrained in length.
Through the Conditions you can specify Conditions for your particular Requirement to become applicable (see below for more information). When multiple Conditions are specified, you can also specify whether all those Conditions must be met simultaneously, or whether instead it is OK for only one Condition to be met, or whether instead none of the Condition may be fulfilled.
Through the Actions button you can specify adhoc Actions for your particular Requirement. More on that below.
A Condition allows to specify towards the LLM when a certain Requirement must be completely ignored.
In principle, you can also specify condition-like elements in the Contents box of a Requirement, e.g. as a separate sentence after your description of what's required. However, it is not recommended to this extensively, due to the advantages of using a separate Condition.
Unlike conditions that you describe within the Contents box, conditions can have Questions associated with them, allowing the end-user to convey deal-specific information towards the LLM, as further explained below.
Similar to the other reviewing elements, a Condition has a Title box in which you can provide a brief description of your Condition (e.g., "Contract value more than 5000 EUR").
If the Condition requires more detail, you can also use the Contents box. (If it contains no contents, ClauseBuddy will instead only submit the Title to the LLM).
You can associate one or more Questions with each Condition. Those Questions will be presented to the end-user, and the answer(s) given by the end-user will subsequently be submitted to the LLM.
Questions are ideal for modulating your review, by including deal-specific information. For example, when a Condition would specify that a certain Requirement is only relevant when the deal value is more than 5000 EUR, but this deal value is not explicitly listed in the contract itself, the LLM obviously would have no way of knowing whether this Requirement is relevant.
You can create any number of questions, and ask different types of question (true/false, text, number, date, duration, currency).
An Action will be presented to end-users, regardless of whether the requirement is met. For example, when a Requirement is "The applicable court should be French" and the associated Condition is "Deals relating to Product X", then you may want to suggest the end-user to:
Insert a clause from your Quality Library that stipulates exactly that.
Ask the LLM to rewrite the clause that specifies something different. You can then specify the writing instruction.
Add a comment in the document with predefined contents.
Insights allow you to provide background information to the LLM.
They are ideal for communicating information that is necessary for the LLM for assessing different Requirements. Instead of explaining certain internal concepts per Requirement, you are advised to create a single Insight that centrally lists that information.
An Insight only contains a Title and Contents box. As is the case with the other components of a Requirement, you can omit the Contents if it would not specify anything beyond the Title.
Once you have created several rules in a category, you can optionally create Review Sets by clicking on the "Combine" button.
The underlying idea is that not all your requirements will necessarily apply to every deal. Through Review Sets, you can specify which rules apply, and additionally pre-fill certain questions.
The end-user will then be able to specify the relevant Review Set when submitting an actual review request. For example, when licensing software, you may have 50 different rules that can theoretically apply, depending on the type of software being purchased, its mission critical nature, value, supplier, etc. Many of the more onerous requirements can probably be skipped when purchasing a low-value product, as opposed to purchasing an enterprise-wide multi-million dollar system.
If conditions have associated questions, then those can be optionally answered and stored within a Review Set. It is not necessary to answer all questions: questions that are left unanswered, will be asked from the end-user.
Only requirements that are selected will be submitted to the LLM.
After all, ClauseBuddy offers the to review & rewrite your documents completely automatically. And, unlike all competing products on the market, the styling of your document will be left intact thanks to ClauseBuddy's layout-awareness...
So don't worry about the confidentiality of using the LLMs, as .
if you have good ideas for other relevant issues the software should spot!
Essentially, this issue is identical to the warnings you can see in the Capitalised Terms panel of the .
Essentially, this issue is identical to the warnings you can see in the Definition List and the Inline Definitions panels of the .
You can also turn reviewing rules into , to allow for a more manually-oriented workflow.
You can also click on the black Rewrite selected text button in order to rewrite the text that is currently selected in the document. ClauseBuddy will then take that selected text and send it to the , where it will be automatically redrafted in order to fit the contents of the rule (and/or the additional redrafting hint that may have been specified in the ruleset).
If the ruleset author also attached one or more clauses to your rule, then they will be shown at the bottom. Similar to how the works, you can insert clauses into your current document through the + button in the top-left corner of the clause.
You can export the review results to a report by clicking on the Export button and choosing either the default export format, or (when that's ) one of your branded custom templates.
You can also export the review results to a , and continue your manual review on the basis of the results initially prepared by the LLM.
Reviewing documents is a spectrum, ranging from a completely manual process (the traditional way, no computers involved) to a completely automated way (either using , or even without any rules at all, as is the case with ).
Under the hood, checklists are actually , with each rule turning into an item on the checklist. Checklists "piggyback" on the storage and management facilities of the reviewing categories, and any reviewing category can be turned into a checklist.
If you have a document that was not based on a ClauseBase-sample, then either use the option discussed above (which uses GenAI to interpret your text), or use a document that is created using outline levels.
If you want a good example of this blindness, check out the famous question on how many letters "r" are in the word "strawberry". .
(*) Instead of using Literal Text Match Rules, you may also want to have a look at the , which contains a Text Extract function that has some similarity to the Literal Text Match rules, but is at the same time sufficiently different to serve different use cases. One of the biggest differences is that the Bulk Operations module can work across multiple documents, with a practical limit of around 50 files.


The Review document feature appears only after you have created your first Review category.
Furthermore, it could be that this functionality is not enabled for you. Get in touch with your Administrator if you would like to change this.
The Bracketeer module allows you to quickly go through all the [square brackets] and highlights in a legal document, by mostly clicking with the mouse. This is much fast and much more user-friendly than by doing this in the traditional way in Microsoft Word.
For example, instead of having to manually go through hundreds of square brackets such as the following...
... ClauseBuddy's Bracketeer offers a much nicer visual representation of all the options, by enabling you to click your way through all paragraphs, choosing and removing options with your mouse:
On the one hand, Bracketeer qualifies as a kind of light full-document automation, because it requires very little preparation to be done within the documents (most templates can be used as-is), and can be learned in a few minutes.
For example, corporate transaction documentation and finance documentation often consist of more than 50 pages, with hundreds if not thousands of options.
In a traditional full-document automation approach, template authors would have to create questions to cover all of those individual options. This easily leads to questionnaire fatigue with end-users. In addition, with traditional full-document automation, end-users may suffer from question dissonance, because a certain option may concern such a small detail that the associated question would be quite long or detailed.
Clause libraries, such as those found in ClauseBuddy, allow template authors to limit the number of questions, e.g. by deliberately not asking questions for parts of the documents that must only be occasionally changed. Instead, if changes must be made to such occasional parts, end-users can find relevant fallback/replacement clauses in the clause library.
When using Bracketeer, template authors can deliberately decide to leave square brackets and highlights within the document that is generated by the system. With the help of Bracketeer, end-users can easily implement hundreds detailed decisions, across the entire document, in a user-friendly way.
This avoids questionnaire fatigue, because users don't have to answer a question for each and every detail.
This also avoids question dissonance, because end-users can often immediately decide which option to choose when seeing that option within the context of the document, instead of as a separate question.
By way of a concrete example, have a look at the 30 calendar days highlighted below:
This option does not represent a major drafting decision that will affect many different paragraphs at once. Instead, it concerns details, of which hundreds can be found in a long legal document.
If you would have to formulate a question for it, you would probably have to give a lot of context to the end-user (e.g., "Number of days granted to the existing shareholders to submit a claim in case of misrepresentation or warranty breach that was notified by an investor?"). Such question easily takes up half a paragraph, while many legal practitioners will be able to immediately decide whether to change the default number when seeing the context.
Any legal team that has templates with square brackets or highlights can benefit from Bracketeer. In practice, these documents are mostly found in finance, corporate and commercial teams. But Bracketeer is both jurisdiction-agnostic domain-agnostic, so anyone can benefit from it — even non-lawyers.
Obviously, Bracketeer assumes that end-users know what they are doing, i.e. are aware of the (legal) repercussions of the changes they make. If users cannot be sufficiently trusted, traditional question/answer based full-document automation must be used instead!
Open a DOCX-file. Bracketeer works with any DOCX file that you can open in Microsoft Word, and which has either square brackets or colored highlights.
Open ClauseBuddy and click on the Bracketeer icon. (If it's not enabled, ask your administrator!)
Wait for a few seconds while ClauseBuddy's server analyses your documents, and converts each paragraph into visual Bracketeer-options.
In each paragraph:
Click on options (surrounded by dotted lines) to select them, or Alt-click (i.e. click with your mouse while holding down the Alt-key on your keyboard) to remove an option you don't want.
Click on one of the alternatives presented next to each other.
Click on highlighted text to change that text. Bracketeer remembers your last changes, so you can quickly make similar changes across the document.
Click on Apply changes to modify the corresponding paragraph in your document. Alternatively, you can skip this step, and apply all your changes in bulk (see the last step).
Go the next relevant paragraph by clicking on the up/down arrows; Bracketeer automatically skips paragraphs without brackets or highlights. Then repeat the previous step for that paragraph.
Instead of applying changes on a per-paragraph basis, you can click on the popup menu next to Apply Changes and choose Apply to entire document (= apply changes in bulk in your current document) or Apply to a new document (= apply changes in bulk within a copy of your current document).
Bracketeer was designed to work with the square-brackets and placeholders that are most commonly found in legal documents.
Optional text parts are represented by square brackets. For example, the text below can either be "each resigning existing Director" or "each Director":
Options can also be nested within each other, typically two or three levels deep. For example, the following bullet is completely optional, because it is surrounded by square brackets. When the end-user would choose to keep this bullet, she can choose between (a) one or multiple resignation letters; and (b) "each Director" versus "each resigning existing Director".
Options can even span across paragraphs, to indicate that entire blocks of text are optional. For example, the author of the following template designated the entire section 5.2 as optional through the opening square bracket at the very beginning of the first paragraph, and the closing square bracket at the very end:
Be careful when nesting square brackets, especially when spanning them across paragraphs. In practice, we very often see that beyond 2 or 3 levels, humans start making mistakes when keeping track of deeply embedded square brackets.
Bracketeer tries to be "forgiving" when missing a closing bracket, but nevertheless it will show you an error when it cannot make sense of a certain set of nested square brackets.
Bracketeer presents these optional parts in a user-friendly visual manner, through dotted lines.
Alternatives can be expressed in two ways: either through neighbouring square brackets, or by using slashes within square brackets.
Slashes within square brackets:
Neighbouring square brackets:
Whichever method you choose, Bracketeer presents the alternatives in a visual manner, inviting you to select one of three:
Placeholders can be inserted by highlighting text:
Any highlighting colour will work, although yellow is most common.
A commonly found style in legal templates is to use both square brackets and highlighted text:
Bracketeer will always show placeholders in yellow
By simply clicking on a placeholder, end-users can replace the placeholder with an actual value. Bracketeer will remember your selections (in the screen below the dates in March & August), so you can quickly choose values by simply clicking with the mouse.
You can click on the Inspect button at the top of the screen to get a kind of "X-Ray" of the modifications you applied.
For example, after you clicked through all of the options, the following "finished" block of text will be shown:
You can modify see which modifications you had made, by clicking on the Inspect button. You can then still change everything by clicking with your mouse.
Through one of the following actions:
holding down Shift when selecting an optional text part or alternative
holding down Shift when clicking on Apply (or a recent text item) to change a placeholder
holding down both Shift and Alt when removing an optional text part
you can add that text / text part / alternative as a blueprint to the "stash".
When you then click on the Apply stash button at the bottom of screen, Bracketeer will go through all the placeholders, optional text parts and alternatives in the currently visible paragraphs, check whether they match with any of the blueprints, and then perform replacements in bulk. For example:
If your document contains 150 times "[reasonable]" across various paragraphs, you may want to add that word to the Stash by Shift + Alt clicking on it. In subsequent paragraphs, you can then simply click on Apply stash to remove that word.
If you have 20 different instances of the three alternatives "[Company / Shareholder / Person]", you can Shift-click on (for example) Shareholder once, and then cause that word to be selected everywhere by clicking on Apply stash.
Alternatively, if you want to apply only one or more items in the stash, click on the triangle
You can inspect your stash by clicking on the Stash button at the top of the screen. At any time you can remove an item (blueprint) from the Stash that you no longer need, by clicking on the trash can. Such removal will not affect instances of that blueprint that you previously applied; instead, it will only prevent that blueprint from applying in the future.
When you click on the Apply changes button, Bracketeer will apply the changes of the currently visible paragraphs to the opened MS Word document. If you are not happy with the result, you can undo your changes inside of the DOCX file by clicking on MS Word's undo button (or pressing the Ctrl-Z keyboard shorcut).
This seems easy enough, but you should be aware of a few limitations:
Bracketeer assumes that you have not modified the paragraph in the DOCX-file. If you did, unexpected results will happen. Instead, when you have changed a paragraph in the DOCX-file, you need to hit the Refresh button at the top of the screen. You should, however, be aware that this may remove some changes you have made inside of Bracketeer.
When it loads your DOCX-file, Bracketeer associates each paragraph in the DOCX file with its own internal representation of that paragraph. When you then apply changes, various technical limitations inside of MS Word will cause that in-memory association to be gone, even when you would Undo your changes in the DOCX-file. While Bracketeer will nevertheless try to manually find back your paragraph, it may sometimes fail in doing so, e.g. when the paragraph was modified in the meantime, or when an identical paragraph exists at an earlier location in the DOCX-file.
Instead of applying changes one by one, you can also apply changes in bulk. Instead of clicking on the Apply changes button, you instead click on the triangle next to Apply changes and choose:
Apply to entire document to apply all changes to the current DOCX file. Note that also here, Bracketeer assumes that you have not made changes in the DOCX-file to the paragraphs that you were modifying inside of Bracketeer.
Apply to a new document to apply all changes to a copy of the initial DOCX file. In this case, Bracketeer will apply all your modifications to a copy of the DOCX-file that was initially loaded by it, and then open the result in a new window inside of MS Word. So even if you would have made changes to the DOCX-file in the meantime, these changes would be ignored.
You can click on a paragraph inside of Bracketeer to highlight that same paragraph within MS Word.
You can undo & redo modifications within Bracketeer (separate from the Undo-function in MS Word) by using the undo/redo buttons in the right corners of the screen.
Bracketeer shows the number of not-yet-implemented brackets and highlights in the bottom left corner of the screen.
While highlighted text can be edited with a single mouse-click, you can change any text by double-clicking on it.
Bracketeer subdivides your document into different sections, based on the numbering and/or titles it detects. If a certain subdivision does not contain any square brackets or highlights, it will completely ignore it — so it will never be shown when you navigate through your document from within Bracketeer.
Bracketeer currently mostly ignores text within tables. This will be changed in an upcoming release.
Bracketeer currently does not work in a browser: it currently only works as an add-in of MS Word.
On the other hand, Bracketeer complements traditional full-document automation, such as Clause9 and ClauseBuddy's . It allows legal teams to limit traditional full-document automation modules to structural parts that require intensive editing, and leave the numerous detailed changes to Bracketeer.
No, this is not possible. The checks that ClauseBuddy does in this feature are built into it. But if you have specific rules or requirements, you can add them in the Reviewing module. You can also always use the module to ask questions about your document. You can then do any spell-checks again via the Polish selection in the .