
Documents mode
What is the Documents mode
The Documents mode of Truffle Hunt allows you to visually browse through a selection of your best documents (typically templates), in search of inspiring fragments of text.
Its biggest selling point is that it allows you to quickly jump to relevant locations in a document, and then assess candidate clauses within their original context. So if you are looking for inspiration, but don't know exactly what you are looking for, and therefore want to be able to assess clauses, the Documents mode is ideal.
Number of documents to use
While Truffle Hunt allows you to search through thousands of documents, it's usually a bad idea to upload thousands of documents if you are mostly focused on the Documents mode.
As explained in the Introduction the Clause mode may be more suited for uploading thousands of documents, if you're using it to solve the frustration of "I have written this clause in the past, but cannot find it."
The ideal set of documents to upload, instead, consists of your set of favourite documents. For legal experts, this is a set between 20 and 50 documents (sometimes a bit more) per lawyer that you often go back to when you search for inspiration. Most legal experts have such a set of favourite documents — they even tend to take it with them wherever they professionally go, because they like those documents, they are high-quality, and so on.
For an entire team, this will typically boil down to a few hundred documents for the entire team.
For compliance reasons you also want to avoid uploading thousands of documents, except if you would thoroughly clean them upfront. If you are like most legal experts, you are subject to client confidentiality rules, non-disclosure obligations, data protection rules and various internal security rules. No matter how secure ClauseBuddy is, storing thousands of confidential on external systems for mere efficiency reasons, is usually a bad idea.
User interface
Getting started with the Document mode's search is quite easy, but there are actually quite some additional search tools that you may want to read about.
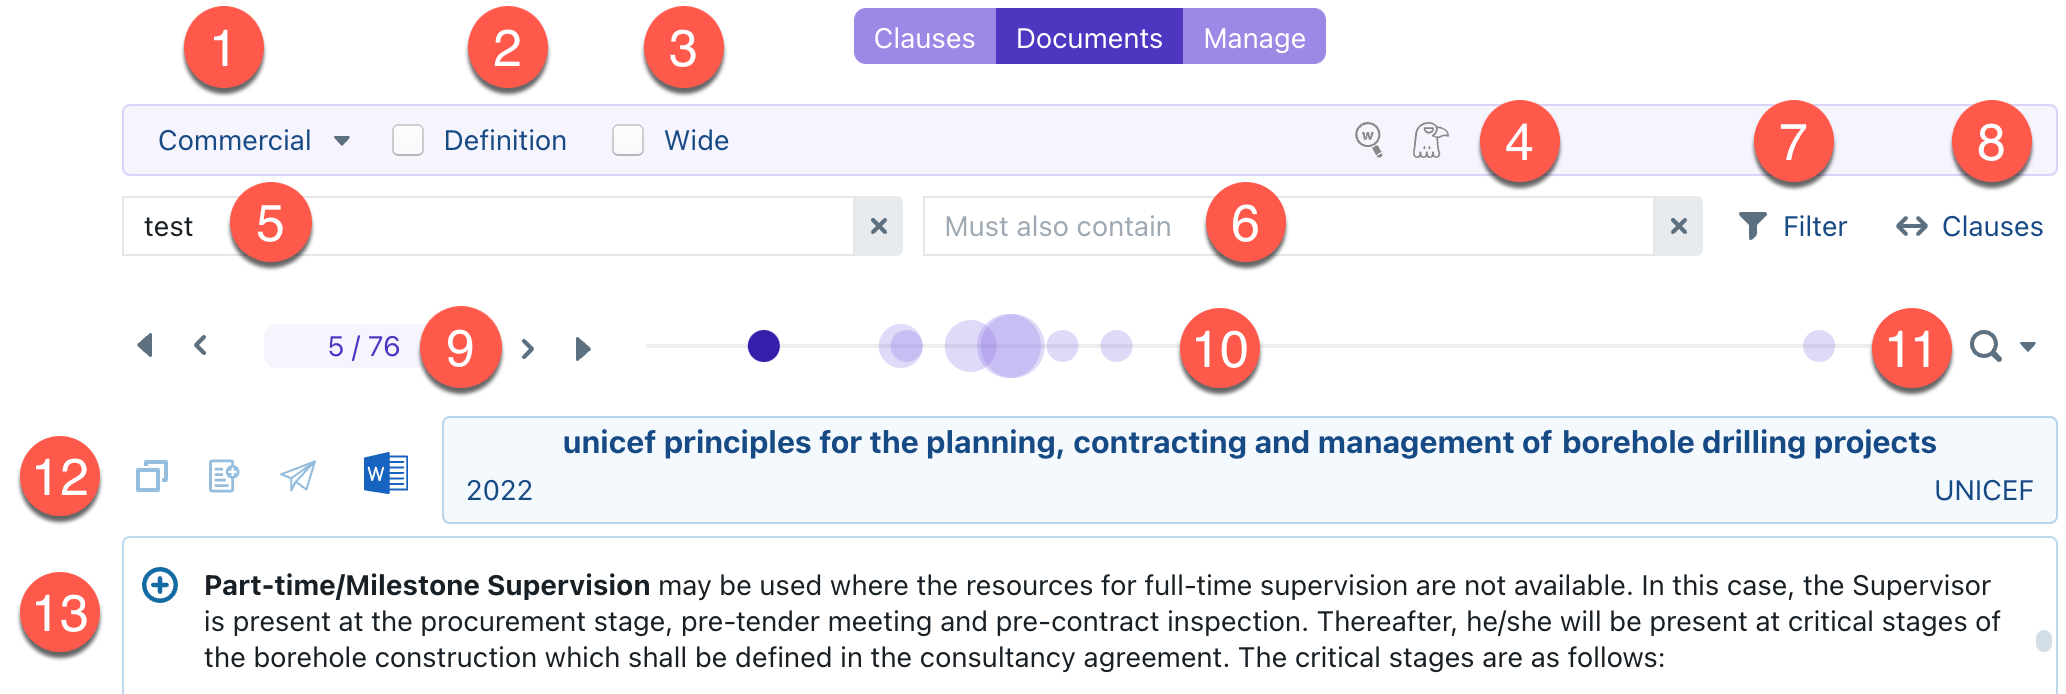
The Basket Selection allows you to select different baskets (folders) to search documents in.
The Definition checkbox allows you to limit searches to paragraphs that resemble contract definitions.
With the Wide checkbox, you can widen the extent of the "neighbourhood" in which words within the Primary Query box can be found near other.
These buttons allow you to easily switch to another search module within ClauseBuddy, automatically taking your current search term with you.
In the Primary Query box you type words that should be found near each other in a document.
In the Secondary Query box you type words that should also be present in the document to be found. (Unlike the Primary Query box, those words do not necessarily need to be near each other.)
In the Filter panel you can narrow down found documents to certain categories, authors, years, files or titles.
The Clauses Amount filter allows you to narrow your results to documents containing a certain range of extracted clauses.
The Results Amount shows the number of results, while the Previous/Next Document outer buttons and the Previous Highlight/Next Highlight inner buttons, you can navigate through the document.
The Clusters Bar graphically shows you where terms are found in the entire document, and how they are "clustered" together.
The Term Highlighter allows you to select another term to visually highlight in the documents.
These buttons allow you to insert or copy the text you selected within the document, copy that text to the Quality Library, and download the original file as a DOCX file.
The "+" button opens a menu in which you can copy the current clause, insert it directly into your MS Word file, or search for similar clauses.
1. Basket Selection
Truffle Hunt allows you to create different "baskets" with documents — e.g., one for the Corporate department, one for Employment, one for IT/IP, and perhaps also a personal locker for every legal expert.
Creating different baskets is not only recommended to create a primary segmentation within your documents (i.e., most of the time an employment lawyer is not interested in finding IP-related documents), but is also useful for compliance reasons and to ensure internal information rules are met.
When you switch between baskets, Truffle Hunt will re-submit your current search query. So if you do not find any useful results in one locker, you can easily try in another locker.
2. "Definition" checkbox
If you enable this checkbox, then the search results will be limited to paragraphs that contain the word "means "or "meaning" close to the primary search query (or translations thereof — e.g., "signifie" and "sens" in French).
Note that you will typically not only find paragraphs in a definition list, but also paragraphs that contain an "inline" definition in the middle of a contract.
3. "Wide" checkbox
This checkbox widens the perimeter of how far words specified in the Primary Query box can be apart within the documents to be searched. Technically speaking, words can then be about 275 words apart from each other, and still be considered to be near each other.
4. Switch to other search modules
By pressing this button, you can easily switch to the other search modules in ClauseBuddy. For example, when you click on the magnifying glass, your current search terms will be copied to the search box of the Quality Library, and ClauseBuddy will jump to that search module.
5. Primary Query
In this box you type in your main search terms. Clause Hunt will then search for documents where those terms are near each other (i.e., maximum about 150 words apart).
You can widen the "neighbourhood" where words are deemed to be in each other's presence, by checking the "Wide" box. This increases the maximum to 275 words apart.
For example, when you enter confidentiality liability as search words, you will find documents where both words are near each other.

Note that the words may also be spread across different paragraphs, e.g. when searching for change of control:

Literal search
Similar to searching in Google, you can quote search terms, to ensure that terms are not merely within each other's neighbourhoud, but are instead found next to each other.
For example, when you want to search for paragraphs dealing with the concept of background intellectual property, a search such as the following may lead to undesirable results:


While a quoted search will be much better in this case:


Combining terms
You can also combine different terms. For example, when you want to search for results where the expressions "background IP" and "foreground IP" are in each other's vicinity:


Removing terms
By adding a hyphen to a term, you will remove search results having that term near the other terms specified. For example, this will search for documents with the expression garden leave not in the vicinty of the word executive.

Stopwords
Be aware that the software will always remove stopwords from your search terms, i.e. common words without much informational value, such as "the", "will", "shall", "if", "further", and so on.
6. Secondary Query
In this box, you can specify other words that need to be present somewhere in the document. Those words do not need to be in the vicinity of the words of the primary query. For example, the following query would search for documents where "material", "adverse" and "effect" are near each other, while the word "hazardous" is also present somewhere (but not necessarily near the three other words).

Note that the word "hazardous" will not be initially highlighted in the document. You can, however, use the Term Highlighter to highlight this word.
7. Filter Panel
In this panel you can filter found results on criteria such as the document's title, year, author, client or dossier name.
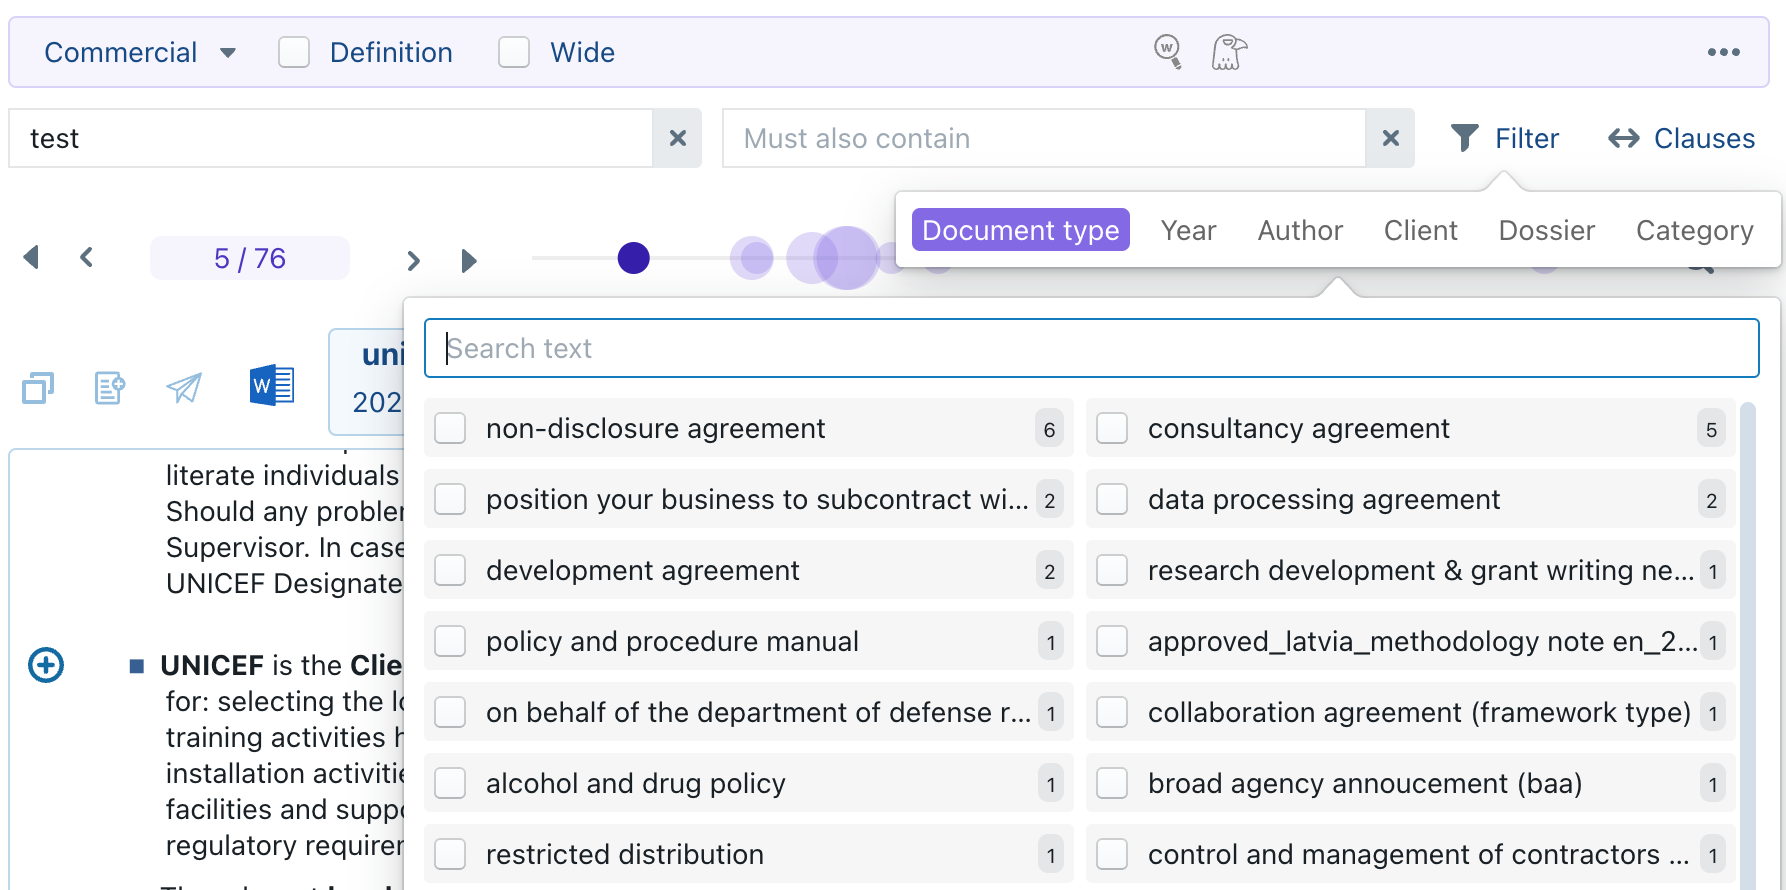
The numbers to the right of each result in the popup dialog indicate how many documents match this filter, taking into account all the other filters and criteria. For example, in the screenshot above, 6 doucments with the word "test" were found that are entitled "development agreement". If other criteria would have been specified as well (e.g., the number of extracted clauses, the year, ...) then those would also have been taken into account when determining the number to the right.
8. Clauses amount
The Clauses Amount filter allows you to narrow your results to documents containing a certain range of extracted clauses.
Note that while this tends to align with the document's length, it is not the same metric, as the number of "extracted clauses" depends on the number of individual clauses that were identified, without taking into account the length of each individual clause.
9. Results & Back/forth buttons
The results amount indicator tells you how many documents were found, and which document you are currently seeing.
With the outer buttons, you can go to the next or previous document in the search results.
With the inner buttons, you can go to the next or previous cluster of results in the current document (except when you are at the end of the document, in which case you would jump to the first cluster of the next document).
10. Clusters Bar
This bar is probably the coolest feature of Clause Hunt, as it graphically shows you how all the search terms of your primary query are spread across a document. When search terms are near each other, they will get clustered into a bubbles — the bigger the bubble, the more search terms are located near each other in a particular part of the document.
By simply moving your mouse over the visual clusters bar, you can jump between different clusters/bubbles. Alternatively, you can click on the inner back & forth buttons [6].
11. Term Highlighter
This popup allows you to specify which terms should be highlighted.
For example, when your primary query consist of the combination of "material adverse effect" and development, while your secondary query consists of pledged, you will see the following list:
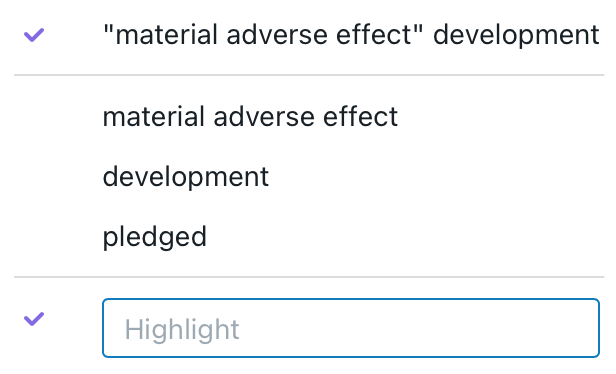
When you select any option in the popup, the Clusters Bar will be updated to show where in the document the selected term is located. This is particularly useful for highlighting terms in your secondary query.
You can even highlight words not located in the primary/secondary query, by using the bottom input box.
12. Exporting text & documents
In the top left part of each document, you can find four export buttons that allow you to use the content in the document

➊ Insert into Word-document
This button allows you to insert any selected text into the Word-file you have currently opened. (If you are using ClauseBuddy in a browser, instead of inside MS Word, then this button will turn into a copy-button, that allows you to copy the selection to your computer's clipboard).
➋ Add to clause library
This button takes the selection and inserts it into the Add clause dialog box.
➌ Send to curator
This button takes the selection and, instead of directly adding it to your clause library, sends it to one of the curators in your team.
➍ Open original Word-file
This button opens the original file that was uploaded to the locker.
If Truffle Hunt detected a clause in a document, then it will show a big "+" icon to the left of it, within the document itself.
This popup menu then allows you to immediately insert a clause in your current Word-document, or to perform a similarity search for other clauses.
When inserting into a Word-document, you can opt to insert the change using "track changes". Click on the name of the author ("ClauseBase Admin" in the screenshot below) to swap it to some author.
You can also change the layout of the clause, e.g. to avoid inserting the title or avoid bullets. See our separate page on inserting clauses.

Last updated