Advanced drafting techniques
While you can get quite far by simply highlighting parts in cyan, there will come a point when you want just a little bit more power while drafting conditions or alternative text parts. This page provides an introduction to these advanced drafting tricks in ClauseBuddy.
Available power
ClauseBuddy shares its drafting engine with its sibling product Clause9, so many of the powerful parts of Clause9 also apply to ClauseBuddy. This is also the case for drafting advanced conditions and clauses.
One way to learn all about all this power is to go through the tutorials available on Clause9's help site, or to visit one of the many in-depth manual pages on drafting in Clause9. For most beginning users, this is probably overkill, so this page will summarize the most important ideas.
Even so, it can be useful to consult the pages on the Clause9 help site, or read the discussions on the Clause9 user discussion forum if you really want to get a deeper understanding of some more advanced use cases.
Dealing with question answers
In the simple examples provided on the introduction page to drafting conditions you were advised to refer to a question's answers by simple including the question's title or identifier — e.g. car assigned = true
In advanced drafting, you will quickly run into various limitations of this approach, inter alia because the spacing between the words will lead to ambiguity. In advanced drafting, you are therefore strongly recommended to use the following structure when referring to the answer of a question.
If the question's title or identifiers does not have any spaces, you can prepend @:
@ + question-title or @ + question-identifier
Alternatively, you can refer to a question's answer using special function @answer, e.g. @answer("What is the name of your company?")
Be mindful of your data types!
Bear in mind that different questions can have different data types: number, text, date, currency, duration, true/false or list.
Not all operations are supported for all those data types, and mixing data types will often lead to errors or surprising results — similar to how you do not want to proverbially compare apples to oranges. For example, it does not make sense to subtract 3 from a text, or to add two dates together.
Quoting text
The simple examples provided on the introduction page to drafting conditions did not require any quoting of text values used, because those examples were not ambiguous for the software. However, in advanced drafting, you really want to properly quote text values using single or double quotes.
In other words, in advanced drafting, you do not say @jurisdicton = UK because that may be confusing for the software if you position that condition in surrounding text (is "UK" also part of that surrounding text? Or is it still part of the condition?).
Instead, you write @jurisdiction = "UK" or @jurisdiction = 'UK', to remove all ambiguity.
Combining sub-conditions
Clause9 allows you to combine sub-conditions any level deep, through combinations of AND/OR/NOT.
For example, the following combination of sub-conditions will only apply if Dutch law applies, and the competent court is simultaneously set to Amsterdam:
@applicable-law = "Dutch" AND @location = "Amsterdam"
Lawyers who first encounter AND/OR conditions, are often confused by them, because they seem to express the opposite of common language.
For example, the sentence “Marie will go to the city when it is Tuesday and when John calls” will usually be understood as “Marie will go on Tuesday, but will also go on other days when John calls”. Hence, in everyday language, the word “and” can sometimes express that something applies when any of the sub-parts apply. Whether this is indeed the case — or whether “and” should instead be interpreted as “only apply when both sub-parts apply at the same time” — can usually be inferred from the context.
In most situations, this linguistical ambiguity is not a problem, because the context will be clear or because the consequences of the wrong interpretation are negligible. However, such ambiguities are sometimes also found in contracts and laws, and then the context may not always be clear, and/or the consequences may be significant.
When building conditions in ClauseBuddy, such ambiguities will not arise, because the word “AND” means “both sub-conditions must apply”, and is thereby clearly opposed to the word “OR”, which means “it is sufficient if any of the sub-conditions applies”.
Much more complex combinations of sub-conditions are possible. The following combination will only apply if either of the following two bullets applies:
Dutch law applies and the competent court is simultaneously set to Amsterdam; or
the contract value is higher than 5.000 EUR:
(@applicable-law = "Dutch" and @location = "Amsterdam") OR (@contract-value > 5000 EUR)
Note that the use of these parentheses is very important once you start to concatenate conditions, similar to how the order of precedence in mathematics is important: (5 + 4) * 3 is not the same as 5 + (4 * 3). Does A AND B OR C mean A AND (B OR C) or instead (A AND B) or C?
The software follows the strict mathematical rules on how concatenated AND/OR conditions should be interpreted, but those rules are quite hard to remember for most lawyers — it is simply much clearer for your colleagues and for your future self if you use parentheses.
You can also introduce NOT to take the opposite of any condition. Such NOT sub-conditions must always be surrounded by parentheses. For example:
NOT(@applicable-law = "Dutch" and @location = "Amsterdam" and @contract-value > 5000)
Using special functions
Clause9 contains a list of almost 300 "special functions" that allow you to perform all kinds of calculations and manipulations of text, numbers, dates, lists and so one. A subset of those special functions is also available in ClauseBuddy.
Essentially, you use those special functions by "calling" them as follows:
@ + name + ( parameter-1, parameter-2, ... )
For example, to insert a date that will always be equal to the date a document is created by the end-user, you use @today, which is a special funtion without any parameters. Similar, to calculate which of two dates is the earliest, you call @earliest(@some-question-with-date, @other-question-with-date).
Different special functions take different parameters and lead to different types of results. You can even combine special functions together — for example, to insert the date (Monday, Tuesday, ...) of the day lies one month in the future of the commencement date of the contract, you would use @weekday(@some-question-about-the-commencement-date + 1 month).
Combining different text parts
Within cyan-highlighted text, you can freely combine very different parts:
Simple text is inserted as, well, simple text that you type in (as long as such text does not contain any special characters, such as
{ } | [ ] @ #Bold text can be inserted by surrounding it by tildes — e.g.
This is some ~bold printed~ text.Similarly, you can insert`italic text`and\underlined text\Conditional text is surrounded by curly brackets:
{@location = "Amsterdam": some tex inserted when the location is equal to Amsterdam}. You can also concatenate conditional text, even with a catch-all part:{@location = "Amsterdam": text about Amserdam | @location = "Brussels": text about Brussels | else: text about all other locations}.Mathematical calculations with numbers, dates and durations must be surrounded by curly brackets when you want to directly insert them within text, e.g.
The contract will end on {@start-date + 1 month} and will continue....As long as a special function is not combined with some other special function, you can directly insert it within the text — e.g.
The contract will start on @start-date and end on ...
Introspection
When you are drafting advanced conditions and textual manipulations, you will easily end up in situations where you will scratch your head wondering why something is not working as you intended.
In such situations, you are highly advised to use ClauseBuddy's introspection tool. You activate it by showing the preview of your document while within the Questions tab:
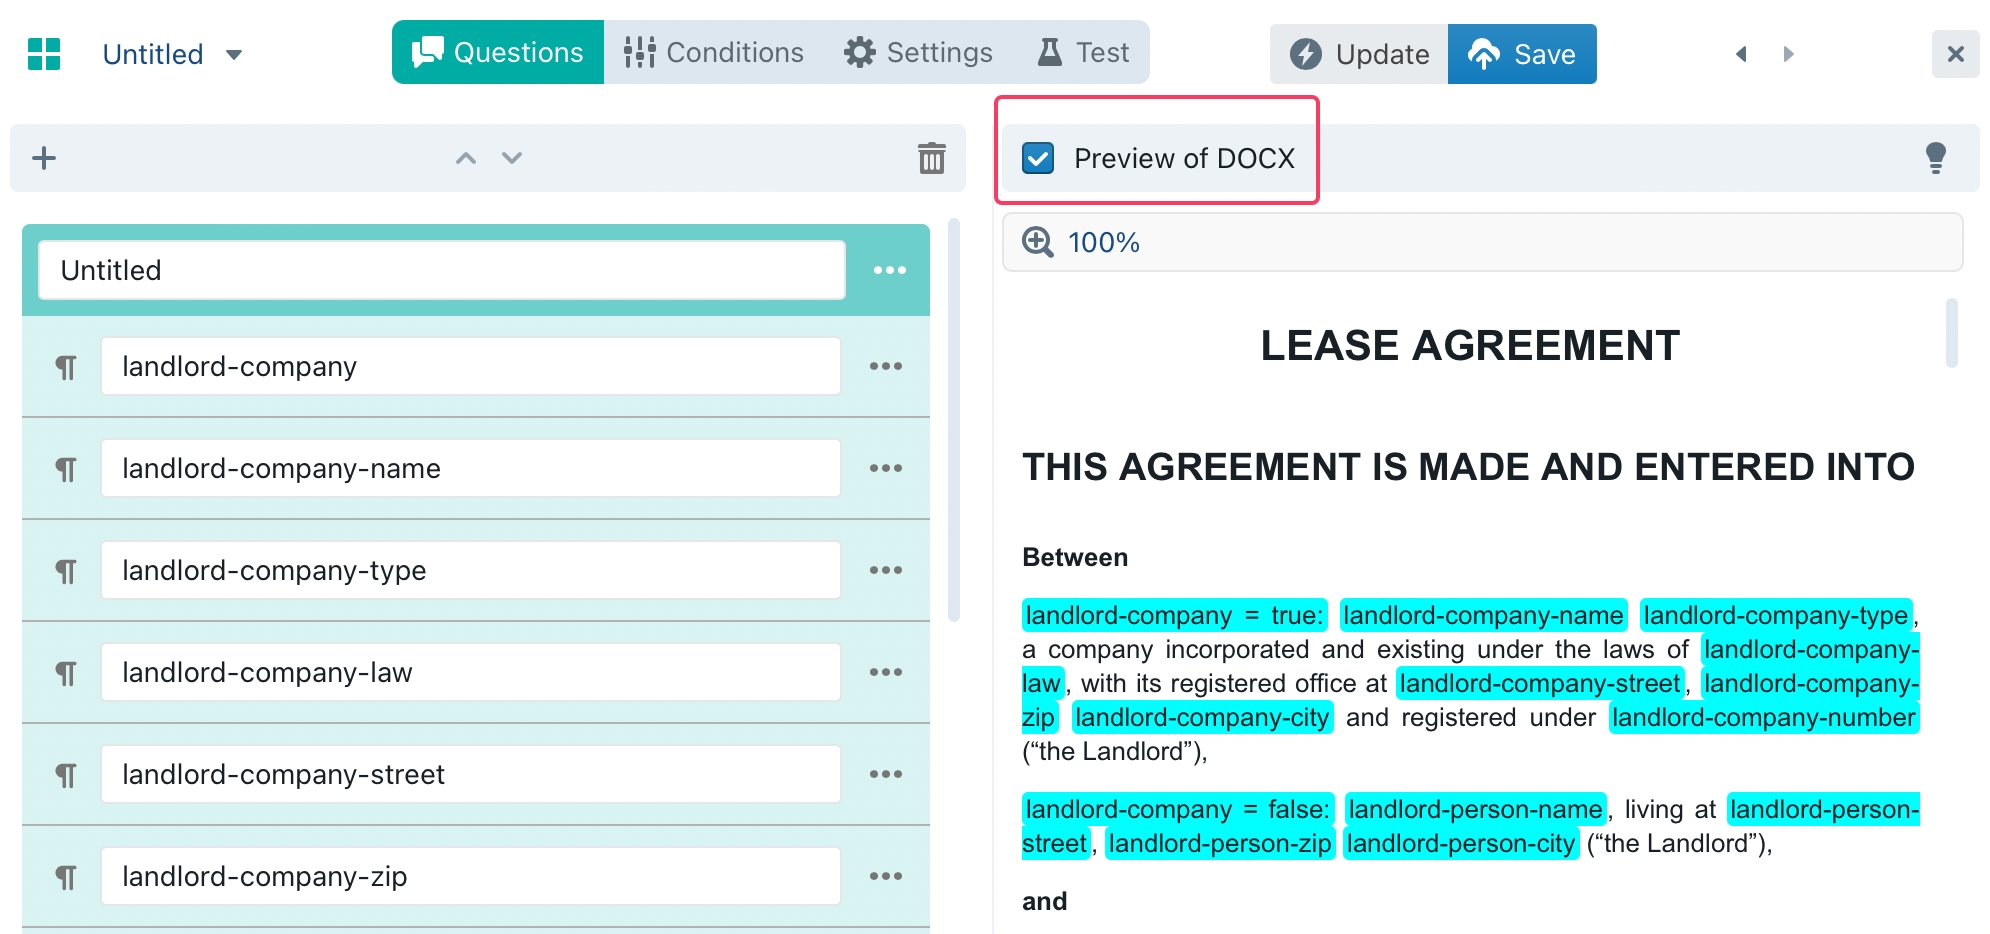
Next, you can click on any of the cyan-highlighted text, to introspect it. For example, when clicking on tenant-company = true you would see:
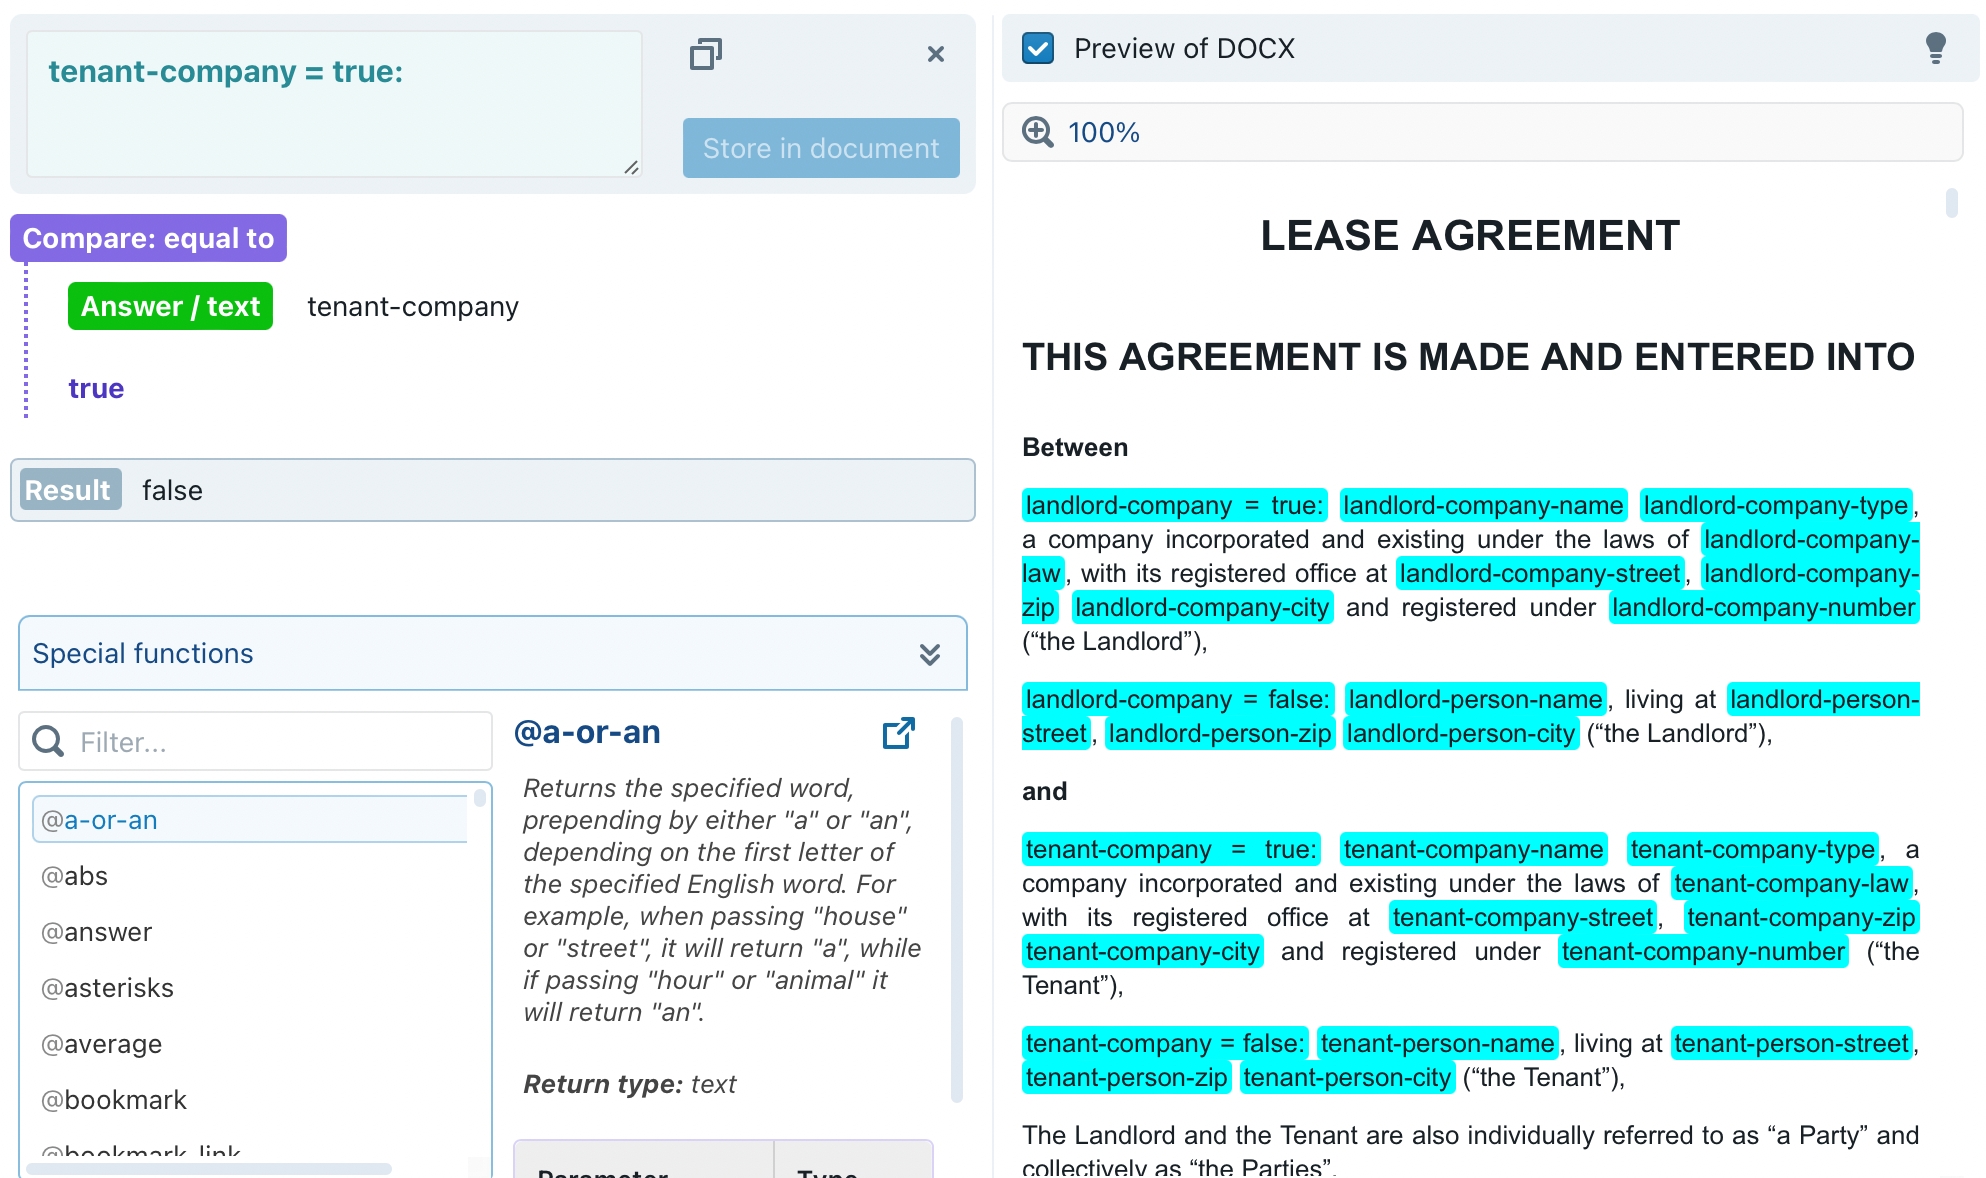
The introspection tool is actually quite powerful, and contains many different parts:
At the very top, it contains a text editor in which your cyan-highlighted text will be inserted. You can freely change that text and see how the software reacts to those results.
If, at some point during your experimentation, you are happy with the changes you made, you can click on the blue Store in document button to update the cyan-highlighted part you initially clicked. This would be similar to the situation where you would modify the cyan-highlighted text in the original Word-file, and press the Update button in ClauseBuddy. (Bear in mind that, if you are using ClauseBuddy inside MS Word, your actual Word-document on the left side will not be changed when you click this button!)
The middle part of the introspection tool contains a breakdown of your formulas (described in detail below), as well as the result of that formula, when applied to the current answers you gave in the Test tab of ClauseBuddy.
At the very bottom, you can see a list of the special functions that are relevant for ClauseBuddy. Using this list, you can easily search for relevant keywords and learn more about each special function. Tip: you can hide this list by clicking on the title bar.
The breakdown in the middle is actually the most important part of the Introspection tool, because it allows you to hunt down errors you made. This breakdown may look a bit scary in the beginning, but actually it is not difficult to understand.
For example, the breakdown for some advanced formula @weekday(@commencement-date + 1 month) looks as follows:
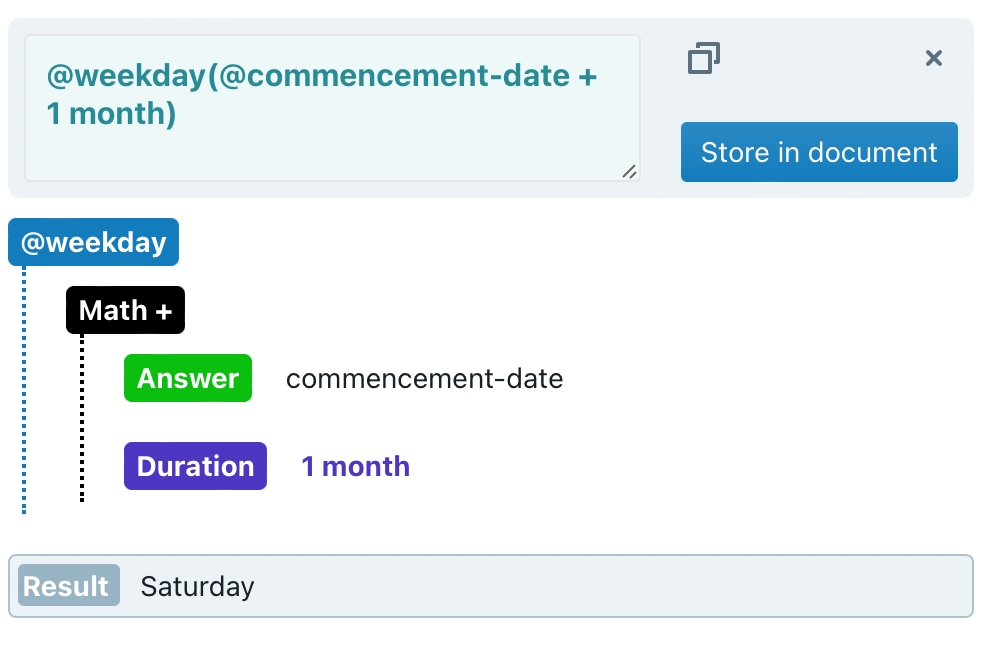
You can see that the software splits this formula in the special function (@weekday), which contains a single parameter. However, that single parameter is actually composed of a mathematical operation, that consists of the addition of two parameters: the answer to the commencement-date question, and a hard-coded duration of 1 month.
Interestingly, the result happens to be Saturday in this case, because of the test answer (5th October 2022) that happened to be given in the Test tab.
If you made a typo in the name of the question, the Introspection tool would immediately suggest it:
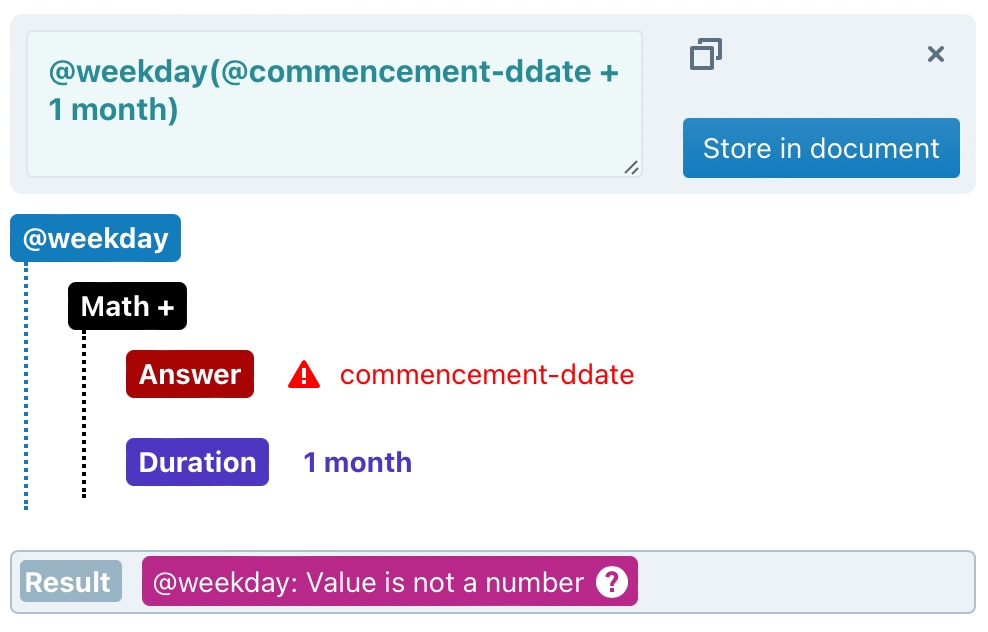
When you hover your mouse over the red warning icon, it will say that no question with that name (or identifier) happens to exist.
Dealing with lists of items
ClauseBuddy provides several facilities to insert several paragraphs or text parts at once. For example, you may want to allow your end-user to submit a list of names (e.g., shareholders with their addresses) or a list of obligations that need to be completed by some counterparty.
You can do so by creating a text-based question with multiple answers.
Follow these steps:
1. Change the answer type
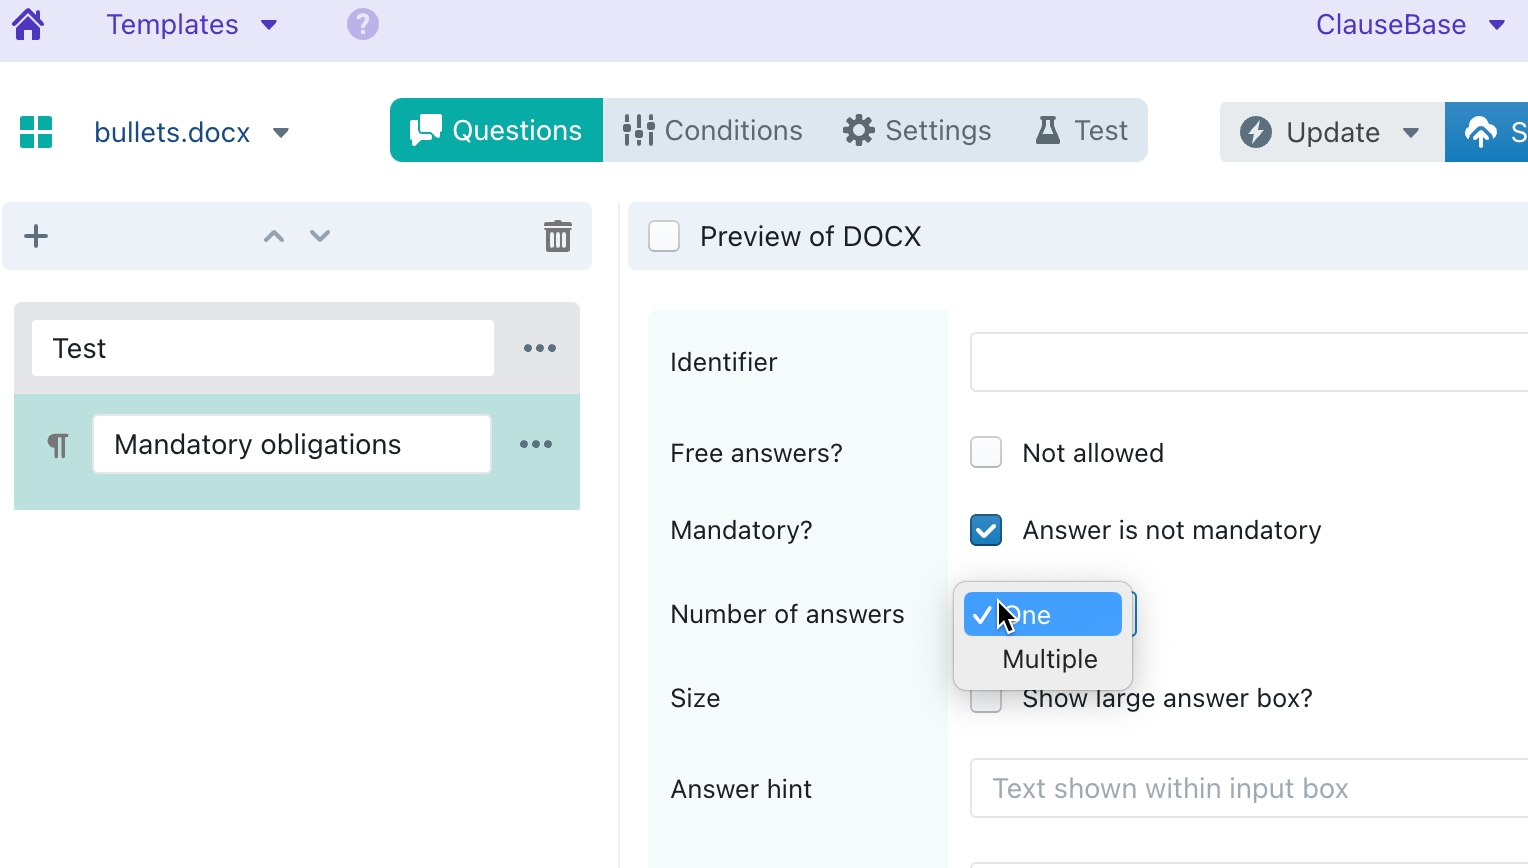
Make sure you are using a text-based question. Then, set the Number of answers option to Multiple, instead of the default One.
The result will look as follows (the answers can be freely determined by the end-user):
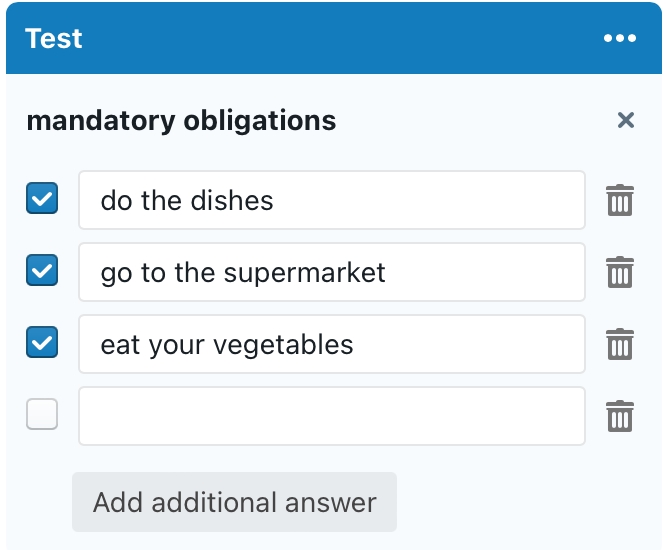
You may also want to consider setting Free answers? to Not allowed. This will remove the Add additional answer button to the bottom list:
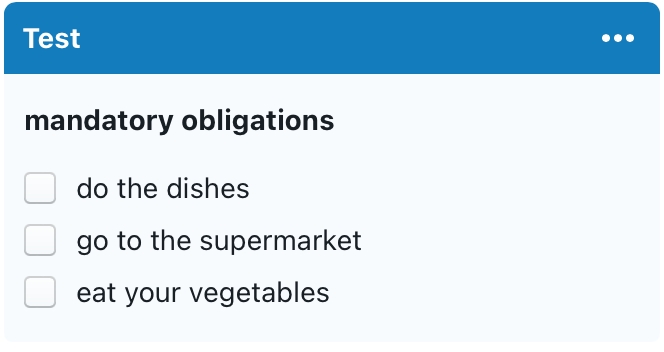
You may also want to add some predefined answers to this question, instead of having the free-form text boxes:
2. Think about your output
Suppose you use the following content in your DOCX file:
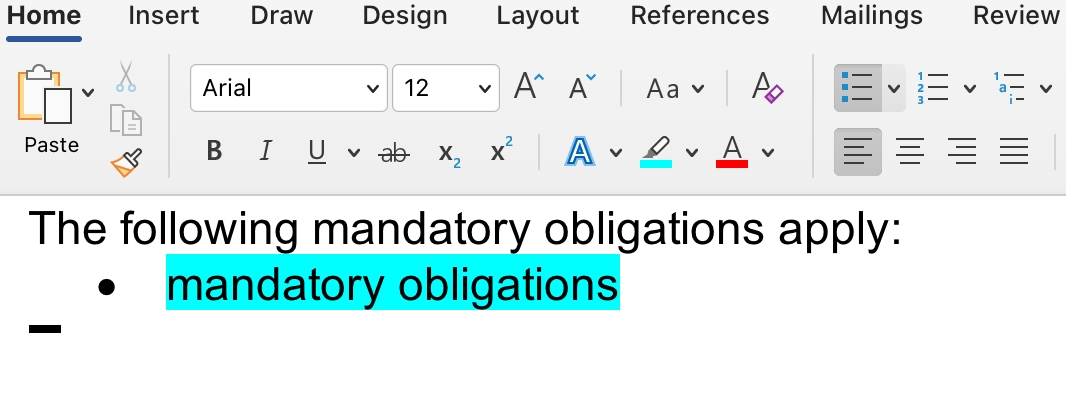
When the end-user then provides multiple answers, the following output is shown:

By default, ClauseBuddy simply inserts a space in between the different answers — this may be what you want in some scenarios, but probably not for this example.
Let's consider a few alternatives. For each of those alternatives, you will need to use specific special functions (as described above). All those special functions operate on a list of items, in this case the collection of sub-answers provided by the end-user.
Simple comma-separated list
The @enumerate special function concatenates all the items with a comma in between, and simply positions the output within the paragraph.

Result:

Separated list
When using @enumerate-and, additional items are inserted in the list:

Results in:

Note that ClauseBuddy will automatically position the "and" in the right place. For example, with only two items checked by the end-user:

Or with four items checked:

There are many different variations, such as @enumerate-or (which inserts or instead of and):

@enumerate-numbered-or

@enumerate-andor:

Bullet-list
Instead of keeping everything on one line, you can also use multiple bullets. Unlike the previous examples — where the result of the special function simply got inserted into an existing paragraph, possibly surrounded by text before or after it — it is important that you insert the cyan-highlighted text within an empty paragraph that contains either an automatic bullet (such as a circle, triangle, hyphen, etc.) or some auto-increasing number (such as 1/2/3 or a/b/c).
ClauseBuddy will then instruct MS Word to continue this list, whereby a new bullet/number will be generated by MS Word.
Once again, there are different variations of the special function to use. For example, plain @bullets:

Results in:

While @bullets-and will result in:

If you do not want the ending period in the last item, use a variation of @bullets-andor-skipfinal

If you do not want any suffixes (such as the semicolons), use @numbered-paragraphs:

Some other examples
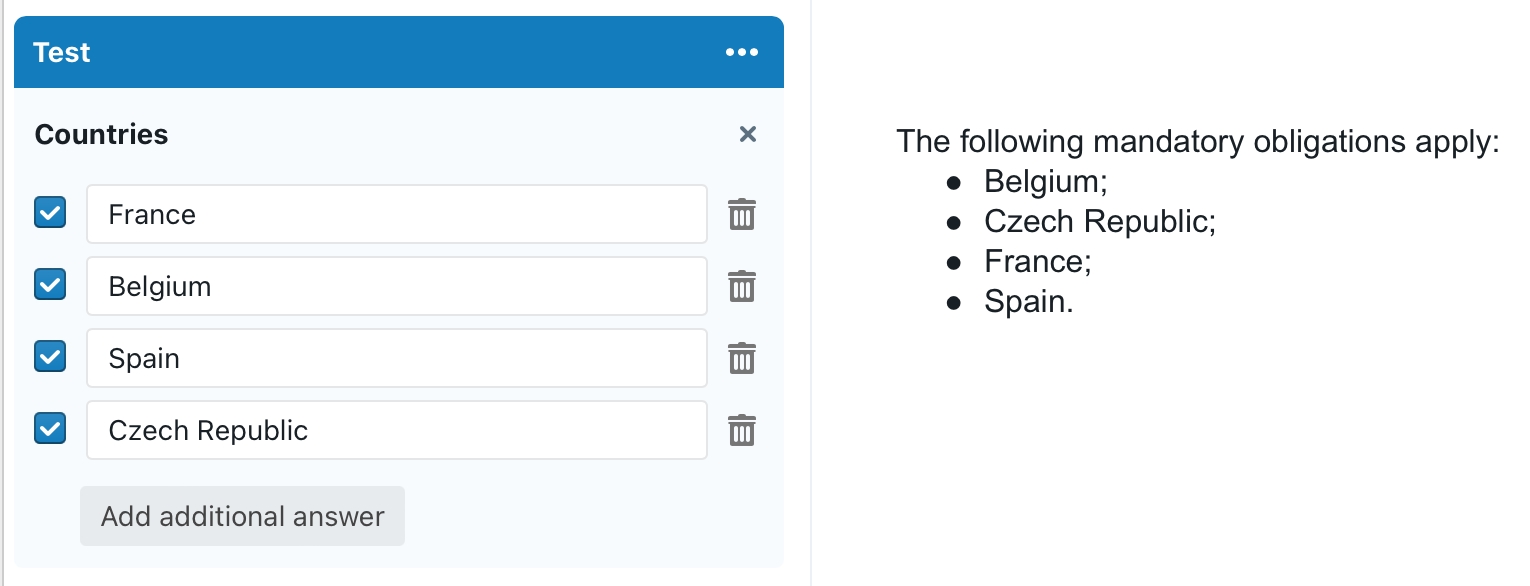
You can surround your list with @sort to sort it automatically. For example, assuming the question is called countries, then @bullets(@sort(@countries)) will result in an automatically sorted list, even though the user entered the countries in a completely different order:
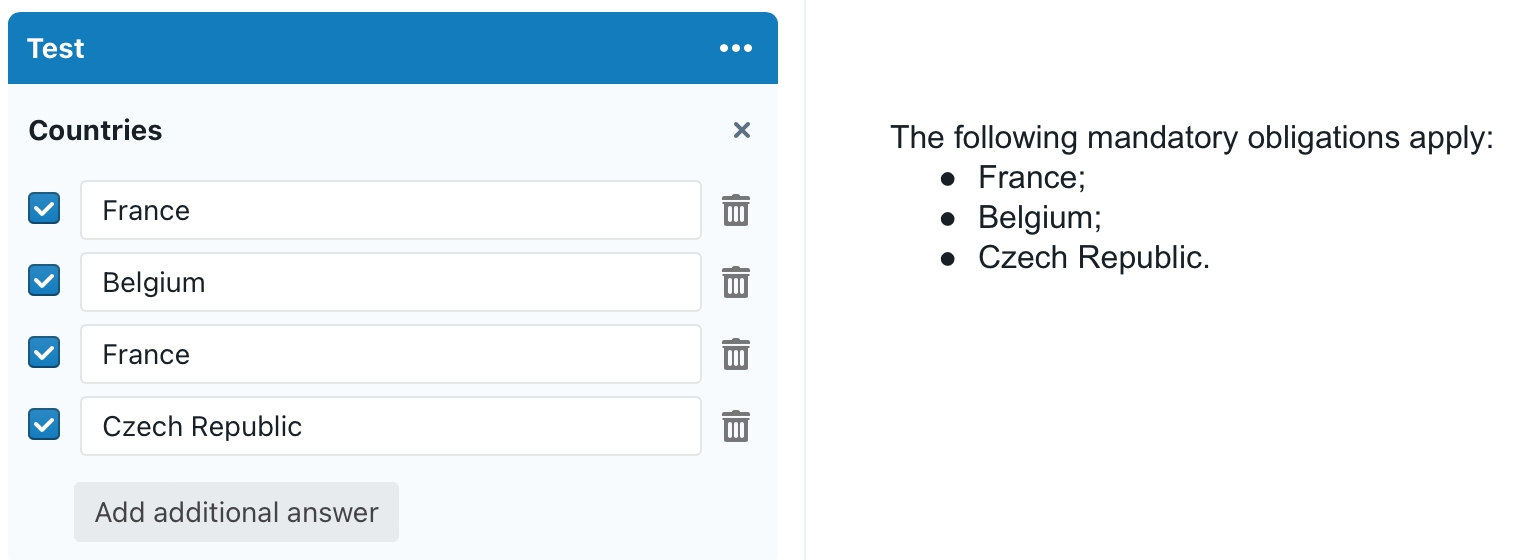
Similarly, @bullets(@distinct(@countries)) will result in a list that does not contain any duplicate values (such as France in this example):
@numbered-paragraphs(@range(1, @shareholder-amount))
will result in the specified amount of bullets:

@comma-split allows you to split a text answer into a list, with the comma as the separator (alternatives: @space-split and @semicolon-split, and even super advanced splitting with @regex-split). For example, @numbered-paragraphs(@comma-split(@obligations)) will result in:

Last updated