
Creating clauses
Adding clauses to ClauseBuddy is very simple. You can either create a new clause yourself, or send interesting text to a colleague (a "curator").
In both cases, the easiest option is to start by selecting one or more paragraphs in your MS Word document, Buddy will then try to pre-fill the submission form with your selection.

Adding a clause yourself
When you choose New clause, the selected text will be analysed by the software and distributed over the relevant fields in the clause entry form.
For example, when selecting the following text in Word:

ClauseBuddy will split the text into a filename, title and two paragraphs for the body.

In the Name field, you can enter a filename for the clause. Typically you will want to make this field as short and descriptive as possible, indicating towards your users (or your future self) what this clause is all about, without requiring them to read the entire clause. In the example above, you may for example use "Entire agreement — standard" as the filename.
It is usually not a good idea to describe every legal nuance of a clause in the filename — ClauseBuddy's attributes (see below) can do a much better job in describing the general properties of a clause, while a clause's location will also provide context for the clause. And for very subtle nuances, you are recommended to use the Description or Comments field described below.
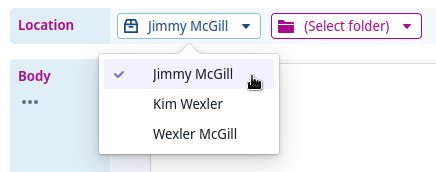
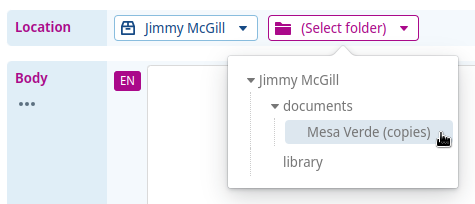
In the Location field you can specify in which search folder then (sub)folder a clause should be stored. Think carefully where you will store a clause, as the location provides a lot of legal context towards the users of your clause. Creating folder hierarchies is described in greater detail on the Managing Folders page.
In the Title field you can specify an optional title for your clause. Unlike the Name field (which ClauseBuddy will never insert into the actual Microsoft Word document), the title field will be included as a (sub)title of the clause that will get inserted into your users' document — although users can also configure ClauseBuddy to not insert that subtitle.
In the Body field you can include the bulk of your legal contents, separated into paragraphs. We describe this in greater detail on the Drafting clauses page.
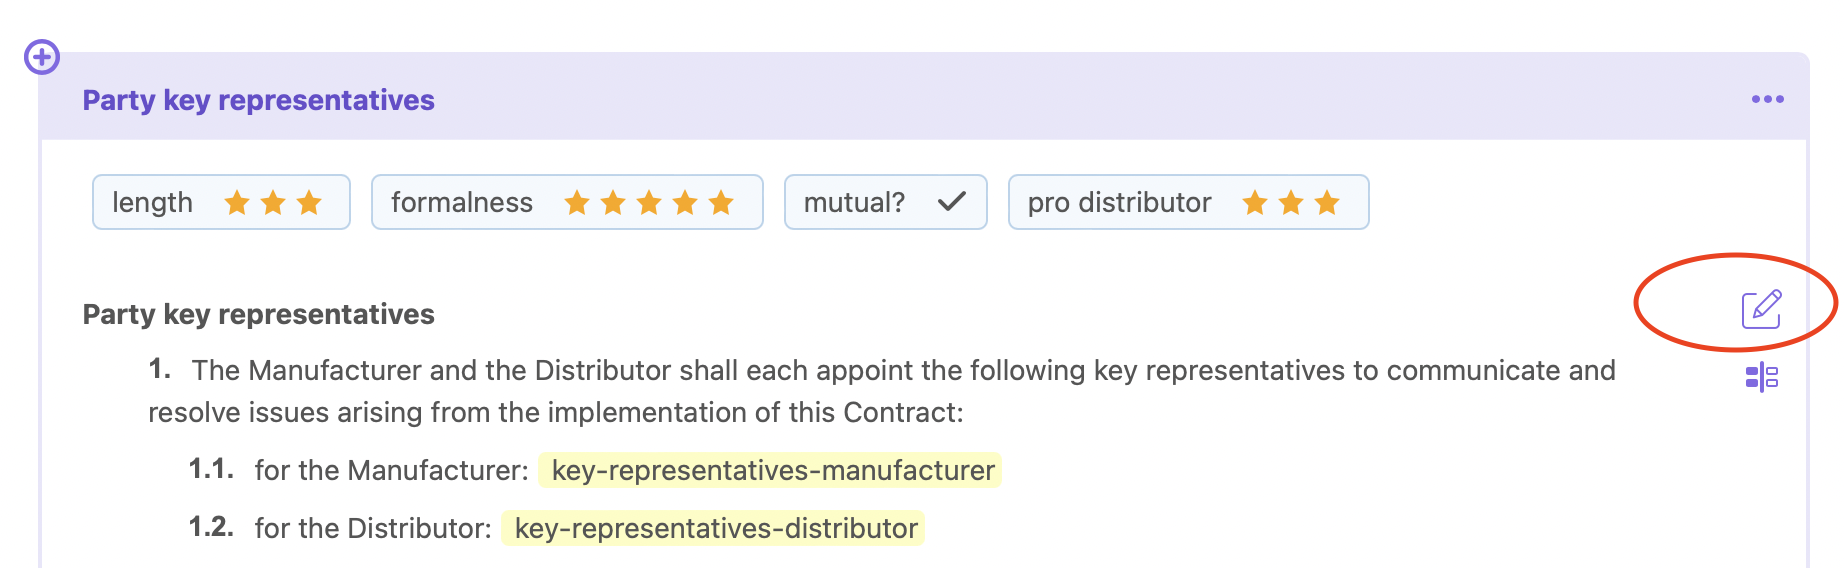
Finally, the Attributes field allows you to store and manage legal metadata regarding a clause — e.g. from which party's perspective a clause is written, how nuanced it is, whether it is treated as the organisation's standard clause, etc. Read all about it on our Attributes page.
In the bottom corner of the ClauseBuddy pane, you can click on + Augment clause to insert additional fields, for enriching your clause even further.

In the Extra keywords field you can add additional keywords on the basis of which this clause should show up as a result when searching for clauses.
In the Description field you can add additional internal information, shedding some more light about the context of the clause — where it comes from, how it should (not) be used, what users should pay attention to, etc.
The text in the description field will be shown above the actual legal content of the clause; this text will never be inserted into the Word document.

Finally, the Comments field should be used for secondary information about a clause. Most ClauseBuddy users treat the Comments field as a storage area for legal comments, such as references to case law and legal doctrine.
Tip: as many users will naturally gravitate towards keyword search, you may want to take the opportunity to enter interesting keywords in the filename, description and/or legal comments. For example, with respect to a "Texas shoot out" clause in corporate law, you will not typically find the words "Texas" or "shoot out" in actual contracts, i.e. the title and body of a clause will not contain those exact words. However, it is probably a very good idea to include those words in the filename or description of the clause, as your users will probably enter those keywords when searching for such a clause.
Translating content
If your clause library is stored on a multilingual server (as is the case in the screenshots on this page), you will notice buttons that invite you to store translations of your legal contents.
This is an incredibly powerful feature if you work in a multilingual environment, as you can keep closely related text blocks next to each other.
ClauseBuddy will automatically propose a translation if you add a new language version of a new or existing clause. You can also use the "..." button to insert a new translation.
Machine translations have gotten much better in the last years, particularly for frequently used legal clauses. However, you should always manually review these translations, because great translations are sometimes interspersed with not-so-great fragments. Treat the machine translation as a brilliant first-year junior legal expert, who usually delights you with her work, but also makes serious mistakes from time to time — typically in a small corner of a document, where you least expect it.

Sending text to a curator
Instead of adding clauses yourself, you can also appoint one or more persons in your team to take care of this task. Your administrator can appoint one or more such persons in the firm/company.
In light of the legal experience and complexity that is often required for legal knowledge management, it is actually not a bad idea to appoint such curators — in particular in larger teams, or when consistency is required.
Tip: if you are a curator, you can also send a clause to yourself. This can come in handy when you stumble over an interesting clause, but do not currently have any time to spend on the curation of this clause.
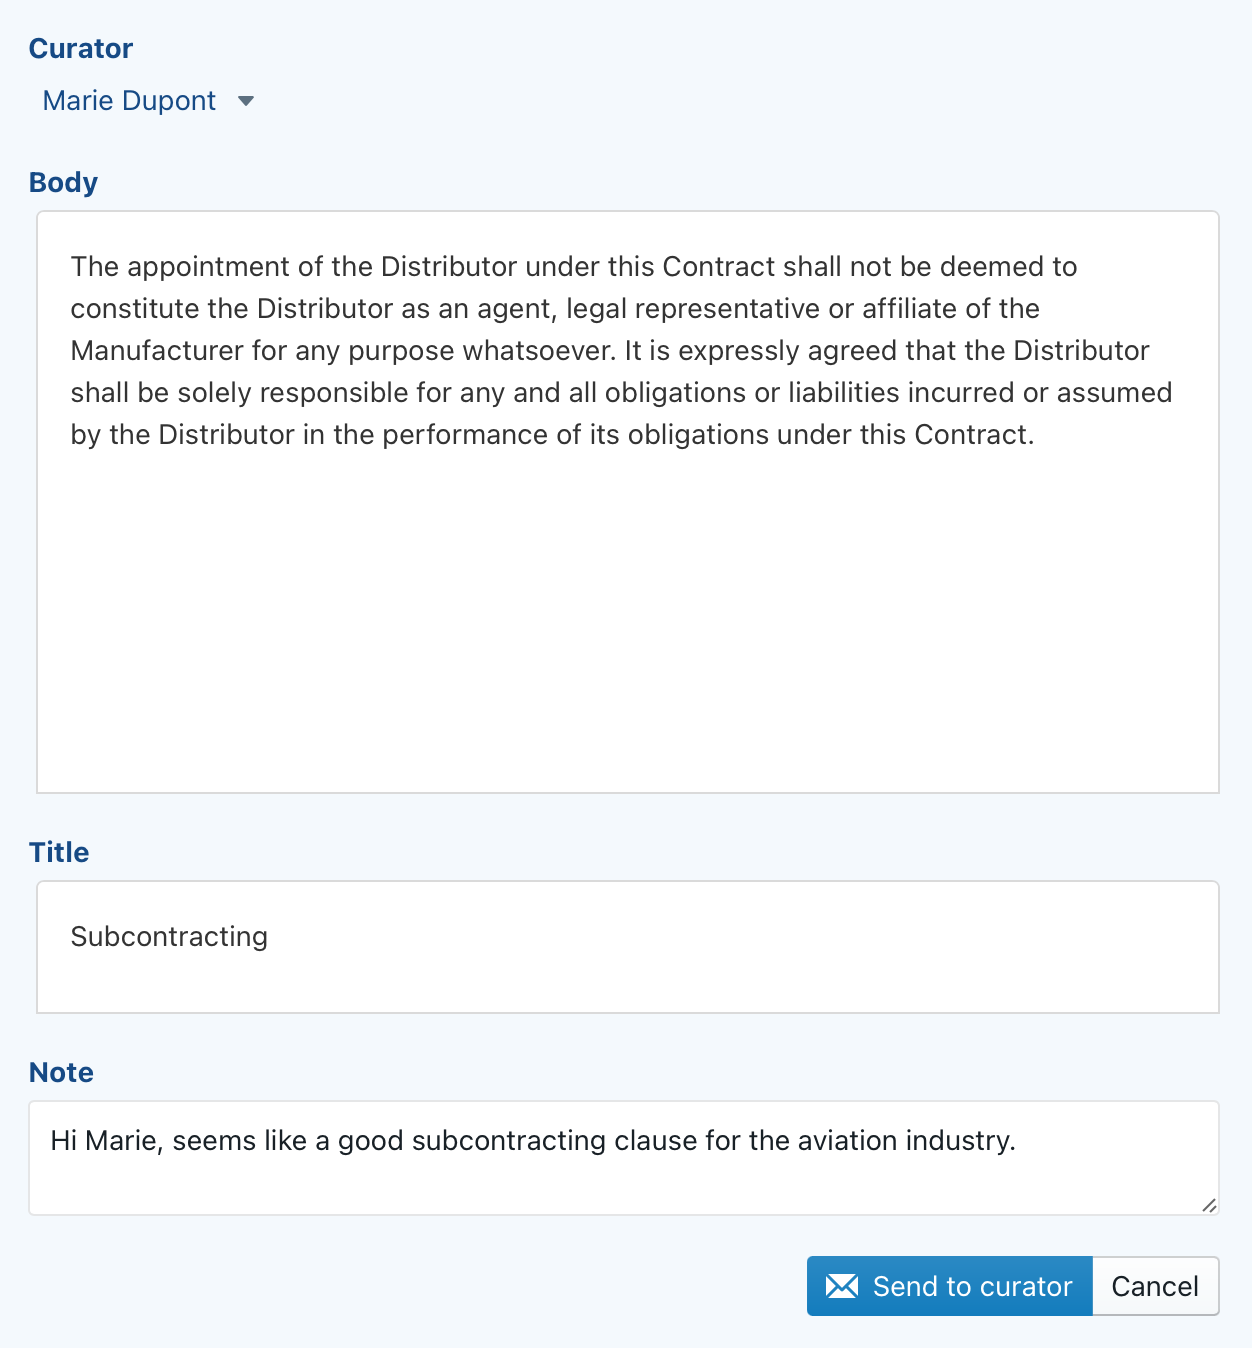
You can include a body section, an optional title and an internal note (presumably targeted at your curator).
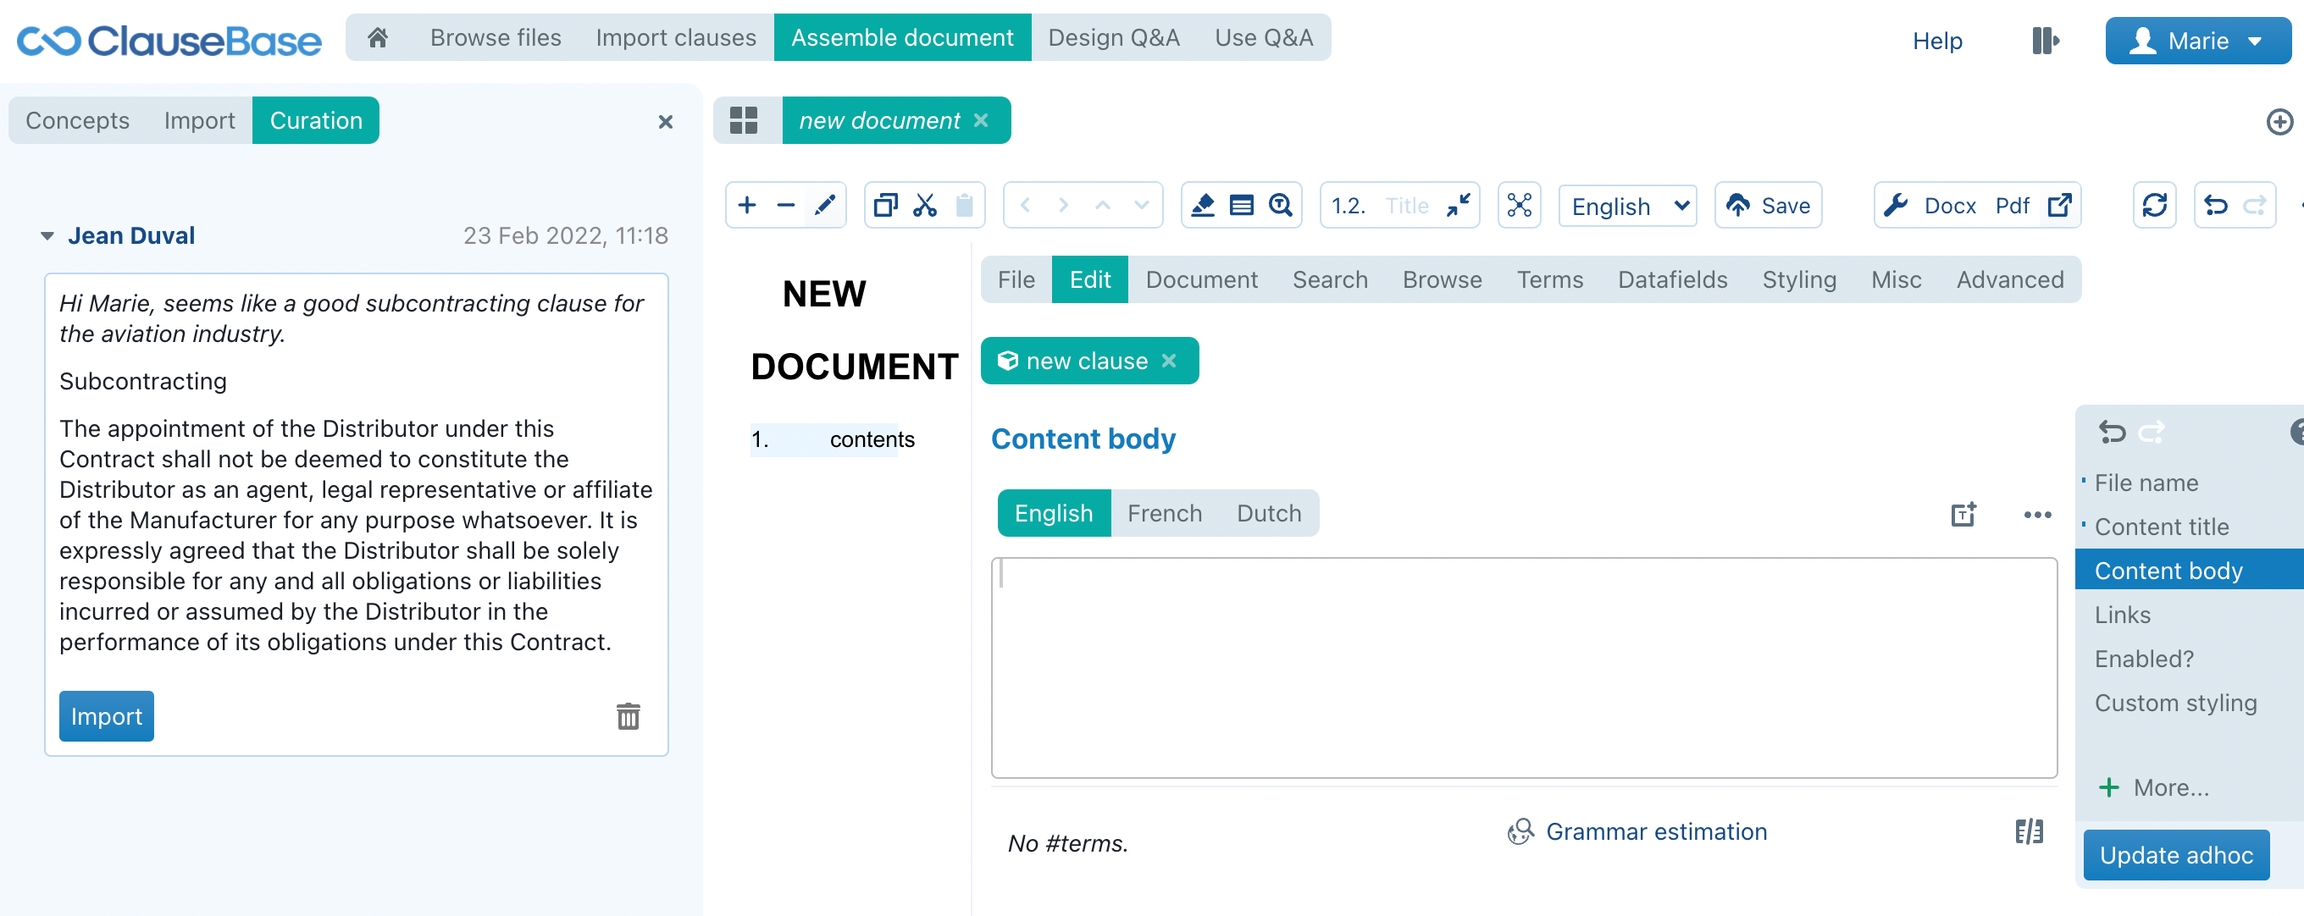
Adding clauses as a curator
If you are appointed as a curator, then you receive the clause-related messages sent by your colleagues in your inbox.
Next time you open ClauseBuddy, the software will see how many messages are waiting in your inbox, which you can view on the home page.
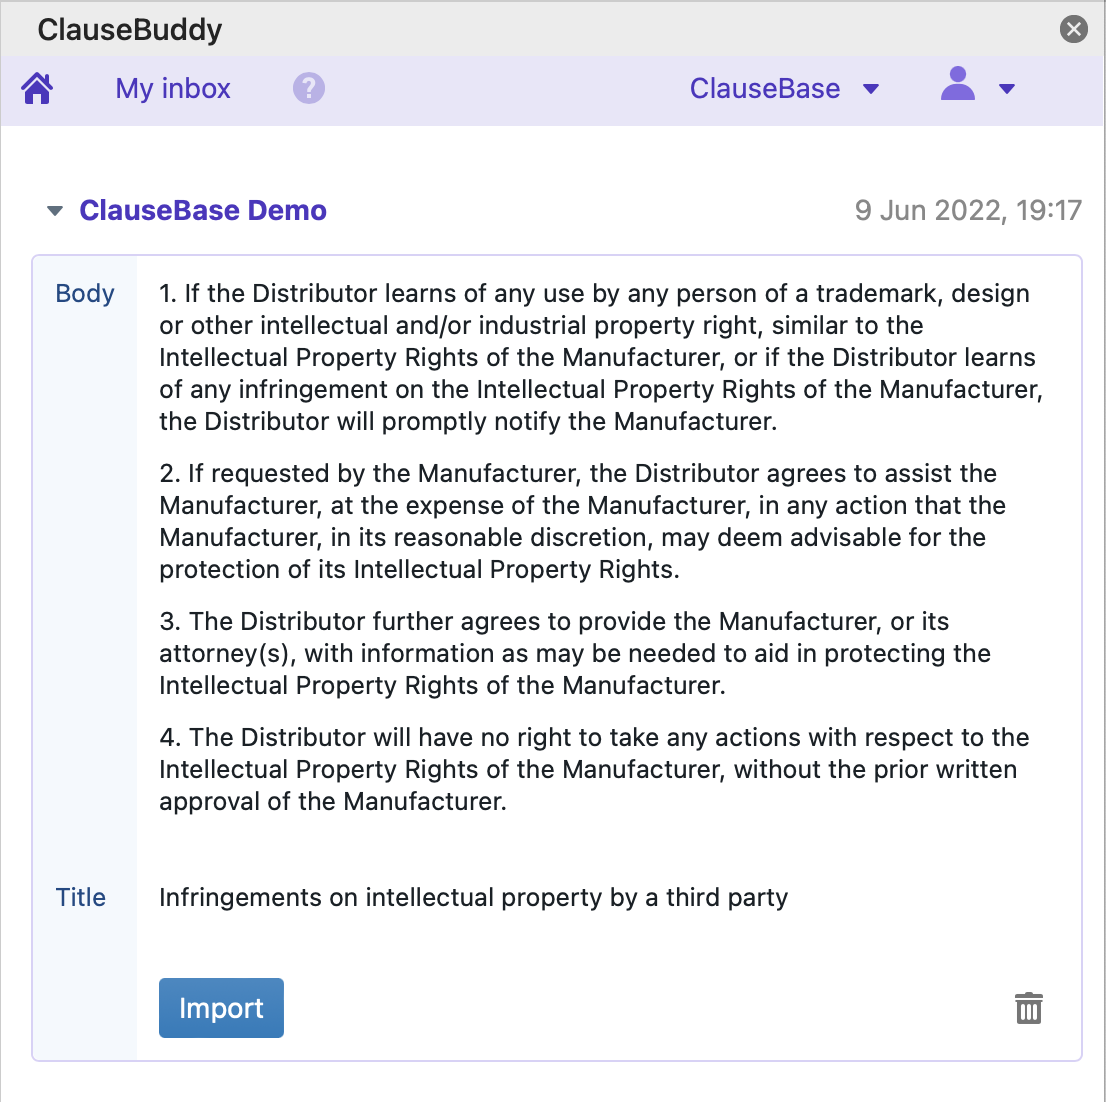
When you then click on the Import button, the body and title will be imported into the clause addition dialog box described above (so from this point on, the process is identical to the situation where you would have initiated the clause addition yourself). The Note will not be imported, as it is considered a merely internal hint at the curator.
When done, you can click on the trash icon to remove the message.
Curation within Clause9
If you are a curator, then you can also opt to edit clauses that are sent from within ClauseBuddy in the Clause9 environment.
This will be particularly important when you want to create dynamic clauses — e.g. clauses with automatically adapting terminology, or with conditional text.
You can find clauses sent to you by opening the Globo panel, accessed from the button in the top-right corner. Next, you have to click on the "Curation" subpanel on the left side.
When you click on the Import button, the title and body will be transferred to the (relevant language box in the) Content body or Content title section of the clause editor in Clause9.
When you are done adding the clause, you can then click on the trash can in the Globo panel to remove the message.
Editing created clauses
If you have the right to do so, you can edit any clause you found via any of the search/browse actions. To do so, click on found clause
You will subsequently be transferred to the clause editor dialog box described above. When you are done, you can simply click the Save button to store your modifications.
Last updated